A clothing store: one model, every size
A step-by-step guide built on a real example — the Ademi clothing store: t-shirts, jeans, hoodies and dresses, each model carrying its own sizes with their own stock and their own barcodes. Deliveries as size runs, selling both at the till and from a phone, swapping a size, a shop window you share as a link, and the cabinet of a regular buyer. Every screen is real, captured in the working app.
Getting in
Once
Signing in to the app
One account — one person. Give the salesperson and the cashier their own logins, so you can see who sold an item and who was on the till that day.
 1
2
3
1
2
3
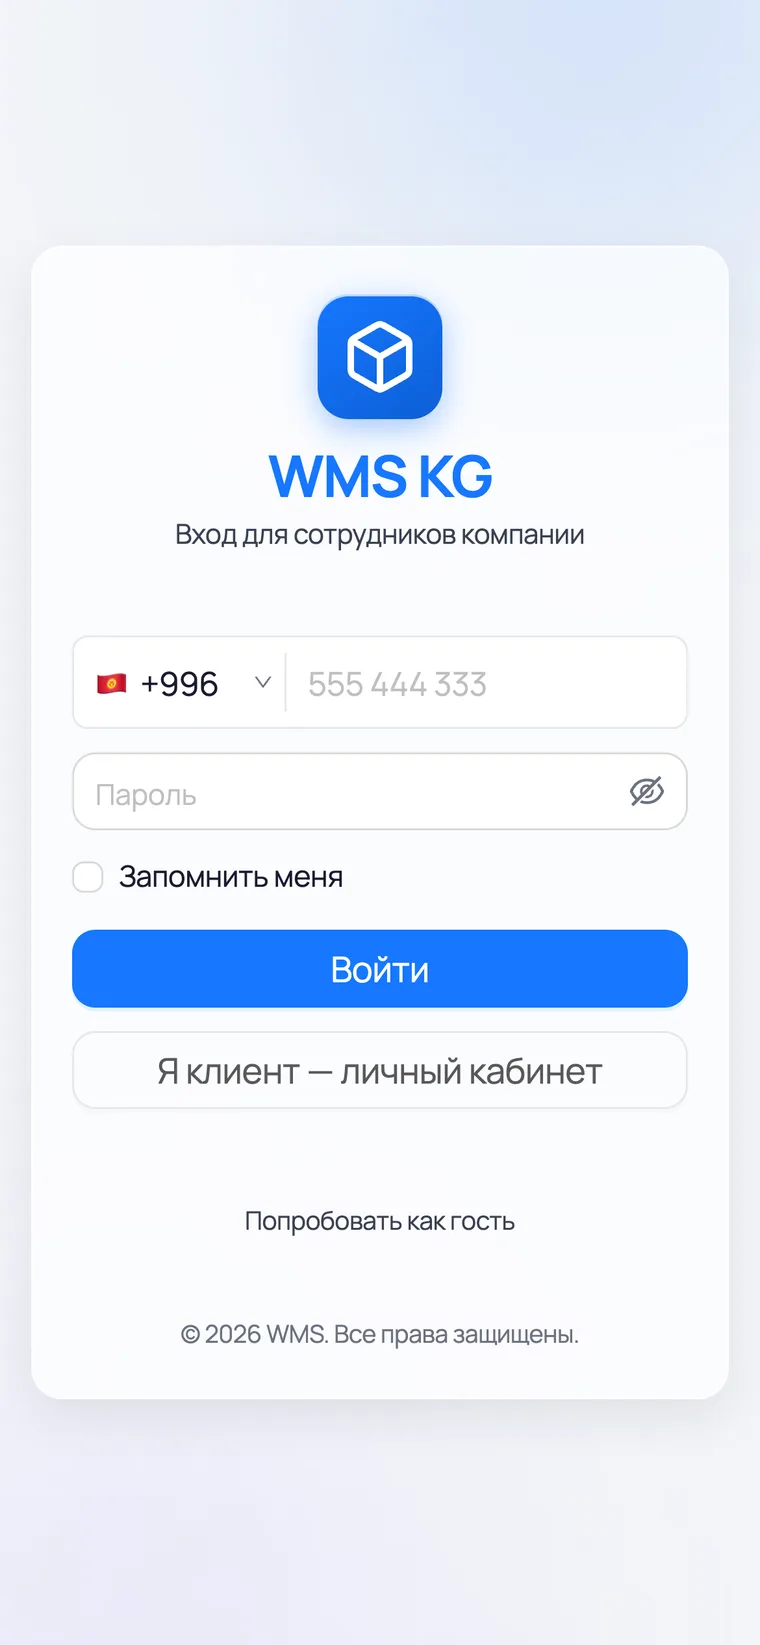
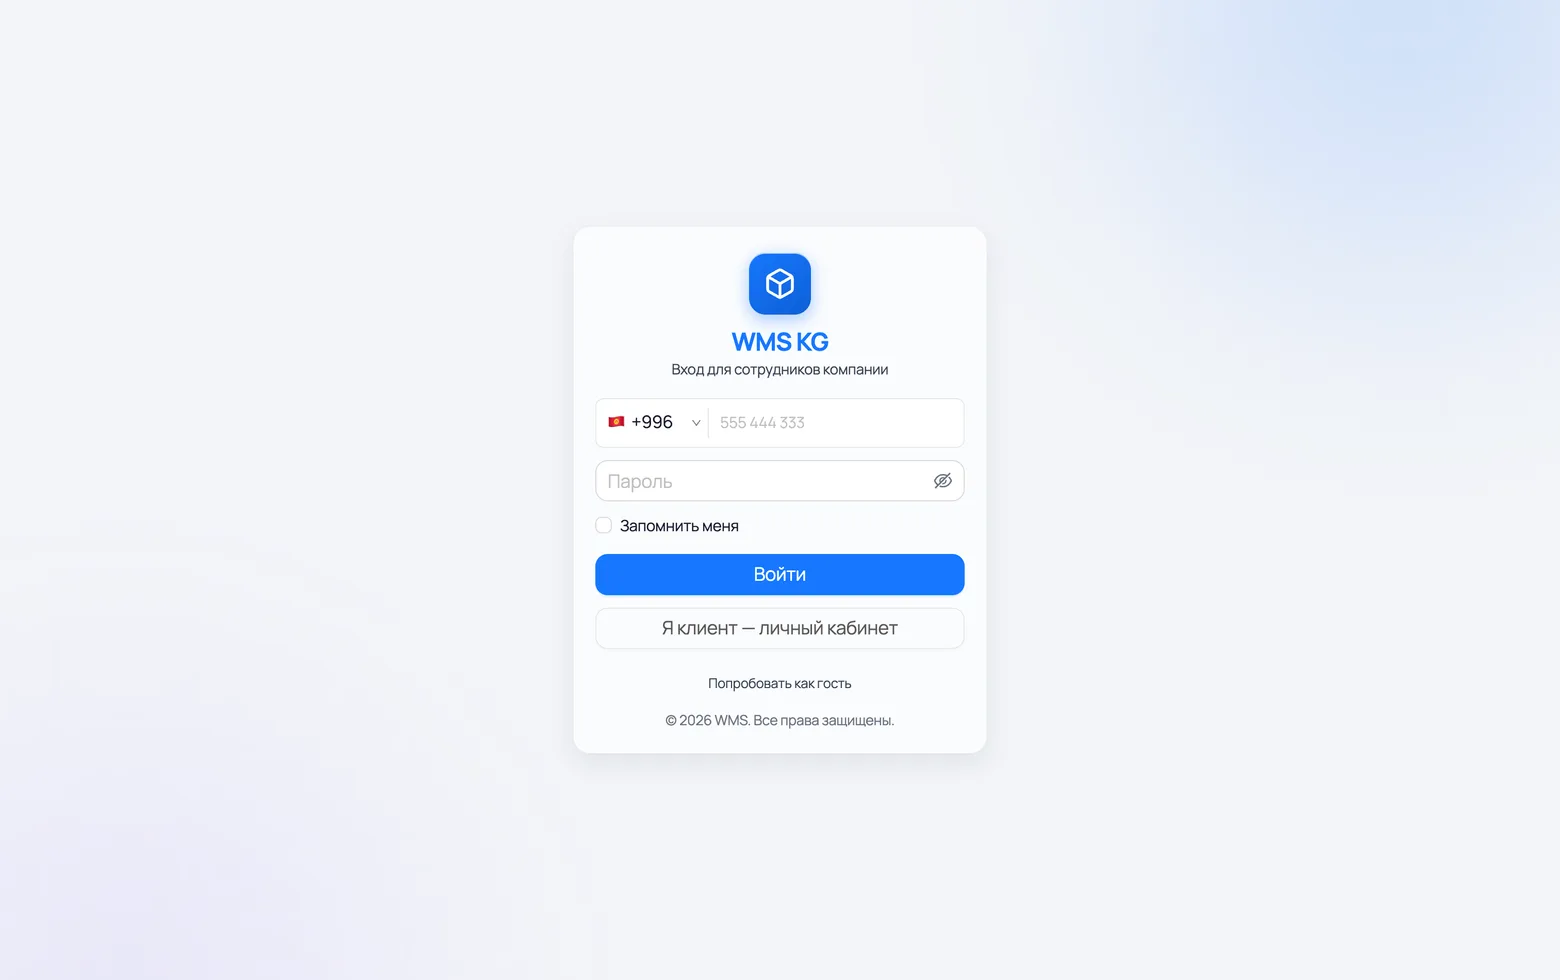
- 1Phone number — the one the shop is registered on. The +996 code is already filled in, so enter only 9 digits.
- 2Password. The 'Remember me' tick keeps the sign-in on this device.
- 3Press Sign in — the Home screen opens.
Setting up the shop
Four steps, in order
The floor and the stockroom are two different shelves
A clothing shop always has two places: what hangs on the floor and what sits in the back room. That is not paperwork — it is exactly why the salesperson says "let me check if we have your size" and disappears for a box. Create both locations from the start, otherwise stock is a single number with nothing to read in it.
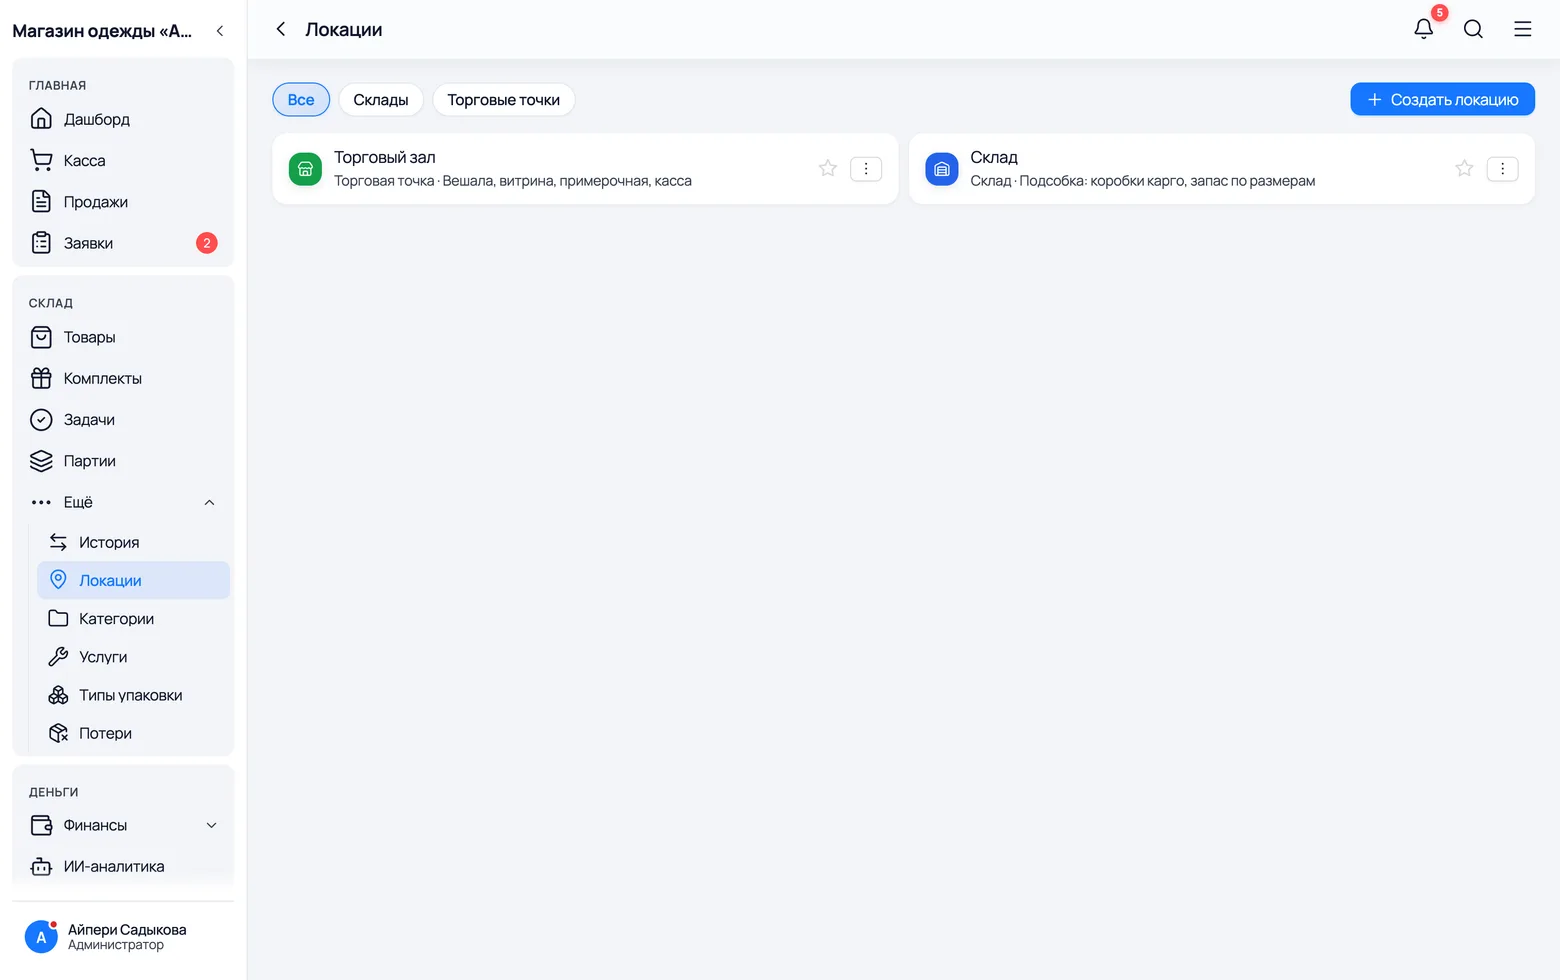
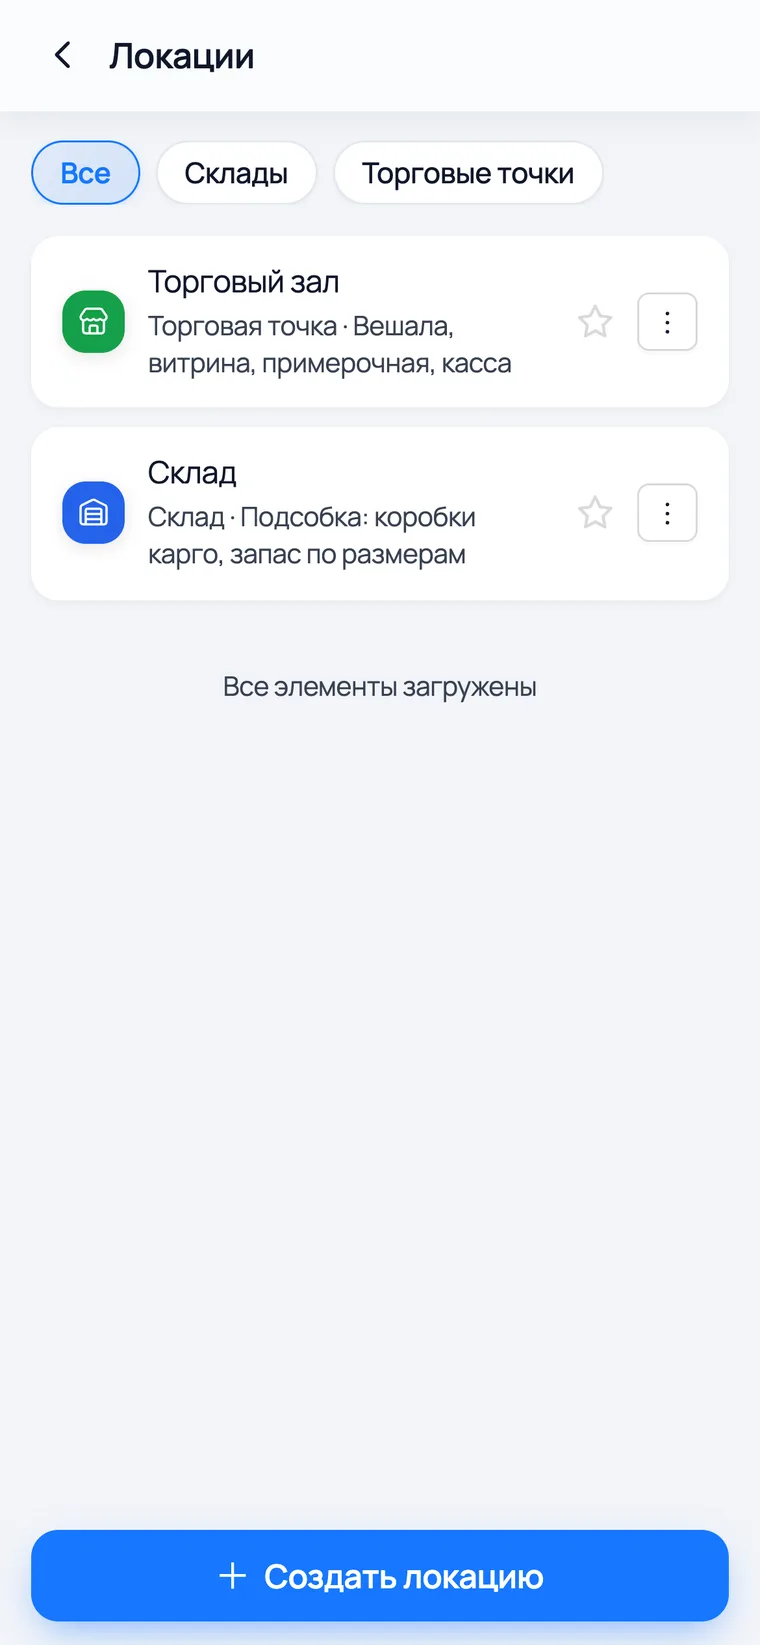
- 1Menu → Warehouse → Locations → Create.
- 2"Shop floor" — type Point of sale. Almost every sale leaves from here.
- 3"Stockroom" — type Warehouse. A delivery is received here in full, and items move to the floor as a transfer.
- You need more than two locations only if you have a second shop or a separate stall at the market. A fitting room is not a location — an item either goes back on the hanger or onto a receipt.
The model card: one item, one card
The first decision you have to make: what counts as a product. The right answer is the MODEL, not the size. "Basic t-shirt, black" is one card with one photo and one price. The sizes appear underneath it in the next step. The temptation to create five cards — "Basic t-shirt M", "Basic t-shirt L" — is understandable, but then your product list grows fivefold, the photo is uploaded five times, and before a sale you have to change the price in five places.
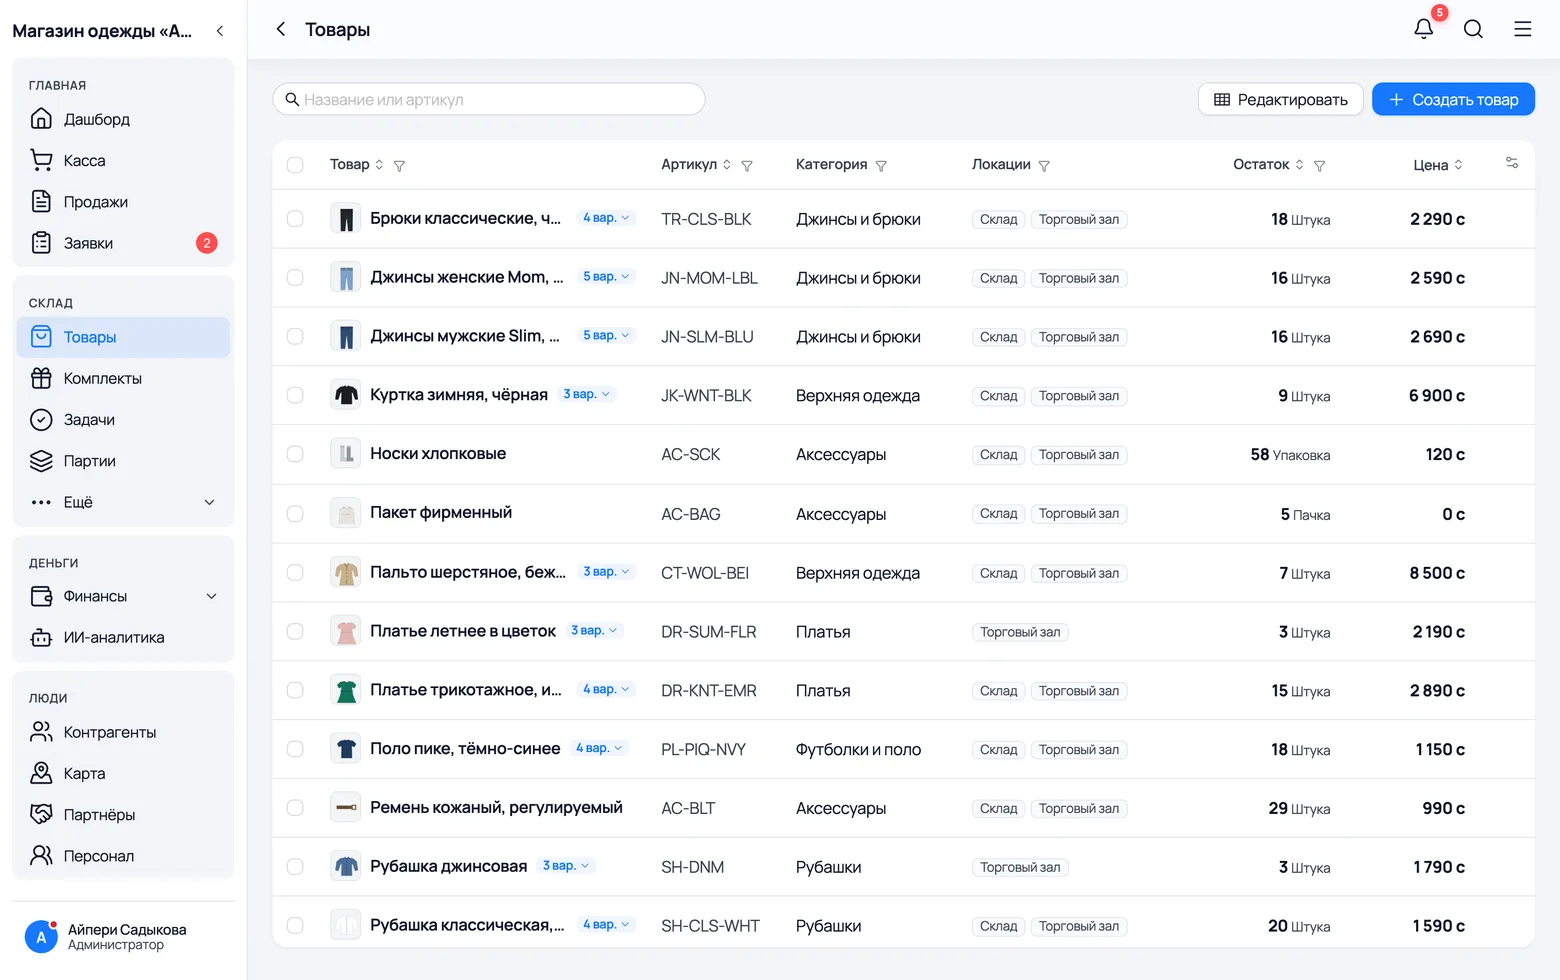
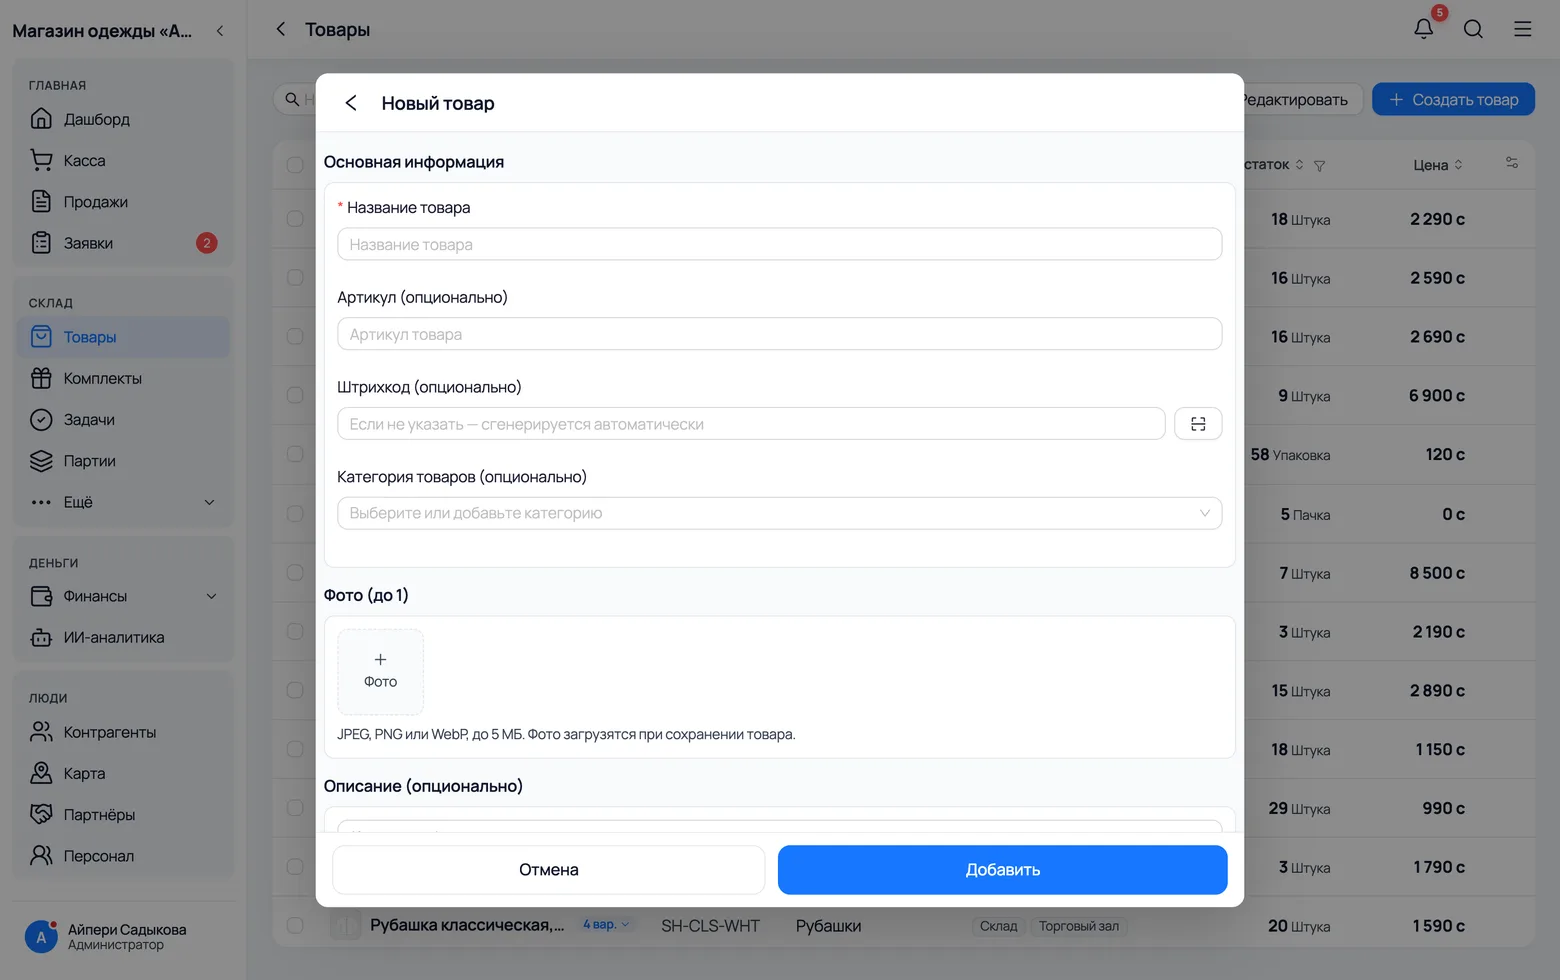
- 1Menu → Warehouse → Products → Create product.
- 2The name is the model and the colour: "Basic t-shirt, black". Colour goes in the name, not into the sizes: two cards for two colours read more easily, and on the shop window they are two different things — which is exactly what they are to the customer.
- 3Category — "T-shirts and polos". Both the catalogue and label printing get filtered by it later.
- 4Purchase and selling price — per item. The sizes will inherit them: the price of a t-shirt does not depend on whether it is an S or an XL.
- 5Do not enter a quantity. Stock will live on the sizes, not on the model — that is what the next chapter is about.
Sizes: variants under the model
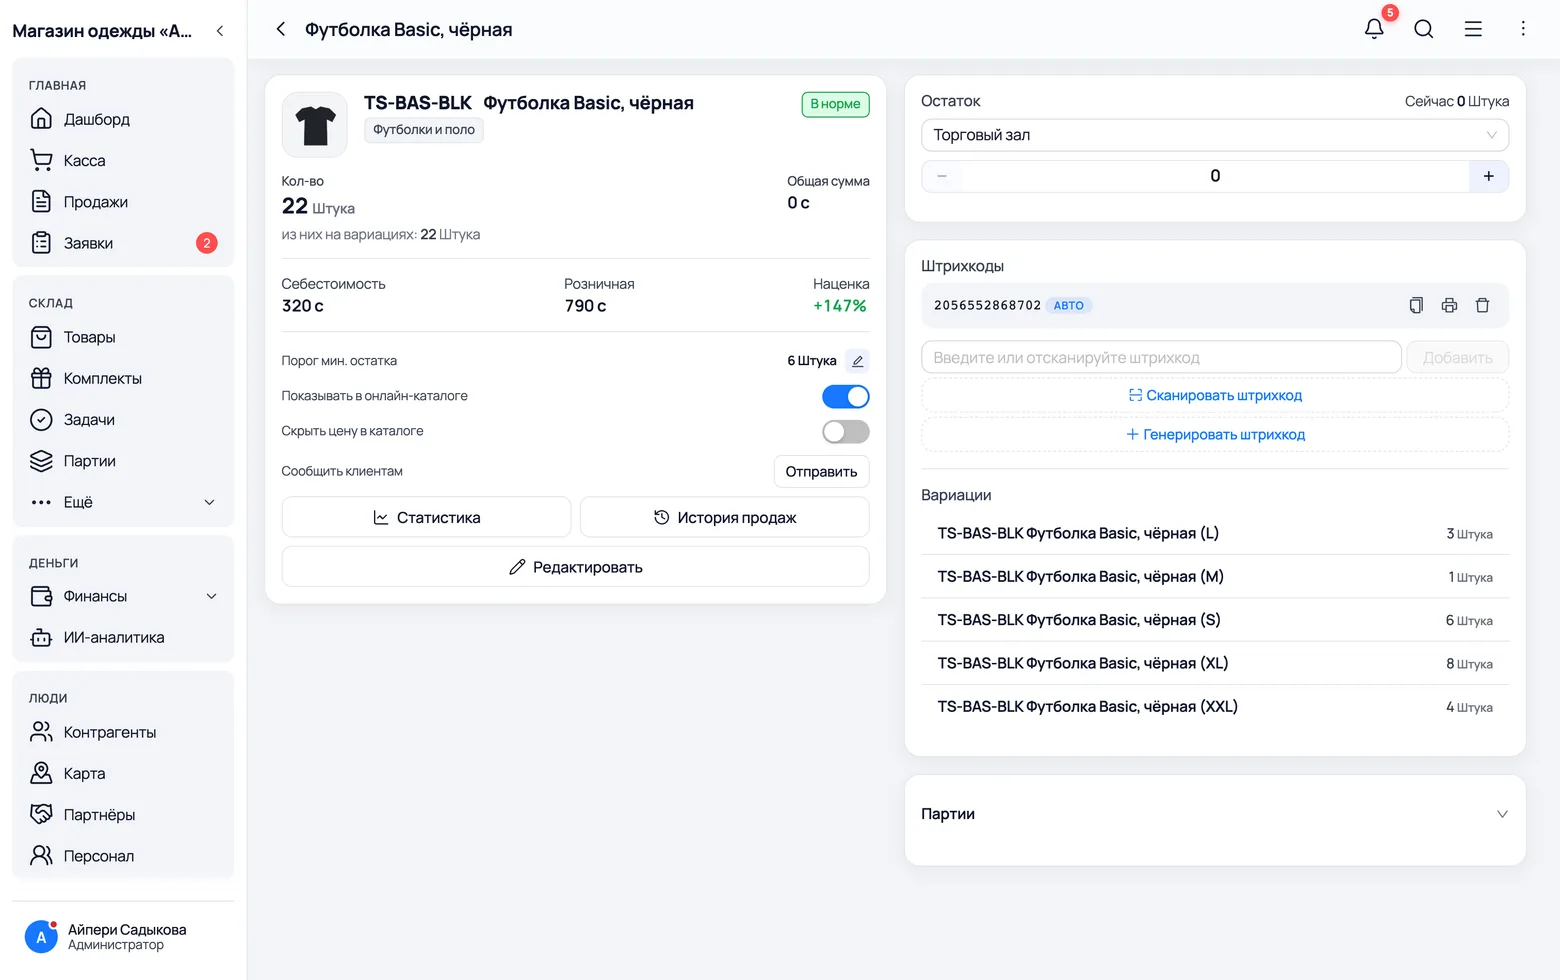
This is what a clothing shop gets a program for in the first place. A size is a variant of the product: a row under the model card with its own stock and its own barcode. The model itself is never sold: what sells is "Basic t-shirt, black · M". The app adds the sizes up into one number on the card, but each of them trades and runs out separately — exactly as they do on the rail.
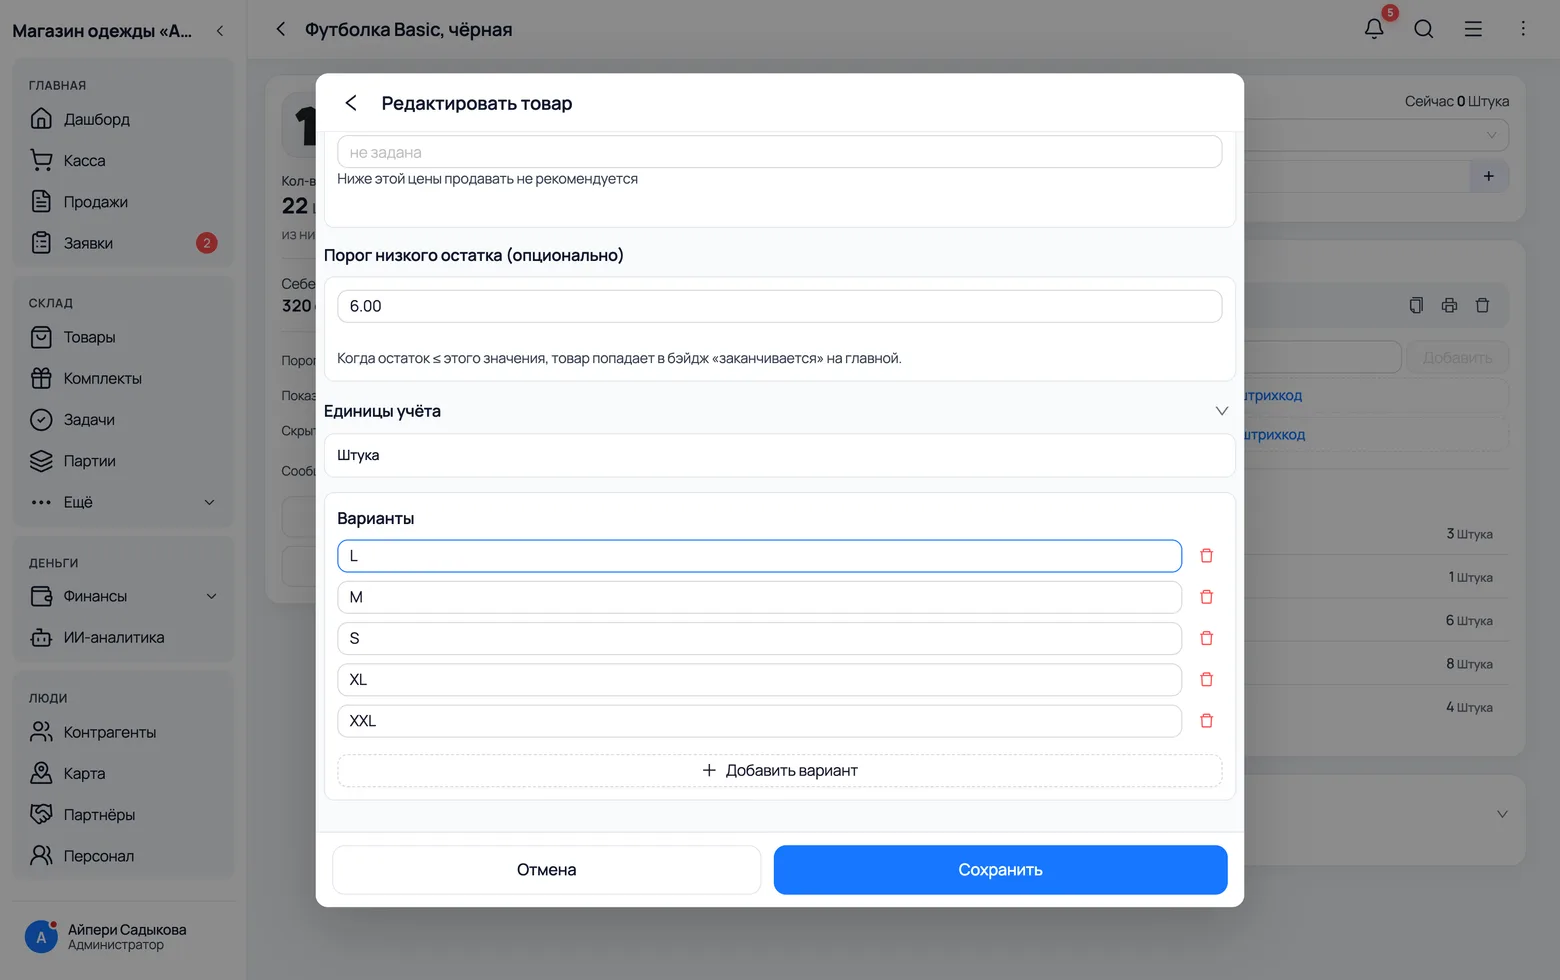
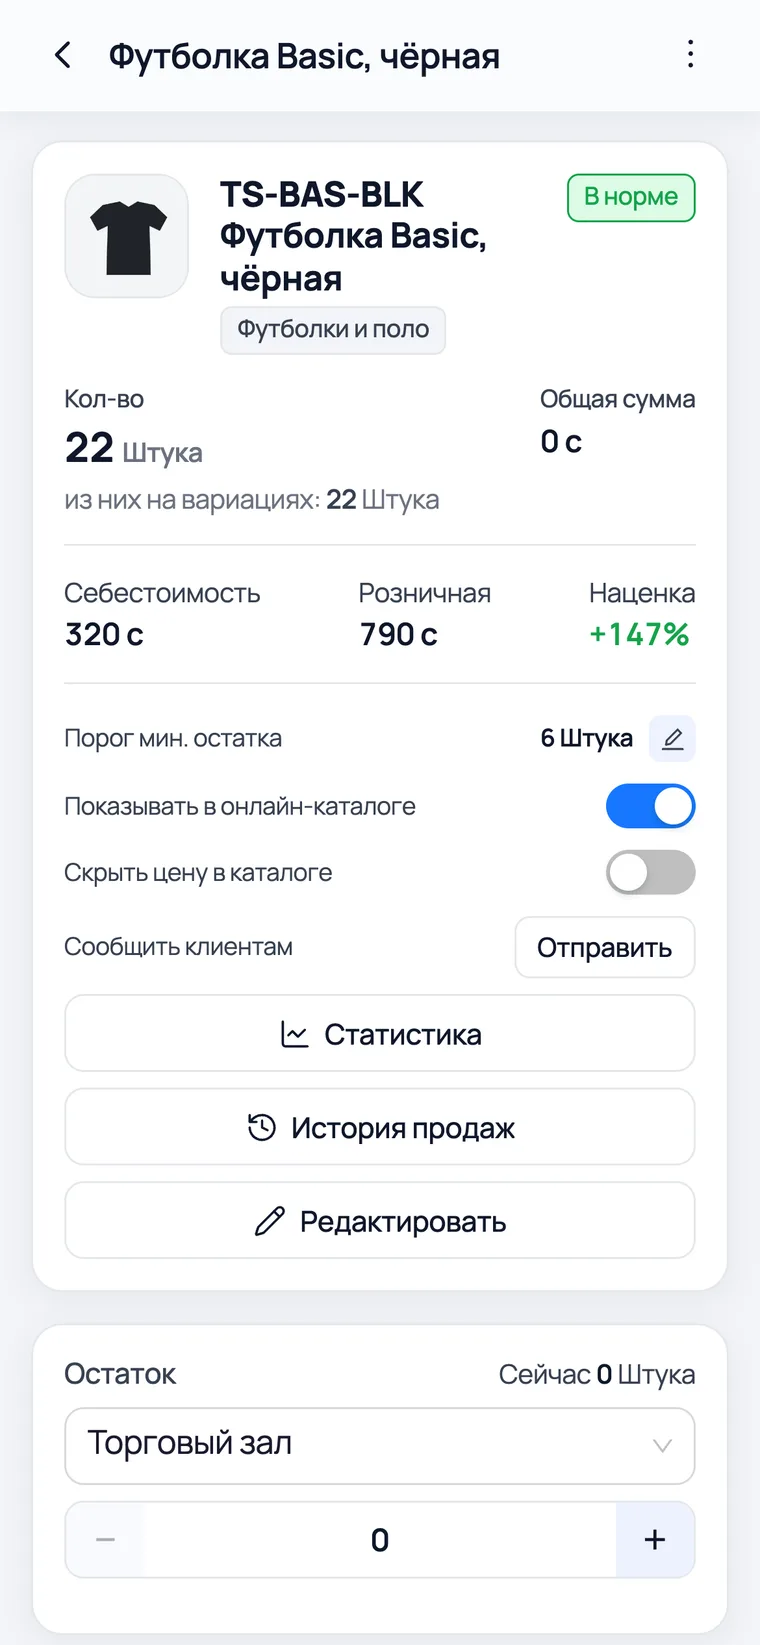
- 1Open the model card → Edit, scroll the form down to the Variants block and press + Add variant.
- 2Type the sizes one per line:
S,M,L,XL,XXL. The field suggests sizes you have entered before, so "XL" will not quietly become "xl" over time. - 3Write the size the way that item is normally sized: letters for t-shirts, collar size for shirts (
39,41,43), waist for jeans (30,32,34), height for kids (98,104,110). The app does not impose a scale — the salesperson sees exactly what you typed. - 4Save. On the card the sizes appear as a Variants list, each with its own stock. And each automatically gets its own barcode: the tag and the scanner at the till both rely on it later.
- Add sizes BEFORE the first delivery. If stock has already arrived on a card with no sizes, the app will not simply let you add them: it first asks you to split the accumulated stock between the sizes. That is honest — otherwise nobody knows how many of what you have — but it is extra work, and doing it in the right order once is easier.
- Price, category, photo and the minimum-stock threshold are set on the model — you do not edit them on every size. Change the price on the card and the app offers to apply it to all sizes at once.
- One dimension, not two. If a model comes in two colours and five sizes, that is two cards of five sizes — not one card with ten rows like "black/M". It is more honest on the shop window too: the customer picks the colour by eye and the size by number.
When you do not need sizes
Half of a clothing shop has no sizes at all: socks, beanies, belts, branded bags. They do not need variants — they are ordinary cards with a single stock figure. The rule is simple: you need sizes where one name covers PHYSICALLY DIFFERENT things that a customer cannot swap for one another.
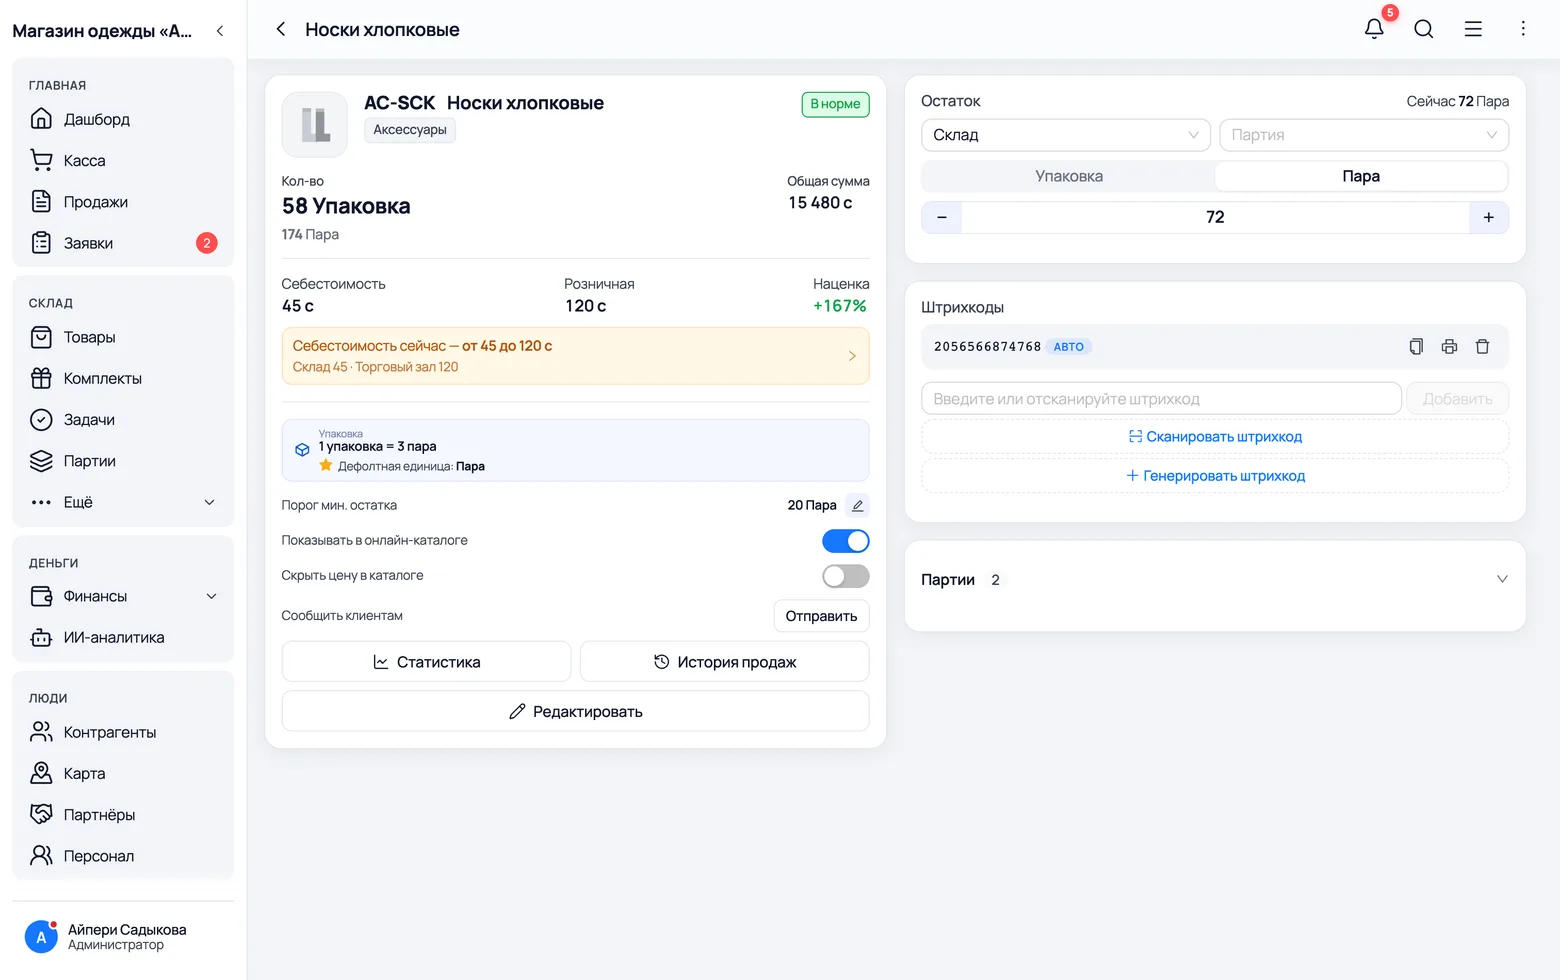
- 1Create it like any product: name, the "Accessories" category, price, quantity.
- 2If an item arrives in packs but sells singly, set the units of measure: "Pack = 3 pairs", "Pair = 1". You receive packs, you sell pairs, and the app does the maths.
- A one-size beanie is a card with no variants — not a card with a single variant called "one size". A lone variant adds nothing and creates an extra step at the point of sale.
Getting stock in
From the cargo box to the tag on the hanger
Receiving: a size run, not "twenty t-shirts"
A cargo box is received BY SIZE. What lies in the stockroom is not "twenty black t-shirts" but six S, fourteen M, fourteen L, eight XL and four XXL — exactly as you ordered them, more of the sizes that move, fewer of the edges. That is why one invoice unfolds into a few dozen lines: it is not the app making extra work, it is how your stock actually is.
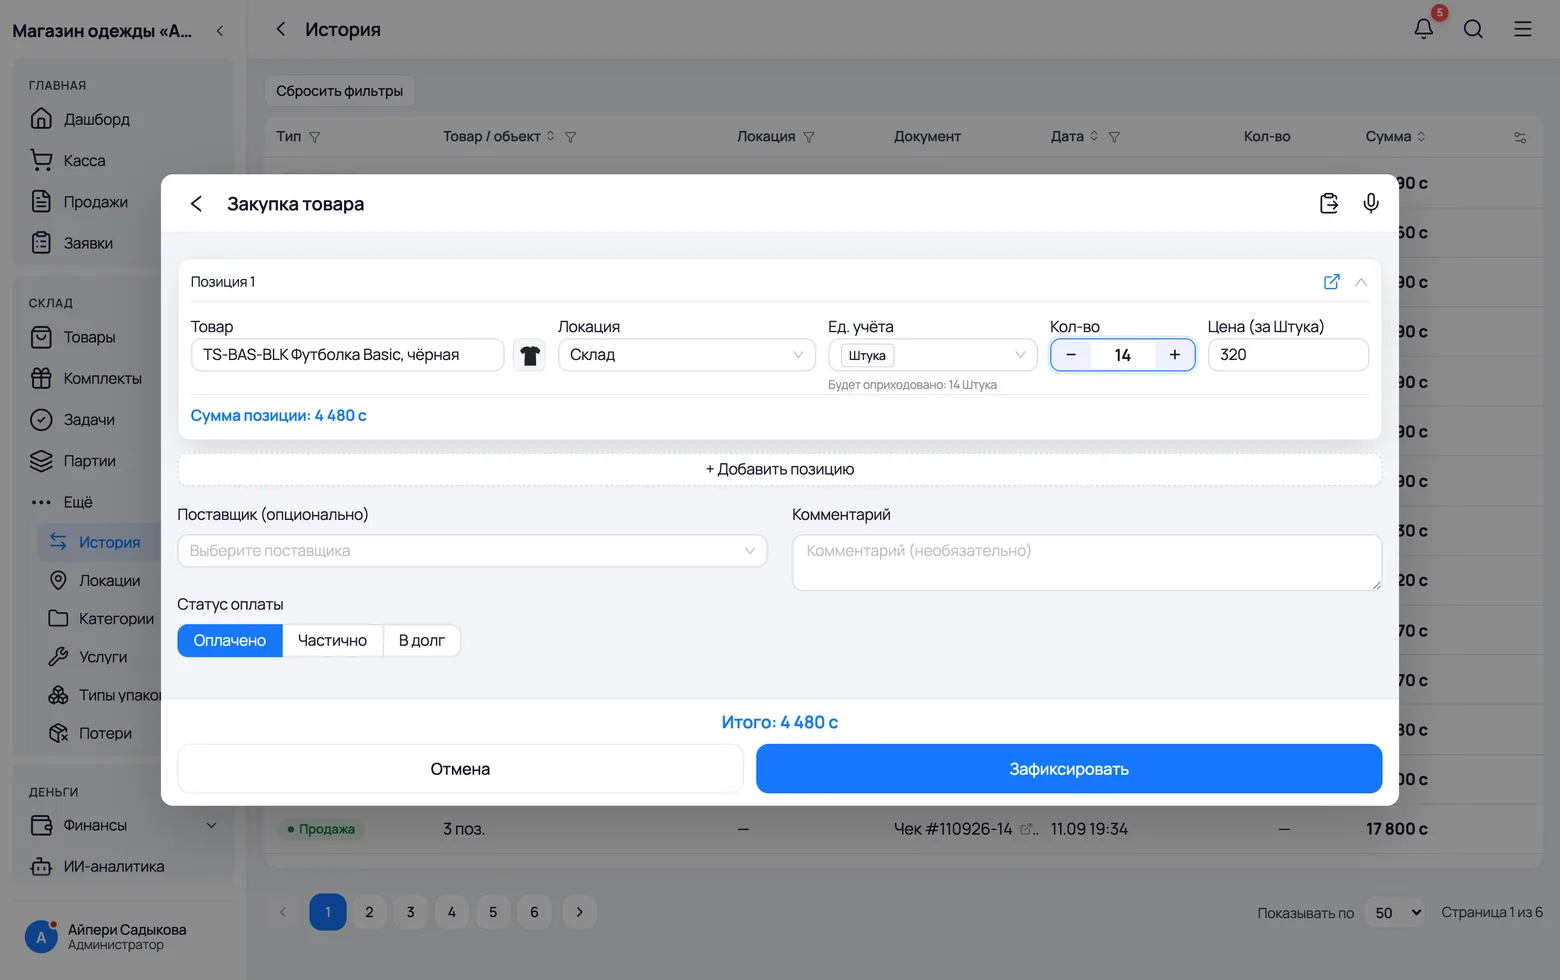
- 1Menu → History → Arrival (on a phone — the + button → Arrival).
- 2Pick the supplier and the Stockroom location: a delivery is received into the back room in full, and items move to the floor afterwards.
- 3Start typing the model name in a line — its sizes appear in the suggestions. Pick the size, enter the quantity, move on to the next.
- 4The purchase price is per item and the same for every size. Payment status — paid, partial or on credit: cargo is usually taken on credit, and then the amount becomes a debt to that supplier.
- 5When the items go out on the floor, make a transfer Stockroom → Shop floor. Edge sizes are often left in the back — then the salesperson knows the XXL exists, it is just not on the rail.
What the box actually cost you
The t-shirt was bought at 320, but that is not what it costs you. On top sit the cargo fee by weight, customs clearance, sometimes delivery to the shop — and on a batch of a hundred and fifty items that is real money. In the app every delivery becomes a batch, and the costs are recorded straight onto it.
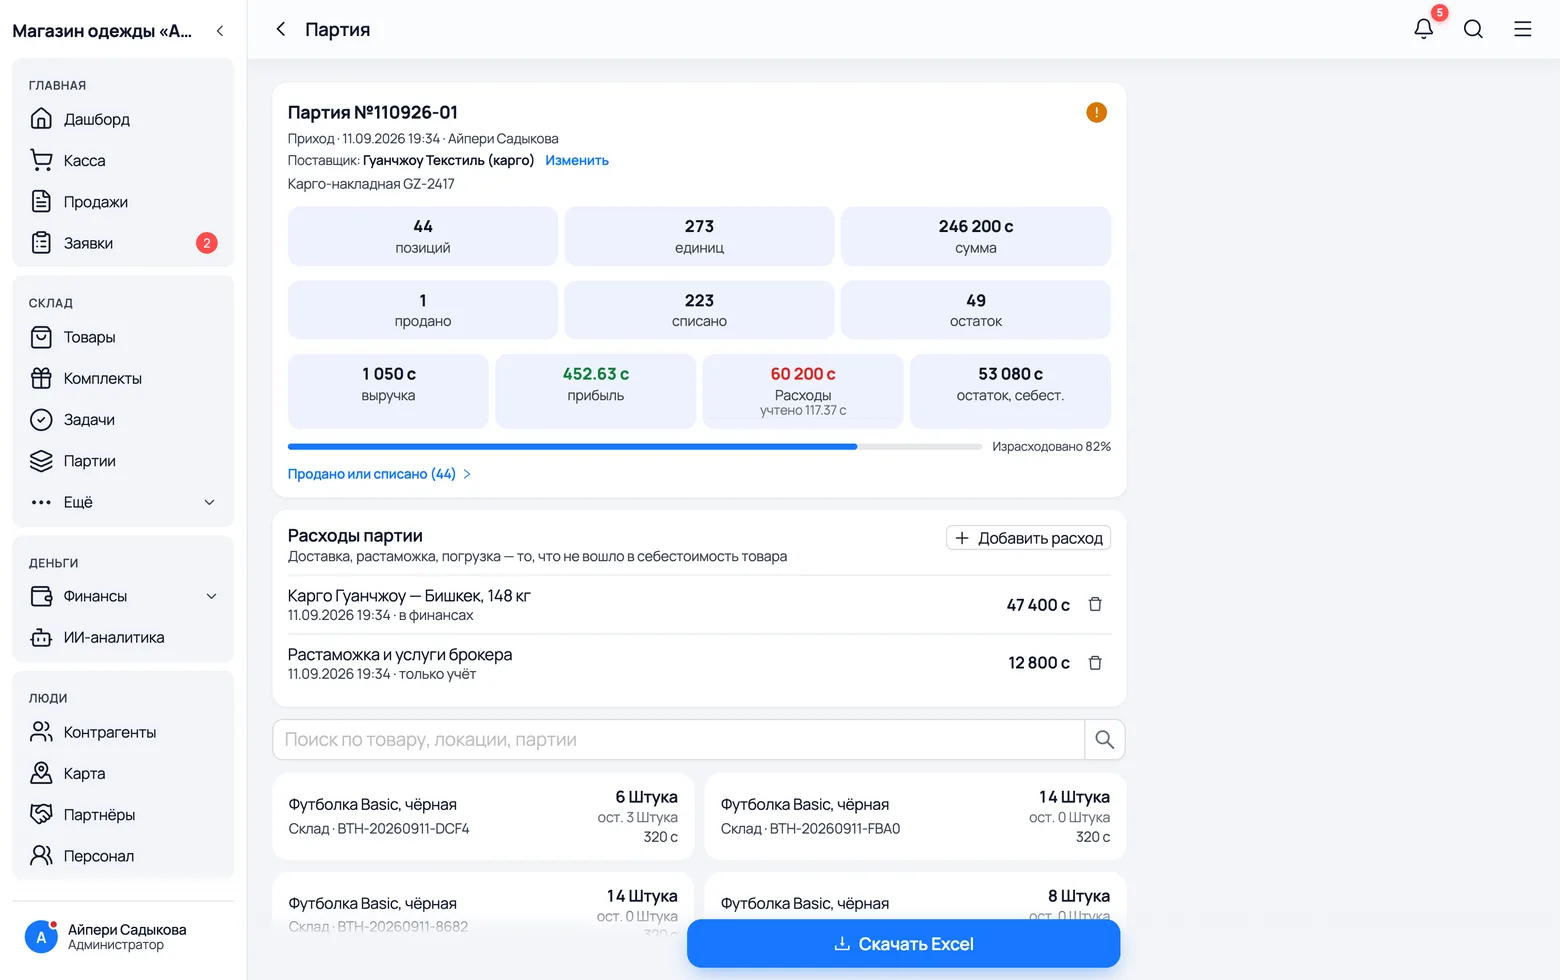
- 1Menu → Warehouse → Batches and open the delivery you need.
- 2The Other costs block → add "Cargo, 148 kg" and "Customs clearance".
- 3The "Record in finances" tick decides whether money actually left your balance for this. If you already entered the cargo fee by hand in Finances, untick it — otherwise the amount is deducted twice.
- The costs are NOT smeared into the purchase price of the items, and that is deliberate: part of the batch has already sold at the old cost, and recalculating would split a receipt's profit from the batch's profit. The batch card subtracts only the share belonging to what has already been sold — which is why a fresh batch does not show an invented loss.
- More on batches, FIFO and delivery profit — in a separate guide.
A tag for every size
Every size received its own barcode when it was created — the tag prints from the app and goes onto the garment. The point is simple: at the till you scan the tag, and the receipt gets exactly the size that is in your hands. Without a tag the salesperson picks the size from a list by eye, makes mistakes, and then neither the M nor the L adds up in stock.
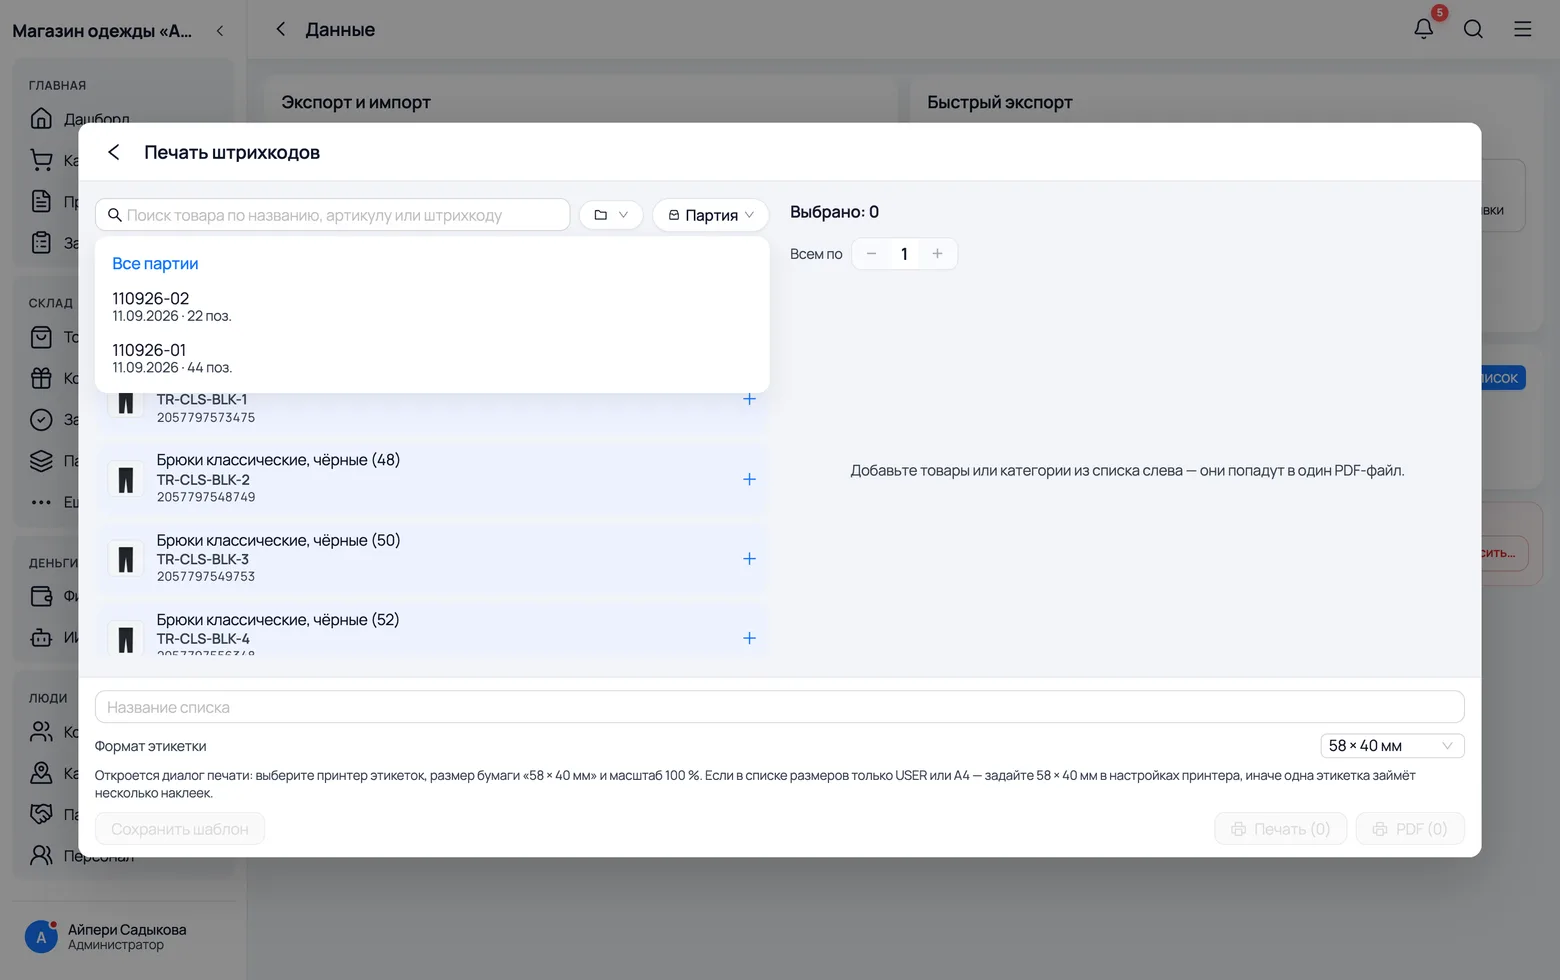
- 1Menu → Data → Print labels → New list.
- 2The fastest way is to build the list by batch: the app takes everything that came in on that invoice, with all its sizes and in the same quantities.
- 3Check that the label shows the model name and the size, then print. The size on the tag is mandatory: without it two identical black t-shirts cannot be told apart by hand.
Living with sizes
The clothing shop's real question: what ran out and what is still hanging
Stock, size by size
After a week of trading the size run comes apart, and that is the key number in a clothing shop. "22 black t-shirts" is a useless figure: if 8 of them are XL and 6 are S while only one M is left, the model is effectively gone. The card shows both at once: the total on top and the size-by-size breakdown as a list.
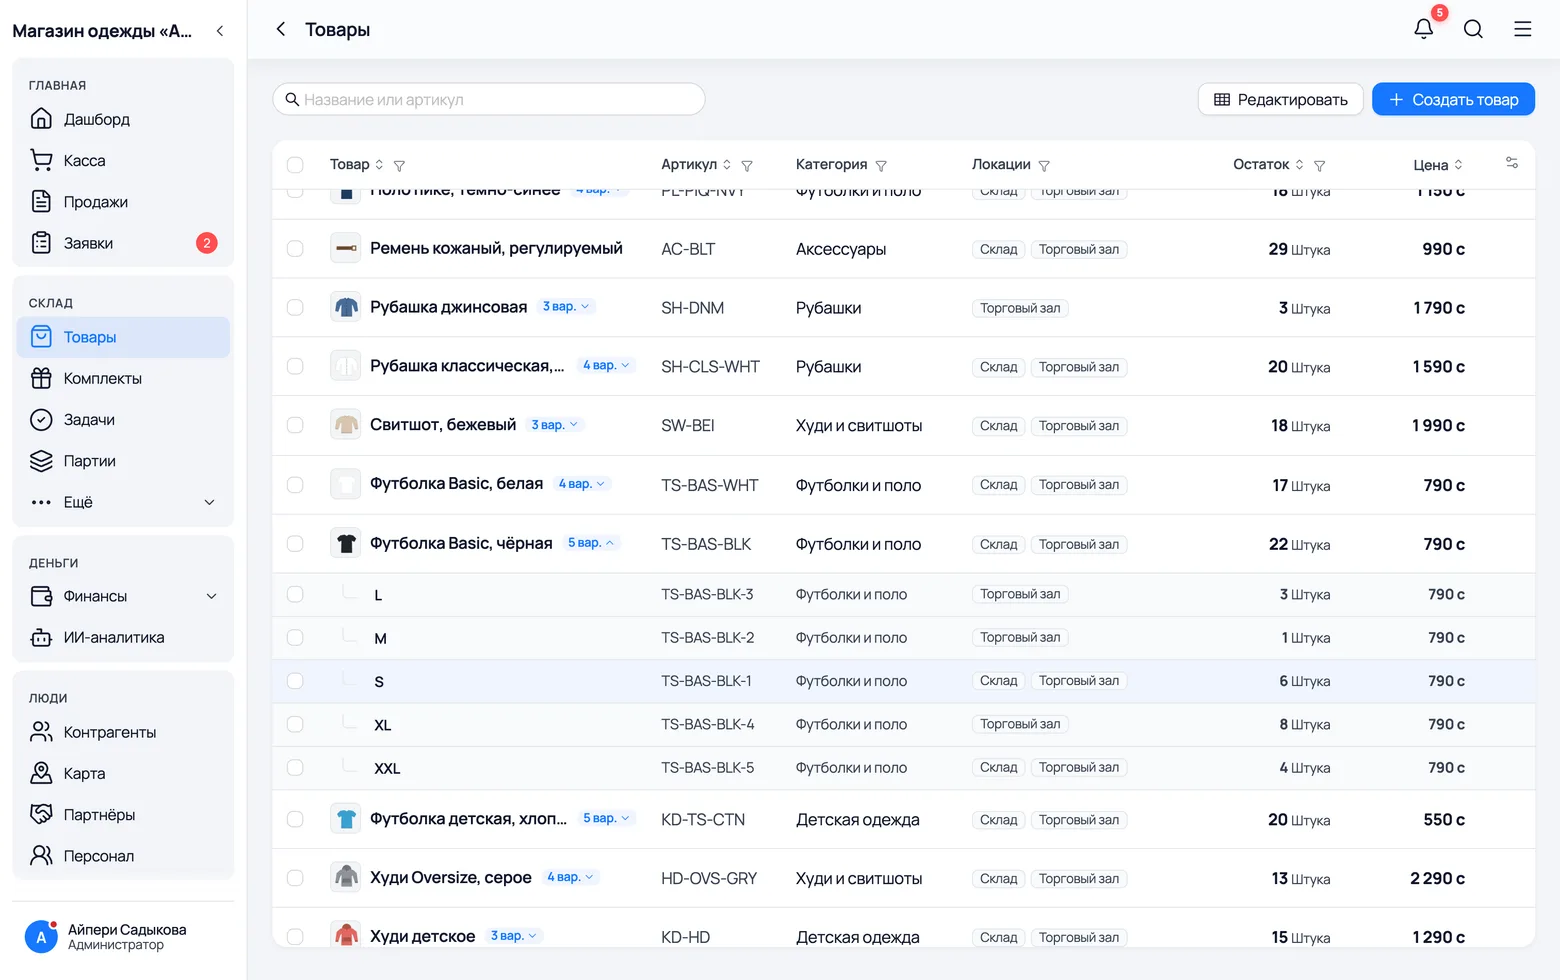
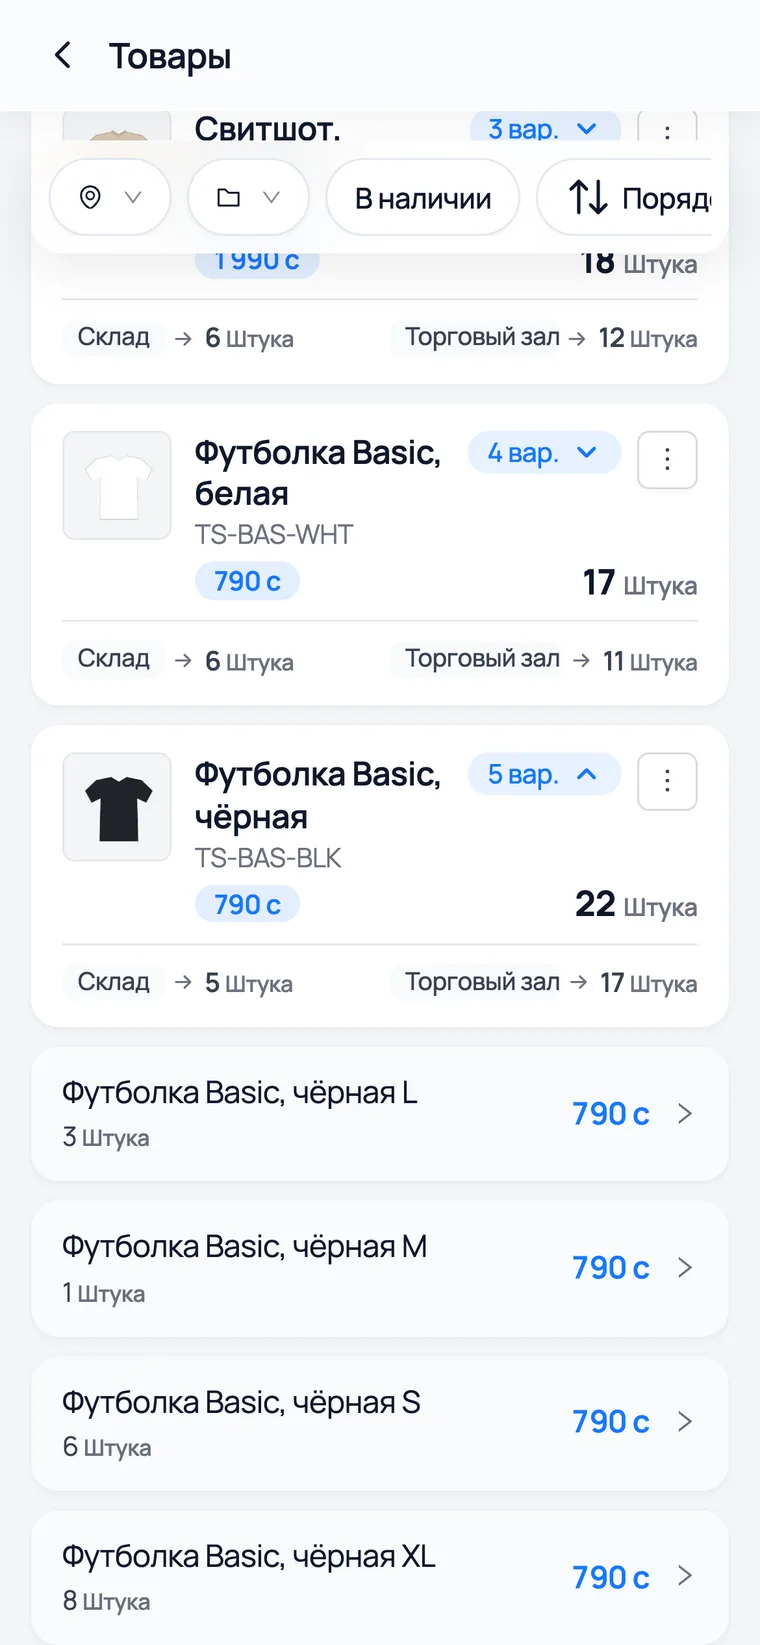
- 1Menu → Warehouse → Stock — everything you have, split by location.
- 2Expand the model row — the sizes are underneath. You can see how many hang on the floor and how many sit in the stockroom: that is exactly what the salesperson goes to the back for.
- 3A size that is out of stock is marked rather than removed from the list. That matters more than it looks: a size that disappears reads as "we never carry that", while a marked one reads as "we had it, it sold out, reorder".
What to reorder in the next delivery
This is the question a clothing shop keeps records for in the first place. And there are actually TWO different questions. The first: "which item is running out altogether" — three denim shirts left across all sizes, time to order more. The second, and for clothing it matters more: "which item has lost its popular size" — you have twenty-two black t-shirts, but only one M, and you have nothing left to sell a customer who wears M.
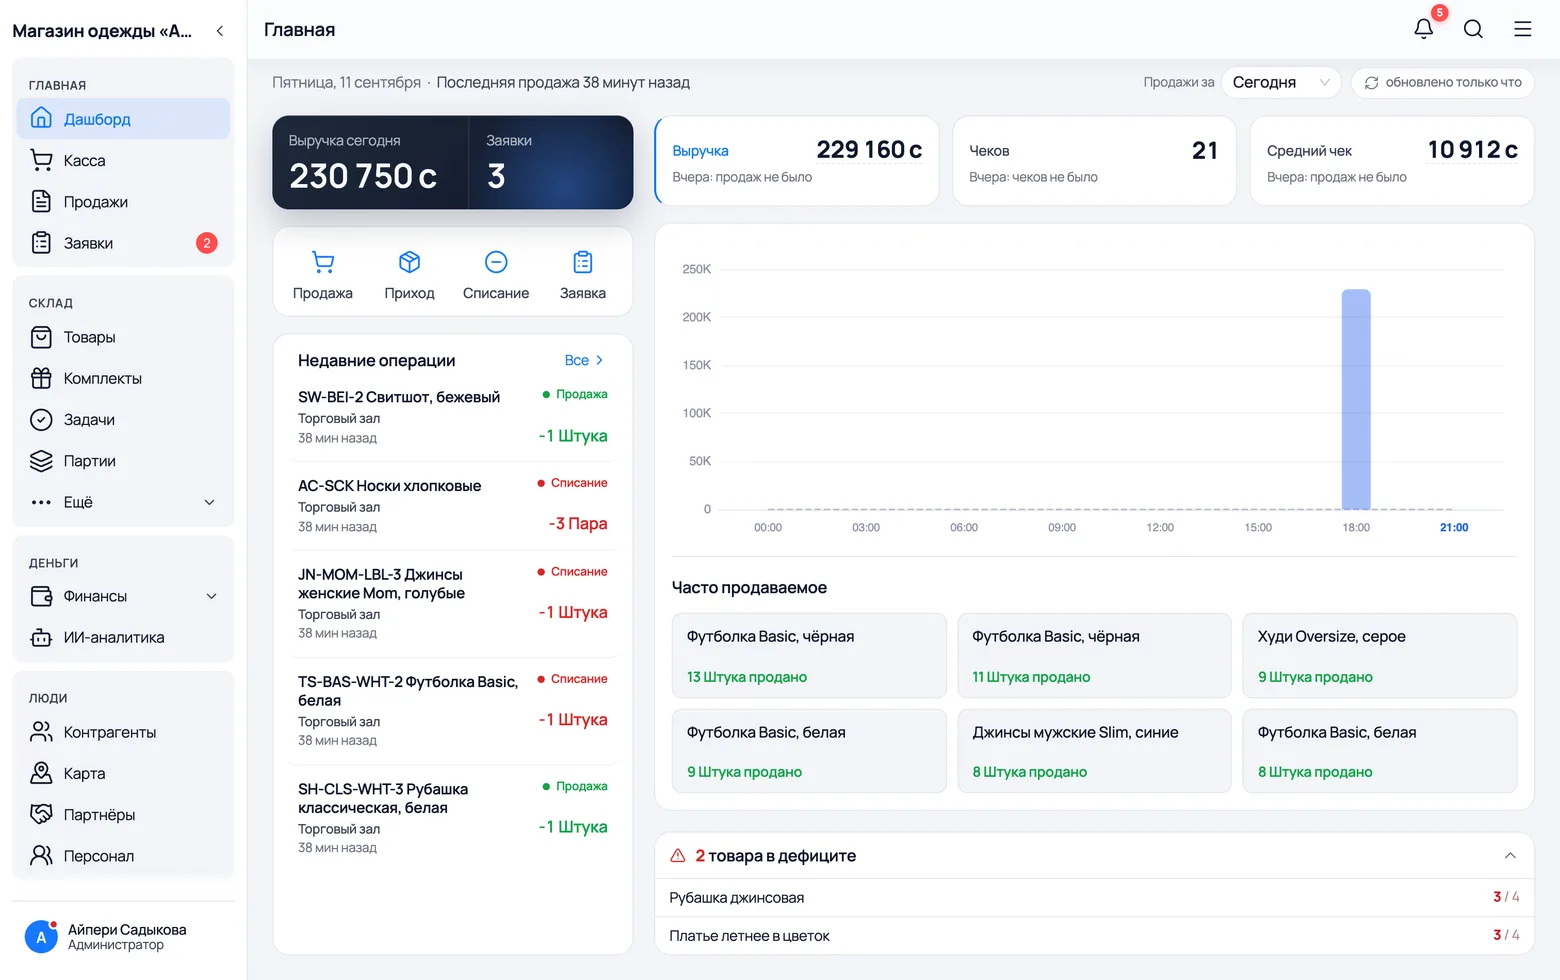
- 1The first question is answered by the "N products running low" card on Home. It counts the MODEL AS A WHOLE — the sum of all its sizes — and compares that with the threshold from the product card.
- 2That is why the threshold is set for the whole item, not per size: 4–6 pieces for a fast-moving model, 2 for expensive outerwear. The field is "Minimum stock threshold" on the model card.
- 3This card does not answer the second question, and you need to know that. A model with twenty-two t-shirts will never show as low, even if not a single M is left. For popular sizes you look at Warehouse → Stock or at the model card itself — there every size is its own row with its own number.
- 4A third source is Statistics and Sales history on the model card: they show which sizes genuinely moved. That is not the same as "ran out": a size can run out simply because you brought two of them.
Selling
With a till and without one — both are real options
Selling from a phone, with no till
Half of all clothing shops work with no till station at all: the salesperson walks the floor with a phone and rings the sale up right there. This is a full method of selling, not a stopgap — the receipt is the same, stock is deducted the same way, and in reports it is indistinguishable from a till sale.
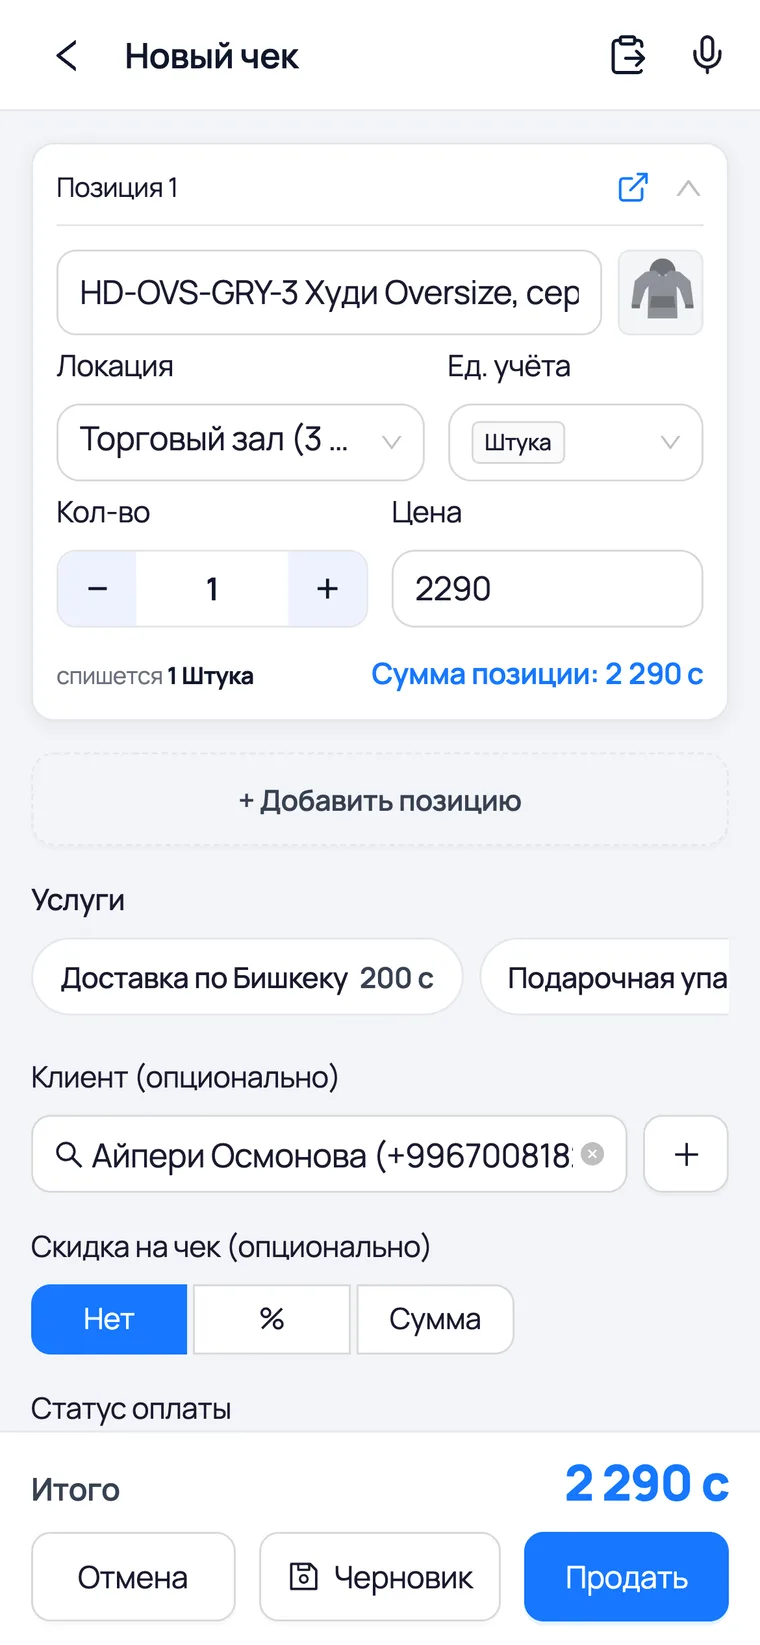
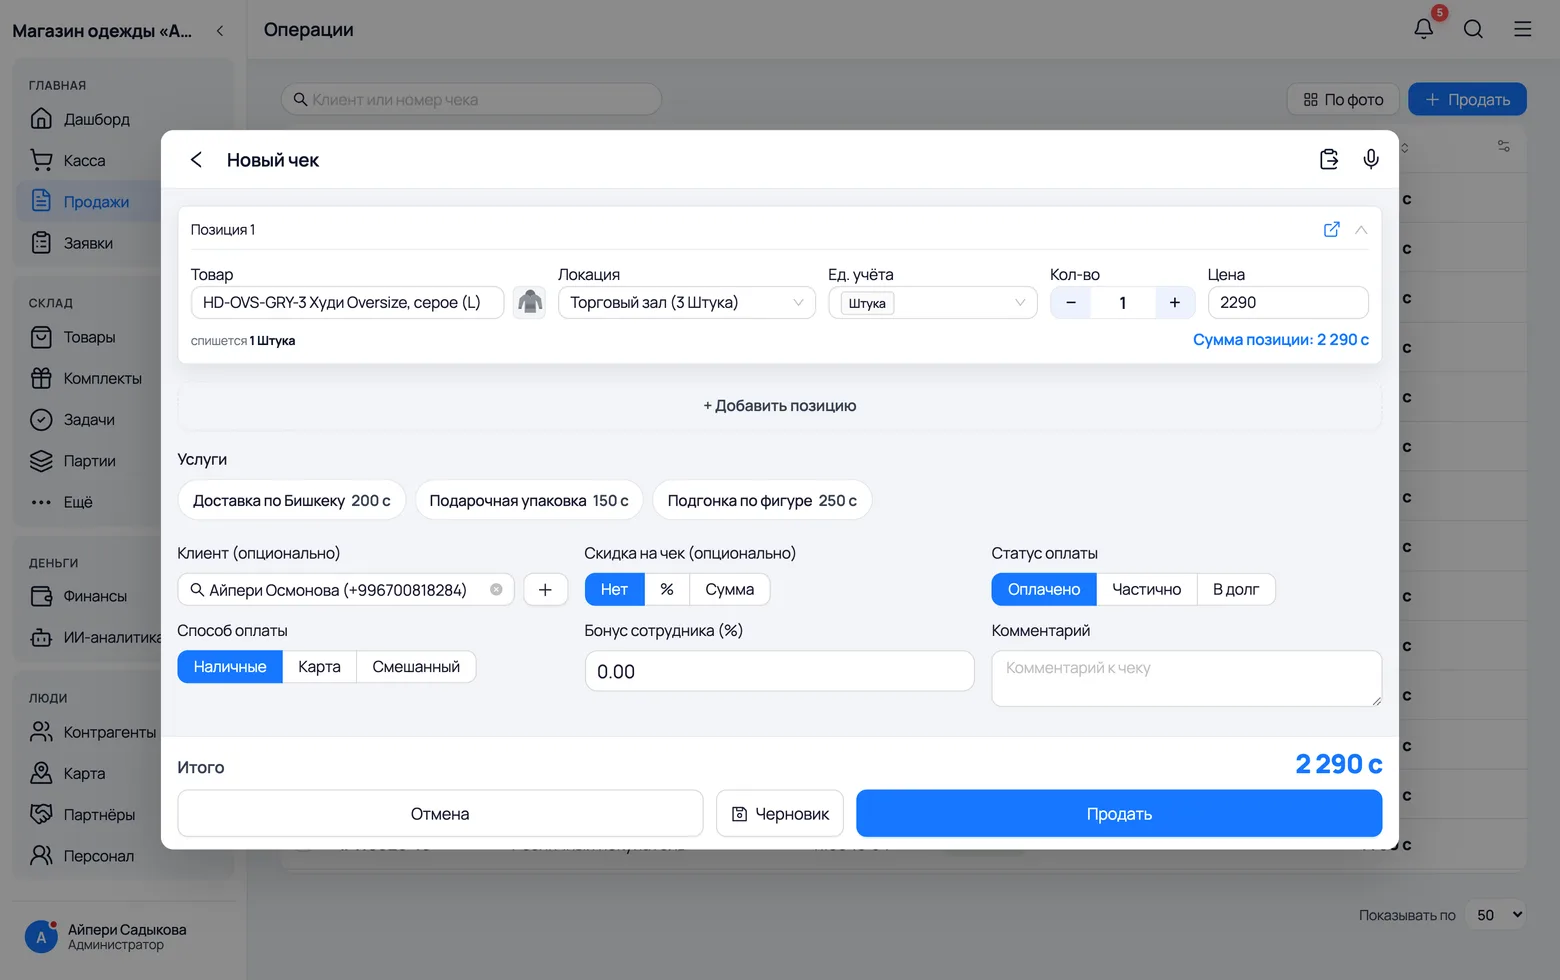
- 1Sales → Sell (on a phone — the + button).
- 2Start typing the model name. The suggestions bring both the model itself and its sizes as separate rows — "Oversize hoodie, grey — L". You must pick the row with the size. The model itself has no stock (it all sits on the sizes), and picking it by mistake immediately flags "exceeds stock" and blocks the sale.
- 3Location — Shop floor. If the item was fetched from the back, set Stockroom: then stock is deducted from where it actually came from.
- 4A service goes on the same receipt as its own line: alterations, gift wrapping, delivery. Services have no stock, but they count towards revenue just like the garment.
- 5Payment — cash, card or on credit. The method matters: at the end of the day the app reconciles the till separately for cash and for card.
Selling at the till, with a scanner
The other half of shops keeps a till station: a computer, a scanner, sometimes a customer-facing display. Here everything rests on the tag — the cashier passes the garment over the scanner and the exact size that hung on the rail lands in the cart. There is no picking a model or a size by hand at all, which is why a till beats a phone when there is a queue.
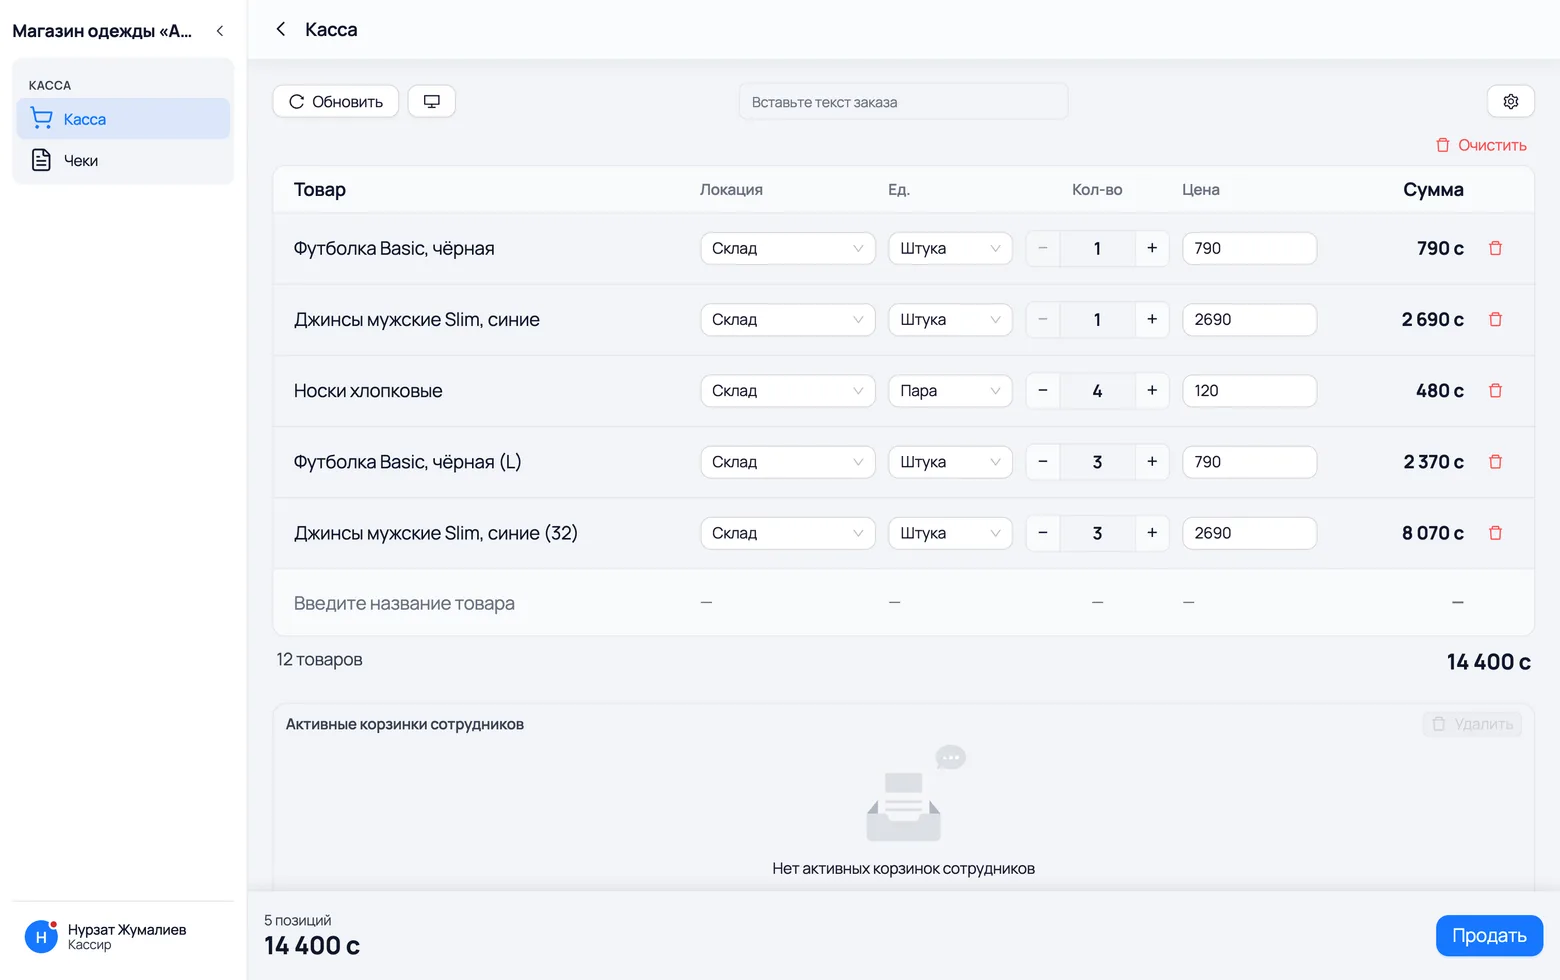
- 1Give the cashier their own login with the Cashier role: they see only the till and receipts — the rest of the warehouse is closed to them.
- 2Menu → Till. Scan the tags — items add themselves to the cart with the size already filled in.
- 3Payment, change and printing the receipt all happen there. The receipt is identical to a phone sale: in reports they sit side by side and count the same.
"The size didn't fit"
The most common story in a clothing shop. In the app an exchange is TWO actions: returning the size that was sold and selling the new one. It is tempting to just edit the old receipt — "swap the L for an XL and be done" — but that would be untrue: the money for the L really did go back into the till, and the XL really was sold. Editing the receipt would hide both, and the till would not balance at the end of the day.
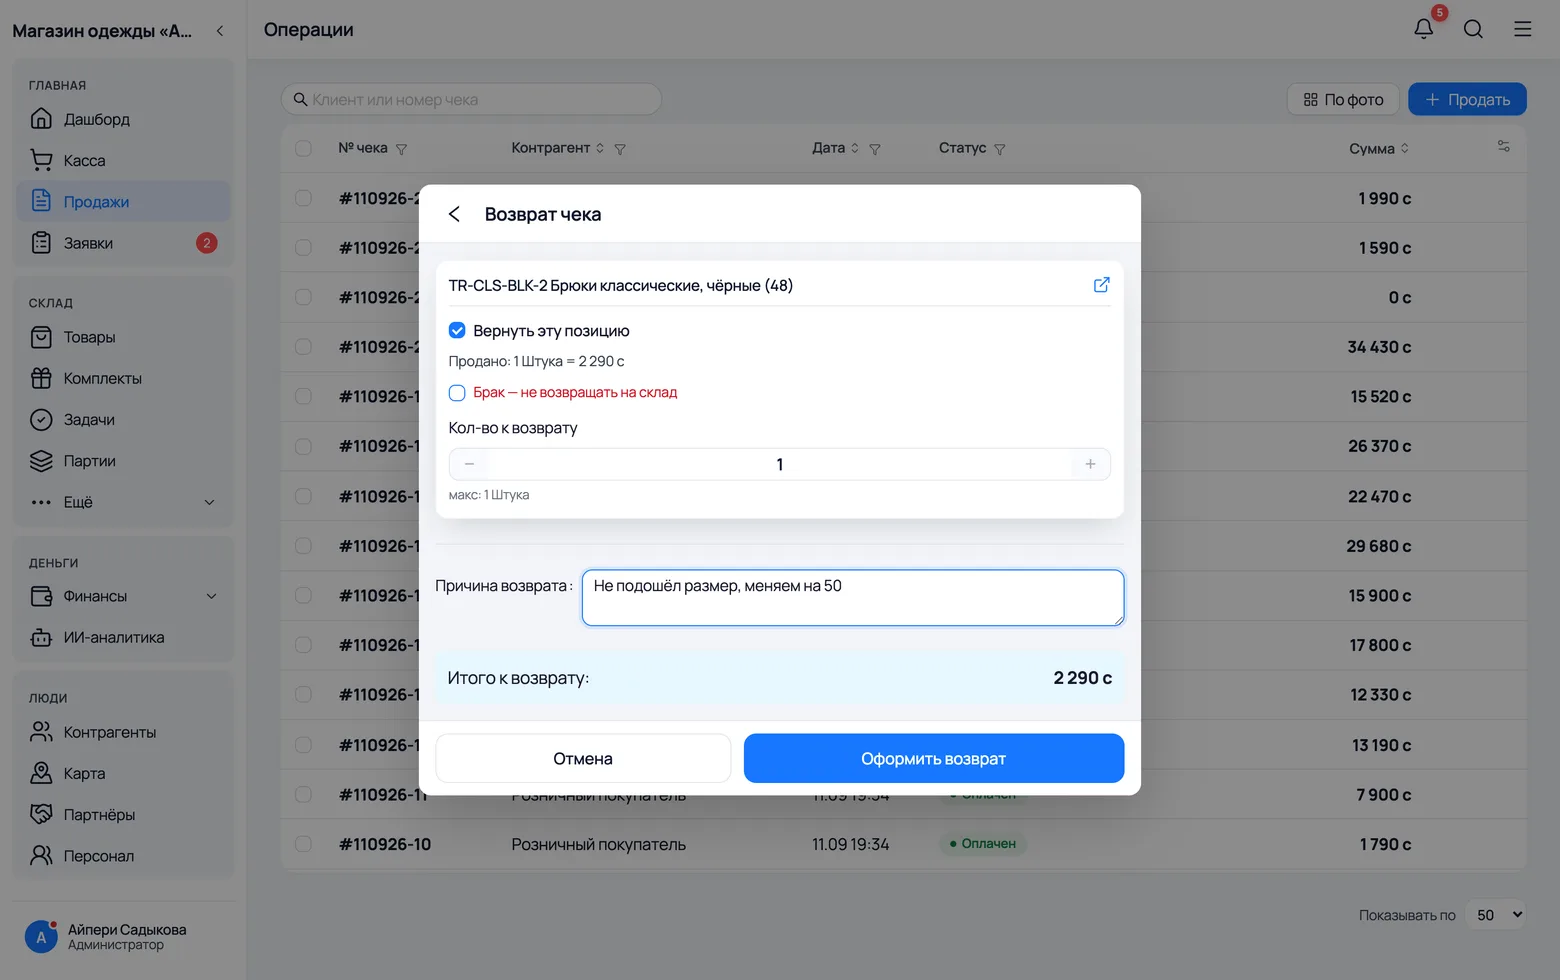
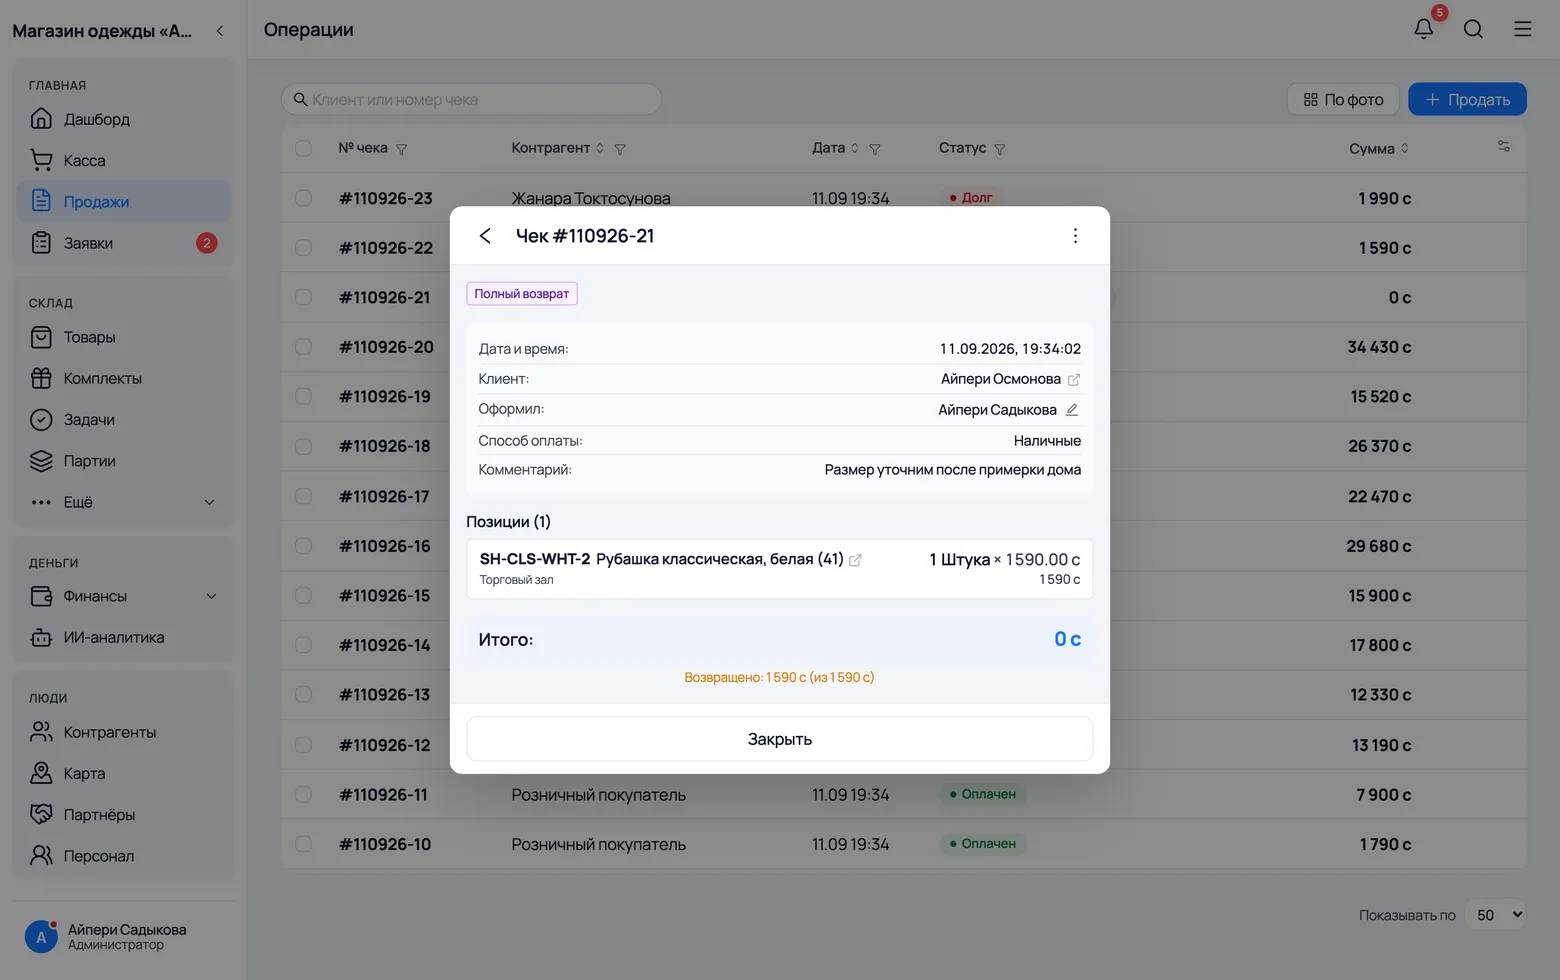
- 1Sales → find the receipt (by customer, by date, or by the number on the paper receipt) → open it → the ⋮ menu in the header → Return.
- 2Tick the size being returned and give a reason — "size did not fit". The item goes back into stock at the location it was sold from and becomes available again.
- 3If the item came back faulty — a split seam, a stain — tick return as defective: the money is refunded as usual, but the garment does not go back on the shelf, it goes into defects.
- 4Sell the right size as an ordinary receipt. The exchange is done: your reports show both the return and the sale, and both sizes add up in stock.
- Not every employee may issue returns: the permission is switched off on the salesperson's card (Settings → Staff). In a busy shop that is ordinary caution — a return takes money out of the till.
Put aside, taken on credit, ordered
Three situations where an item does not leave at once or not for the full amount. "Put the coat aside until payday" — a deposit and an order. "Put it on my account, we'll settle at the end of the month" — a sale on credit. "The salon needs eight polos for its staff" — a corporate order, often on credit too. The app handles all three, and in all three the debt is worked out for you.
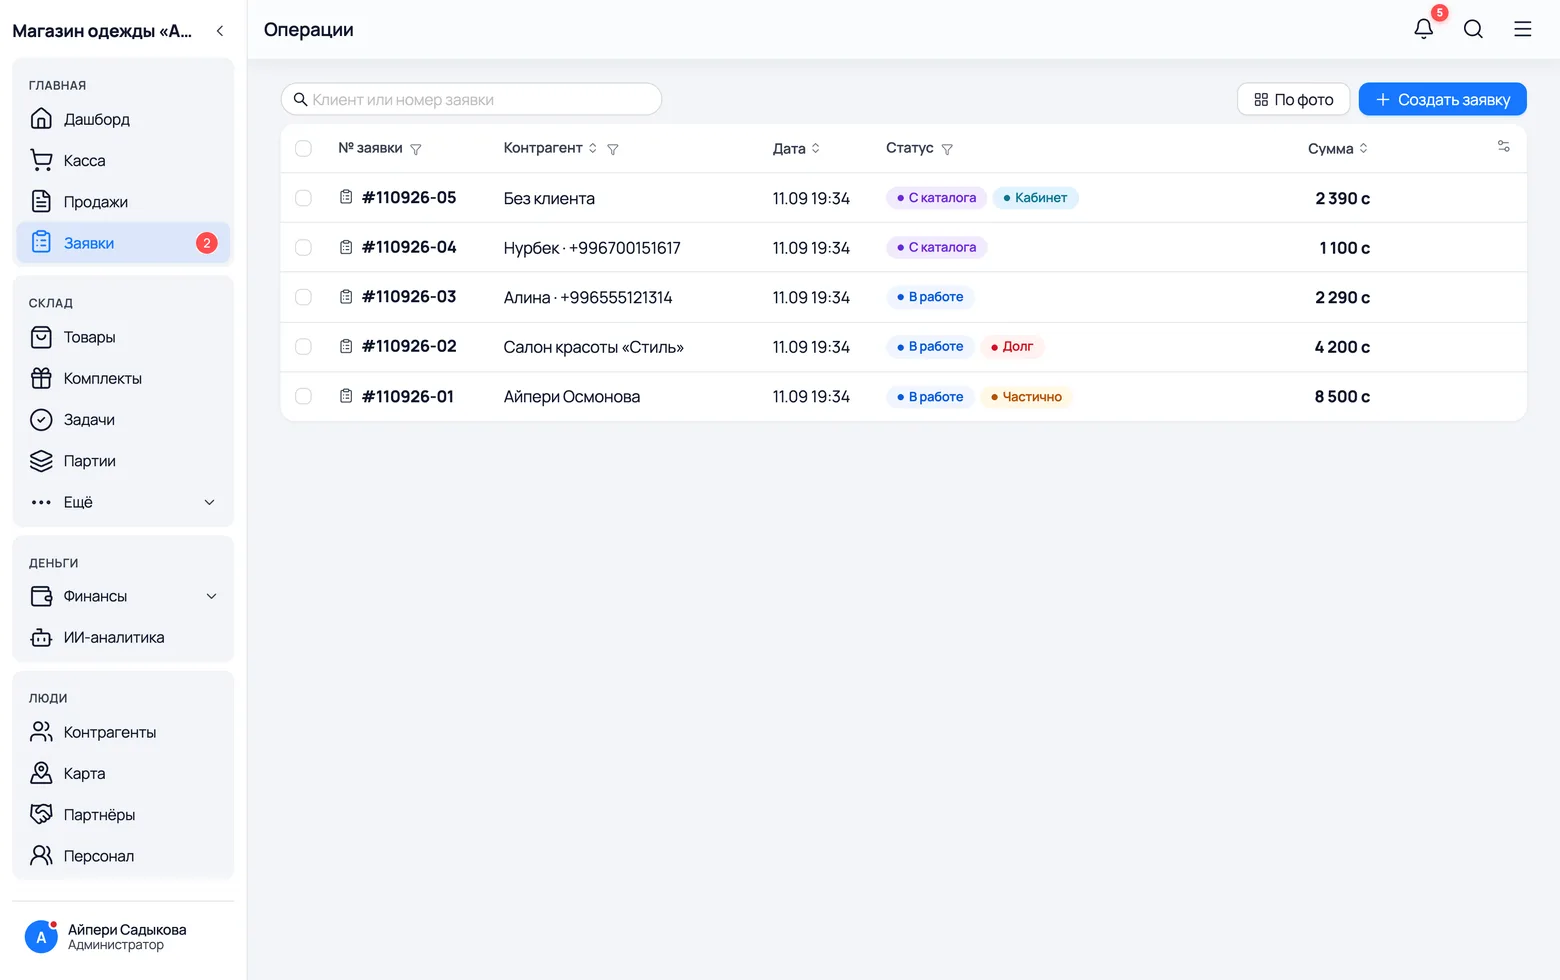
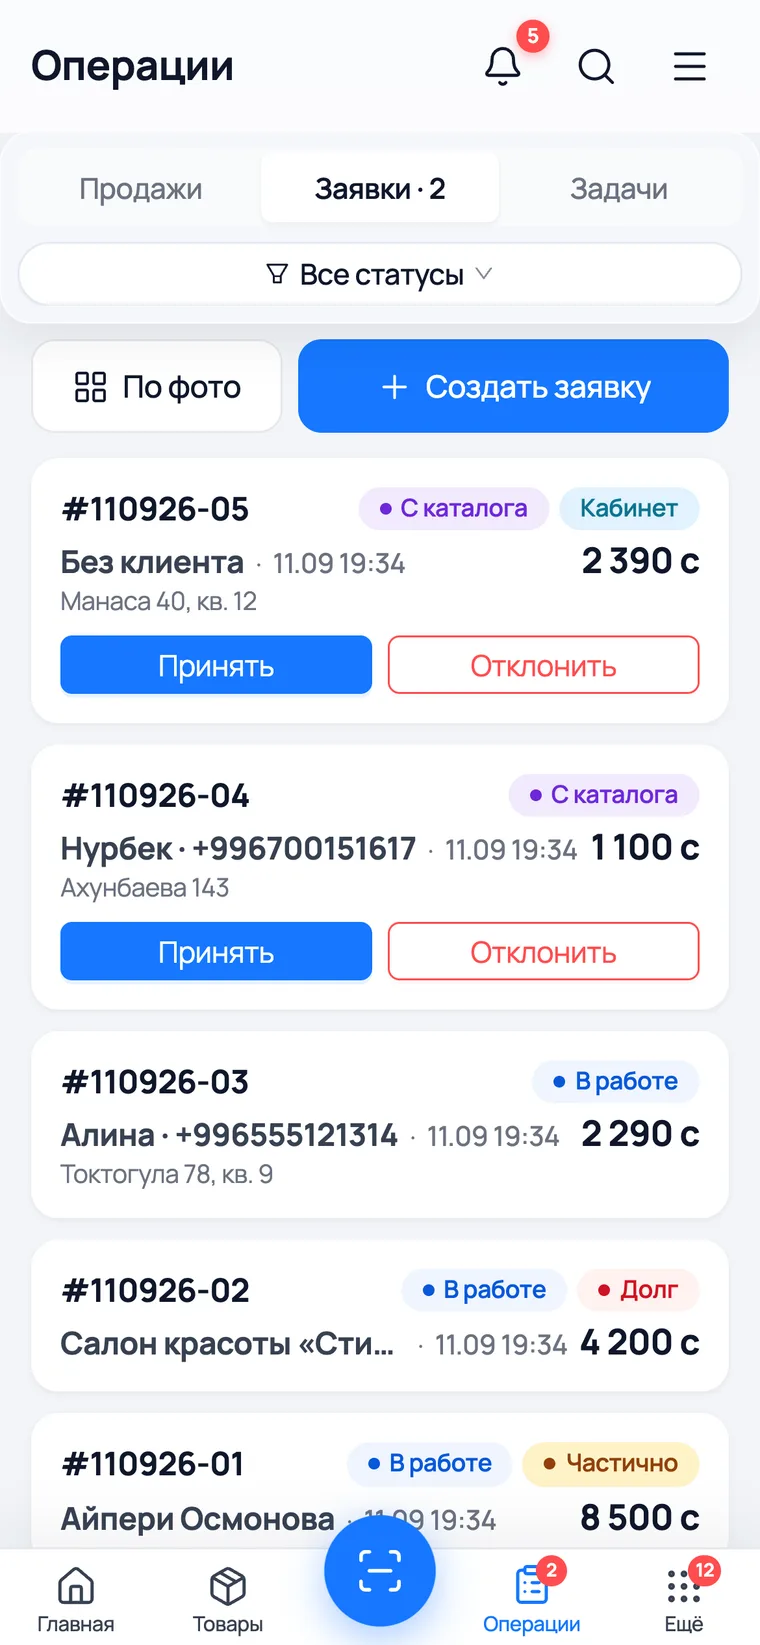
- 1An item put aside is an order, not a receipt: it has not been sold yet and the money is not all in. Orders → Create, set the size, the customer and the deposit paid ("partially paid").
- 2When the customer comes for the coat and pays the rest, the order is completed and becomes a receipt. Stock is deducted at that moment, not when it was put aside.
- 3A sale on credit is an ordinary receipt with the status on credit. The amount goes into the customer's debt, and their card shows how much they owe and for what.
- 4Settling up — Counterparties → customer → Pay off debt. The money lands in the day's till, and the card keeps the history: when and how much they paid.
- An order does NOT reserve the item: while it sits there, the size keeps selling to everyone. If there is only one coat and it truly has been put aside, it is safer to ring up a credit receipt right away — then it is deducted and cannot be sold twice.
A shop window for customers
People choose clothes with their eyes — then ask about the size
The shop window: your shop as a link
Clothes are chosen by eye, so a clothing shop needs a shop window more than anyone. The app publishes your catalogue as its own page at an address like wms-kg.com/ademi — you drop the link into Instagram, WhatsApp or your status. It is not a second catalogue to maintain: the window shows the same models, with the same prices and photos, ticked as "show in catalogue".
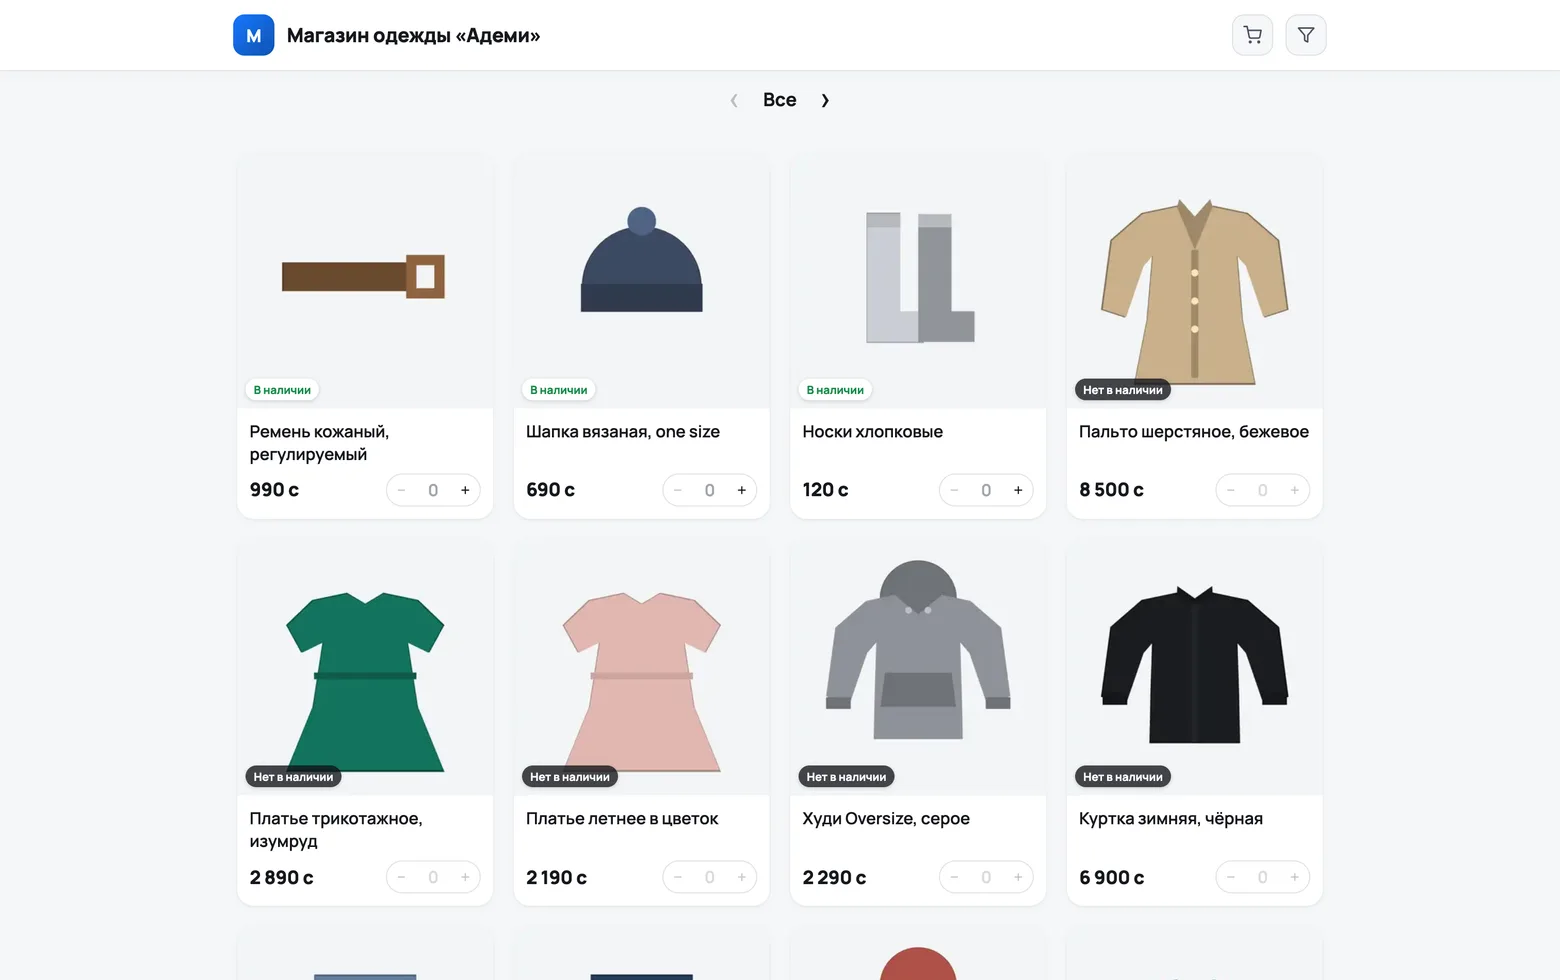
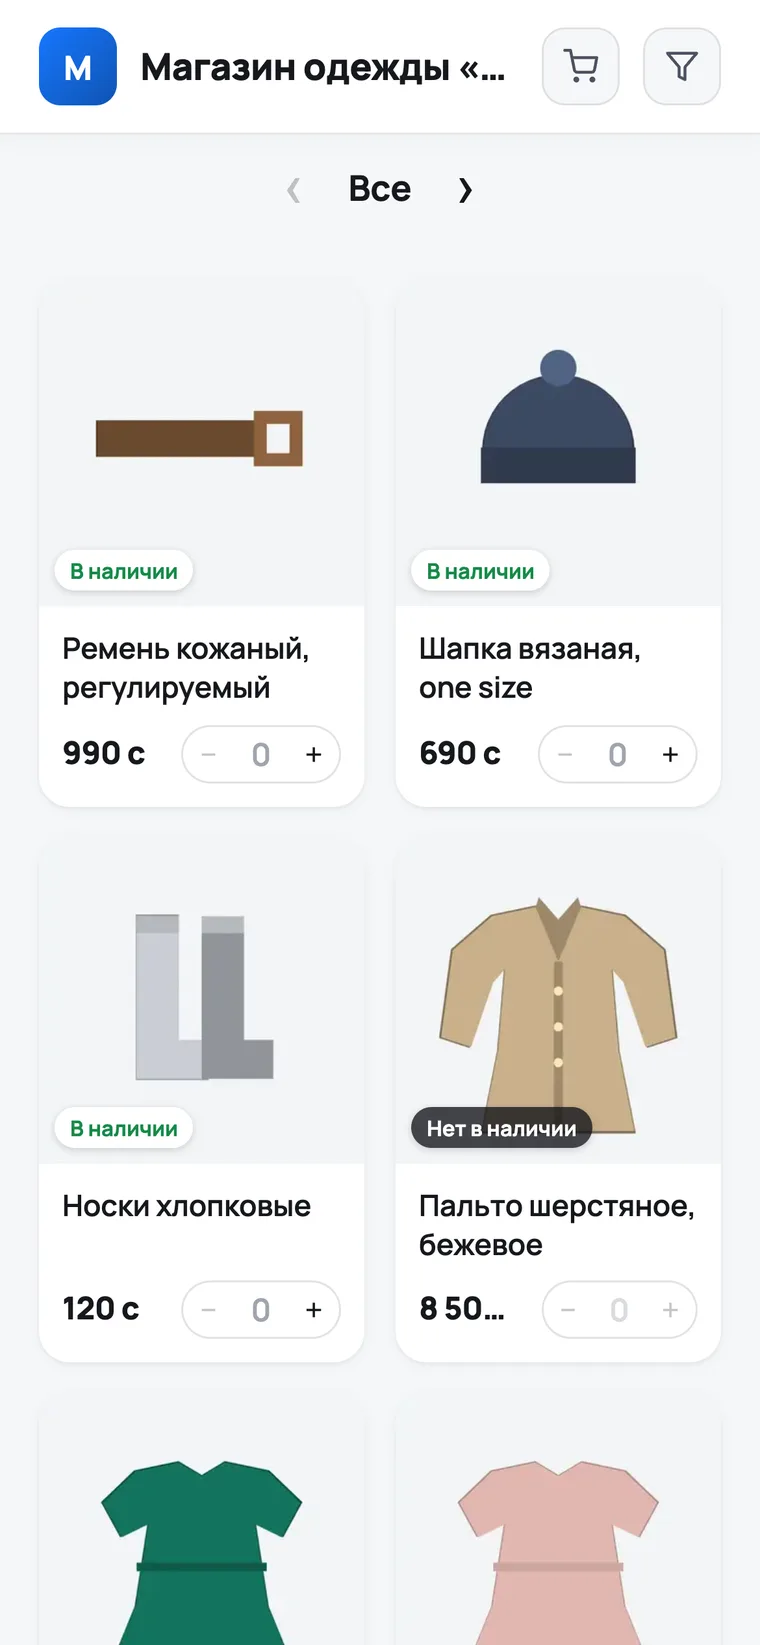
- 1Menu → Settings → Online catalogue — switch the window on and choose a short address for the shop.
- 2Tick the models to display. A photo is essential: without a picture nobody picks a garment on a shop window at all.
- 3A guest picks an item and leaves an order — it arrives in your Orders. They usually write the size in words in the comment, and that is fine: an order is taken by a person, not a machine.
The cabinet of a regular buyer
The shop window answers a passer-by. A regular customer needs something else: their own login, the history of their own purchases, their own balance and a notice when new stock arrives. That is the cabinet — the buyer installs the app, connects to your shop with a code, and from then on orders not as a guest.
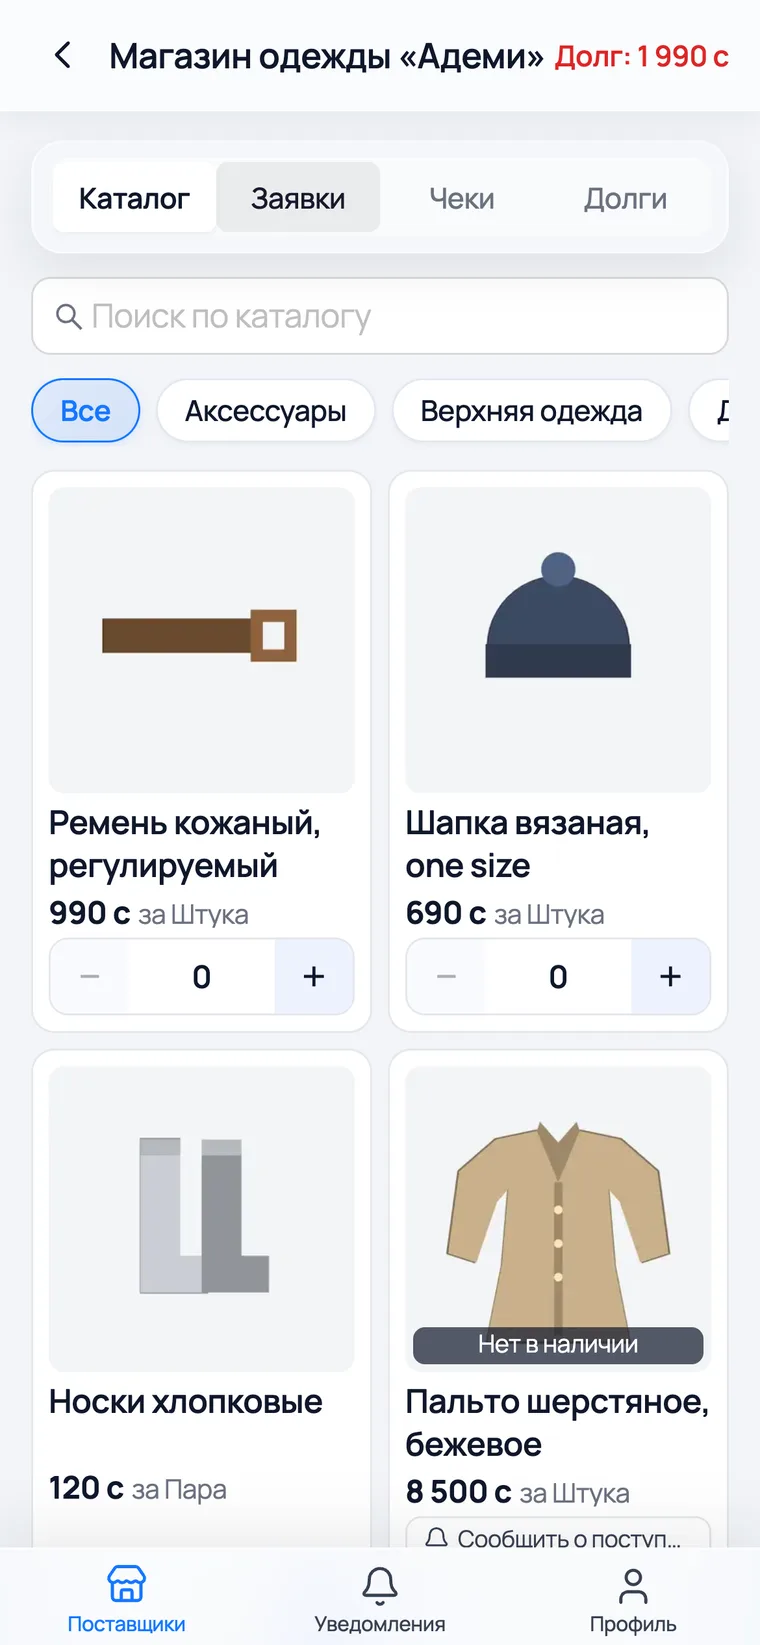
- 1Menu → Partners → Buyers — your shop's invitation code lives there. You send it to the customer.
- 2The buyer enters the code and sends a request — you accept it and link it to their customer card. From then on their orders arrive signed, and their purchases go into their history.
- 3A new model can be announced to connected buyers with the Notify customers button on the product card. For a clothing shop this works better than for anyone: "new dresses are in" is a reason to drop by.
Every day
The screens you will live in
Defects and losses
A lipstick mark after a fitting, a split seam, an item someone walked off with. These get written off, not "forgotten": unwritten-off damage sits in your stock, the salesperson promises it to a customer over the phone, and then hunts the whole floor for it.
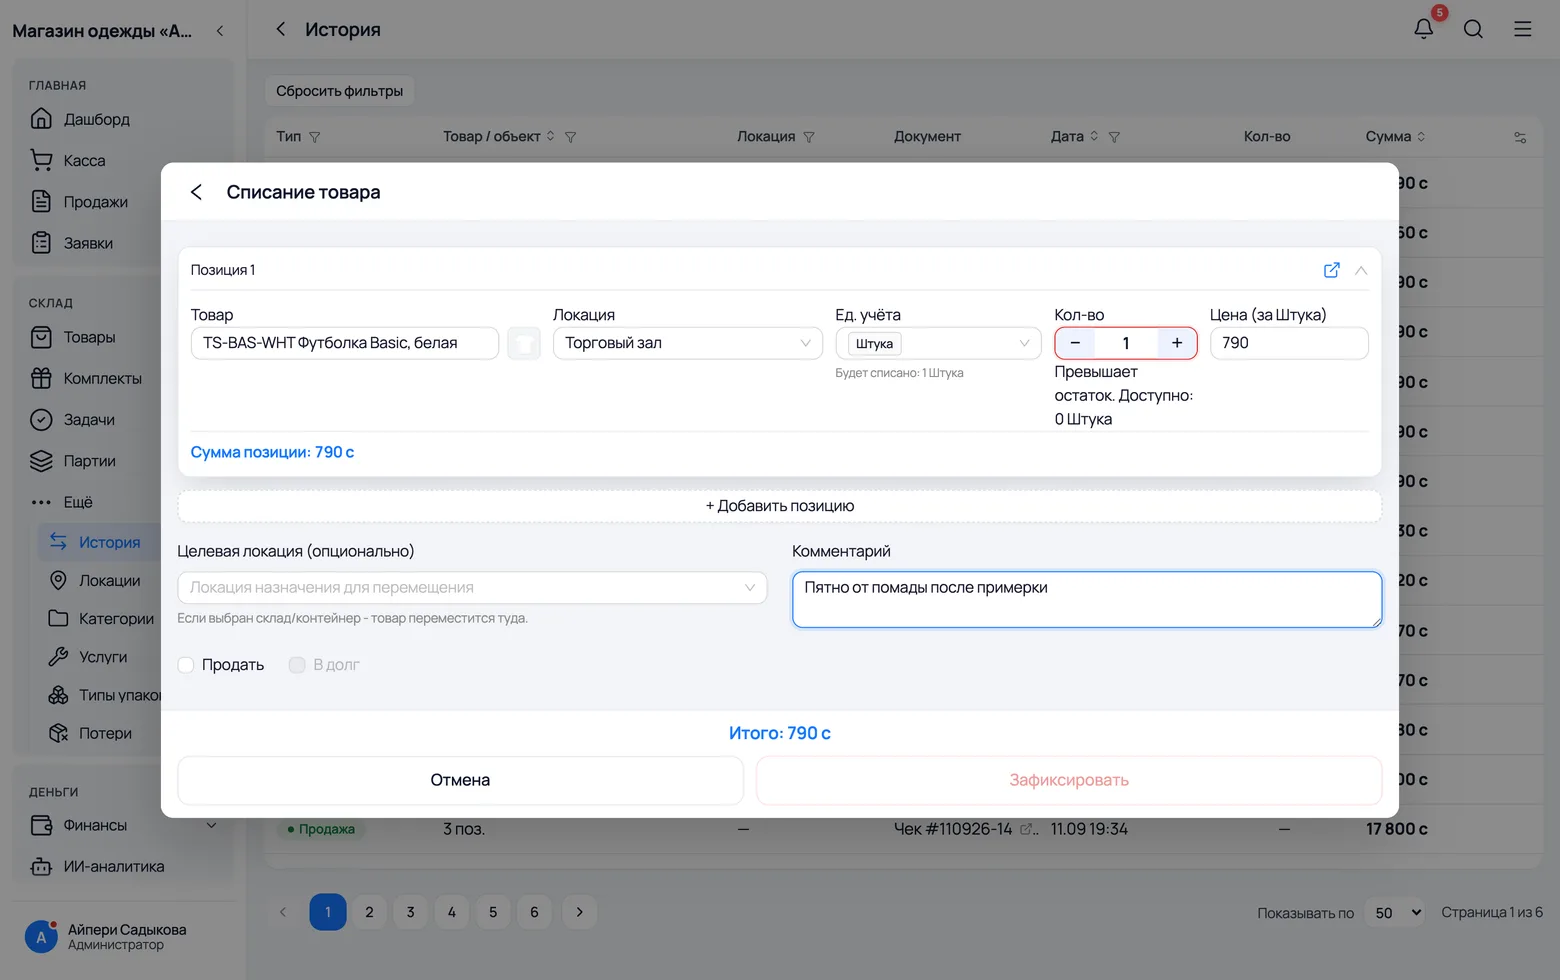
- 1History → Write-off (on a phone — + → Write-off).
- 2Pick the specific size and the location the item was in. Write the reason in words: a month later "1 pc written off" explains nothing, while "stain after a fitting" does.
- 3Record supplier defects under their own reason. By the next cargo you will have something concrete to back up a conversation about a discount.
Home: what happened today
The screen you look at every evening. Today's takings, how many receipts, what is running out, who sold how much. A clothing shop owner needs two numbers from here: how much sold today, and which sizes ran out — the second one decides what to order.
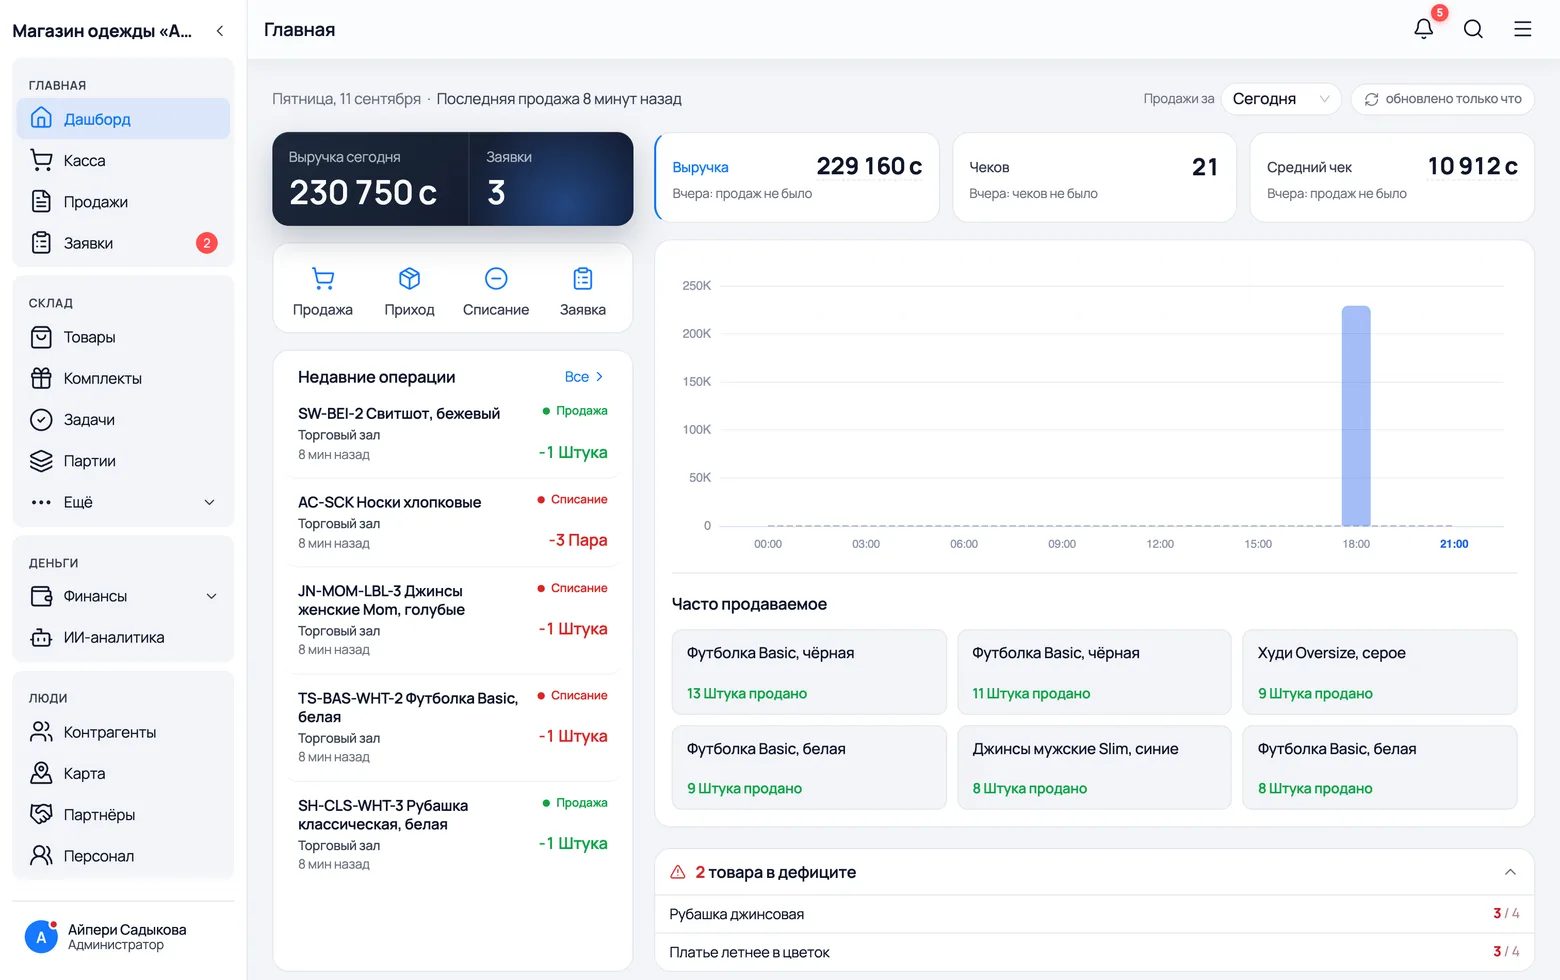
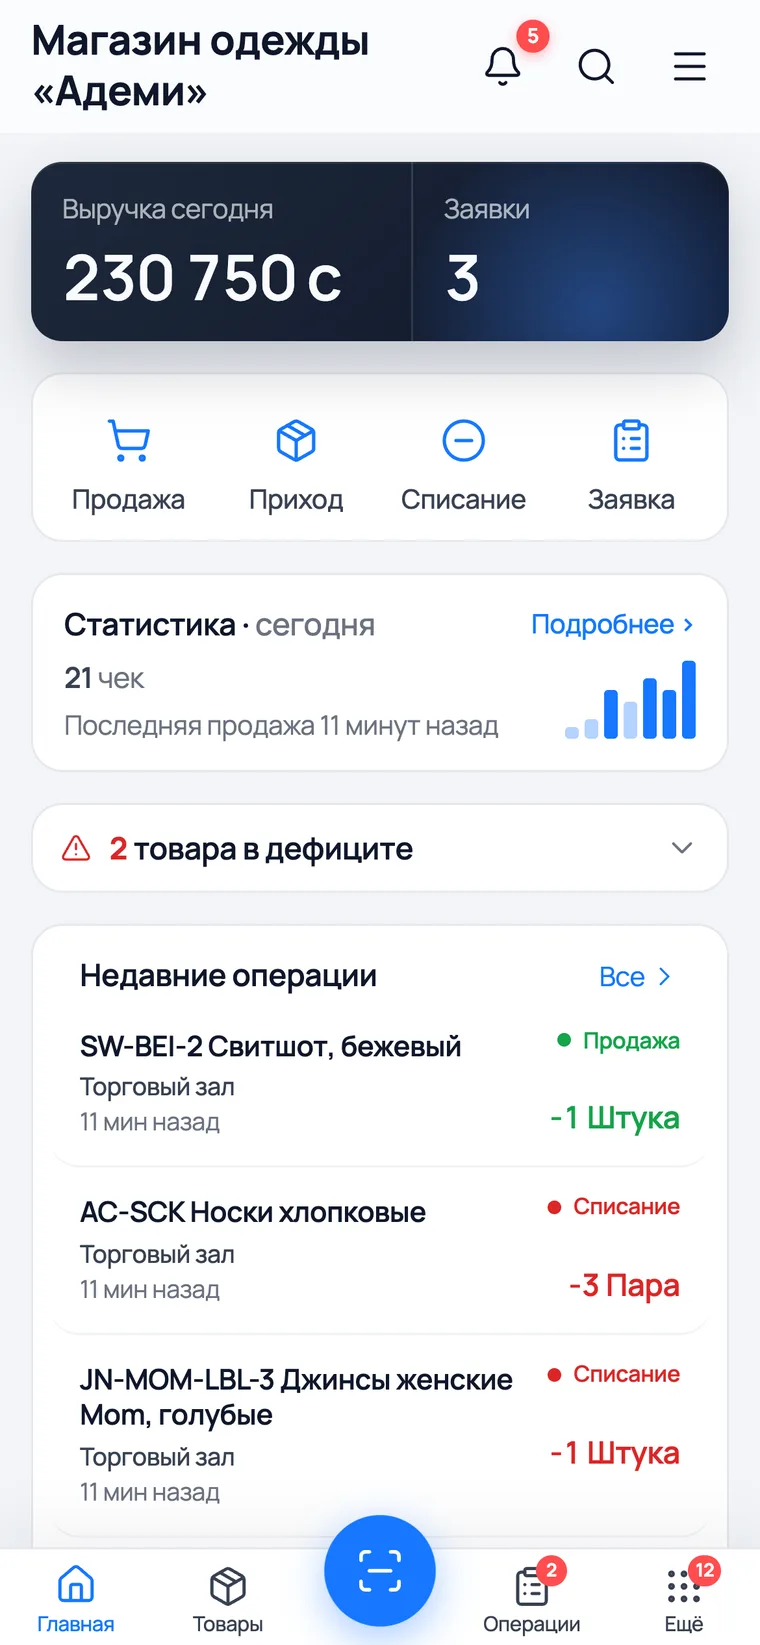
- 1The takings and receipts tiles count today. Tapping a tile expands it into a list — every receipt and who rang it up.
- 2Below the tiles sits the "running low" card: items with less left than their threshold. It counts the whole model, not an individual size — the "What to reorder" chapter covers that in detail.
- 3If you have several salespeople, this also shows who sold how much today — those numbers are what a sales percentage is calculated from.
The money at the end of the day
In the evening three things have to meet: the cash in the drawer, the card payments, and what was put on credit. The app splits them itself, because the payment method is fixed at the moment of sale — but you still have to count the drawer by hand, and there is a separate screen for that.
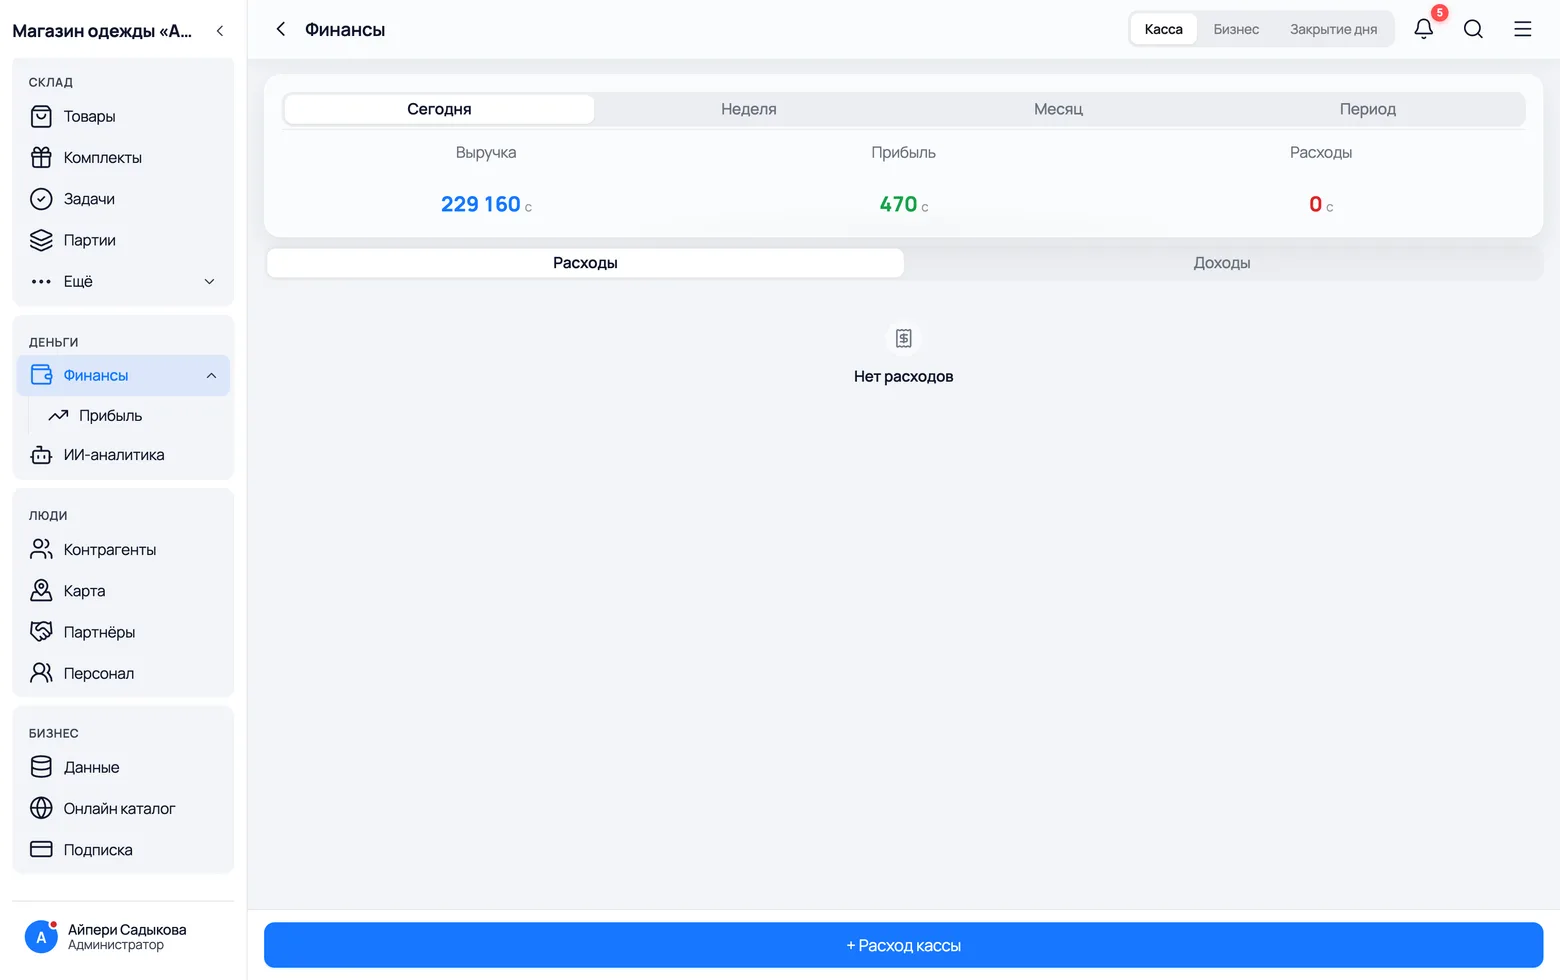
- 1Menu → Close the day — the till reconciliation: how much should be in cash, how much on card, how much went on credit.
- 2Menu → Finances — revenue, purchases, costs and profit for the period. Profit is calculated from the actual purchase price of the items sold, not an average: the same t-shirt from two different cargo runs has two different costs.
- 3Rent, wages and advertising go in here as separate costs — otherwise the profit in the report will be larger than the profit in your pocket.