The till: a shift at the counter, from the first scan to counting the money
The cashier sees two screens and nothing they do not need. We walk through building a sale with a scanner, taking over a helper's cart, showing the customer their own basket on a second monitor, and closing the day.
Setting up
Once, in order
Turn the Till section on
The till is a separate section of the app. A shop that does not need it switches it off, and then nobody has the menu item. So we start by making sure it is there.
 1
2
3
1
2
3
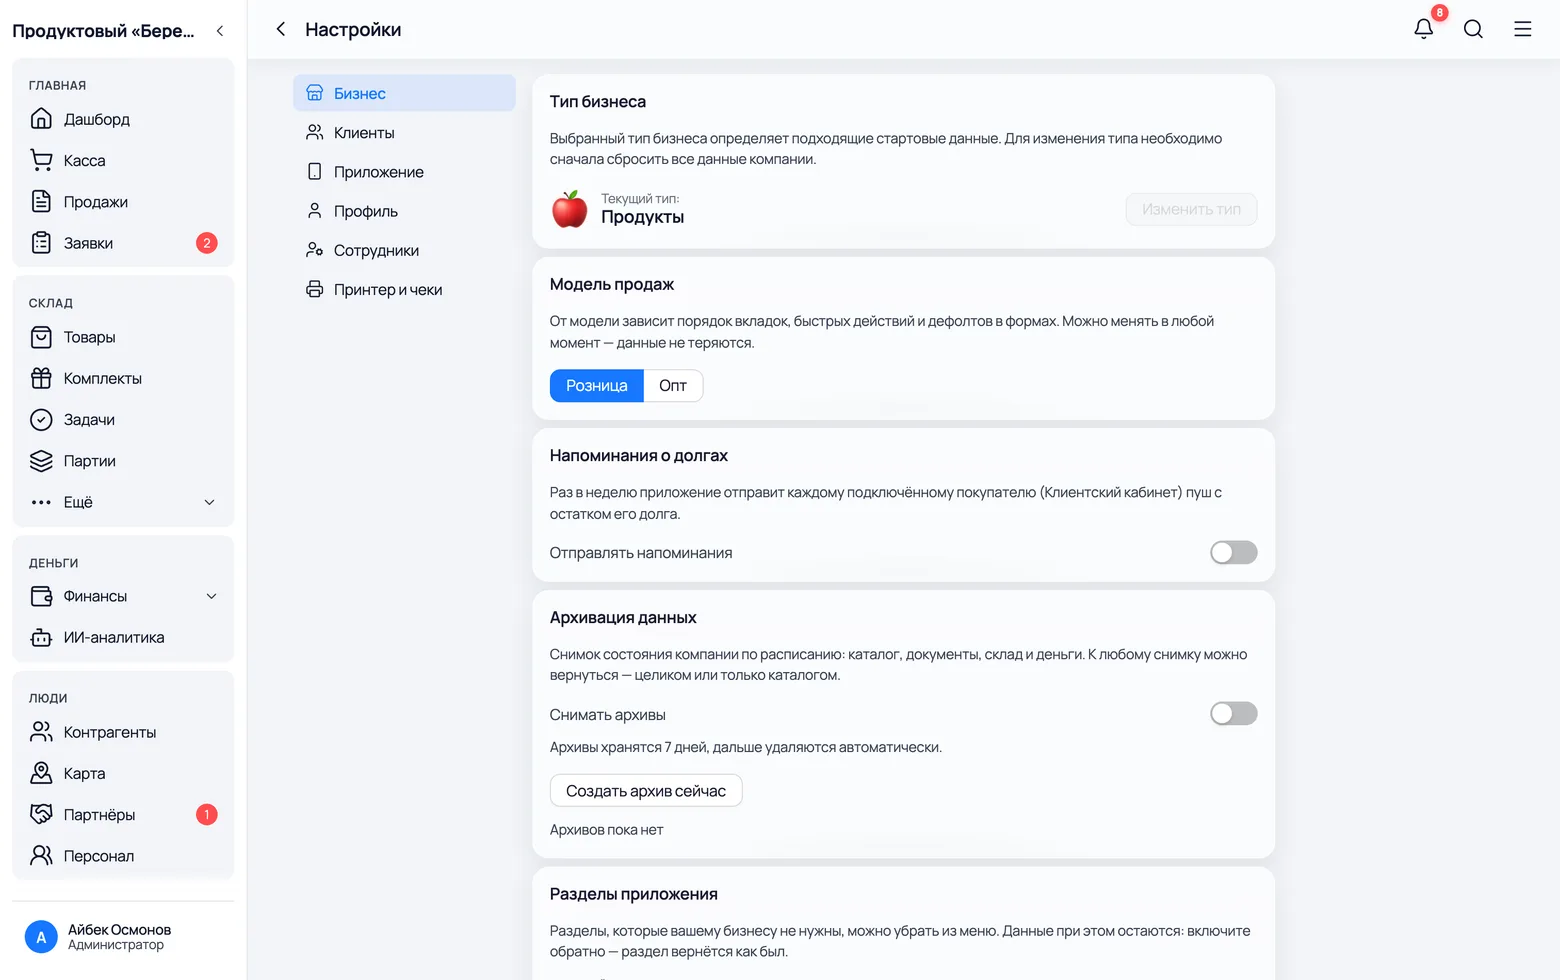
- 1Open Settings and go to the Business tab.
- 2Scroll down to the App sections card — it lists every section with a switch. Till must be on. The setting is company-wide: this is how the app looks for every employee at once.
- 3Check the menu on the left: the Till item should be there. That is the screen your cashier works on.
- Switching a section off deletes nothing: receipts, stock and settings all stay. Switch it back on and the section returns exactly as it was.
Create a cashier
Cashier is a role, not just another employee. Someone with it sees only the Till and Receipts: no stock, no purchase prices, no revenue, no finances. If an inspection turns up at the counter, there is nothing in the app for them to look at.
 1
2
3
4
5
6
1
2
3
4
5
6
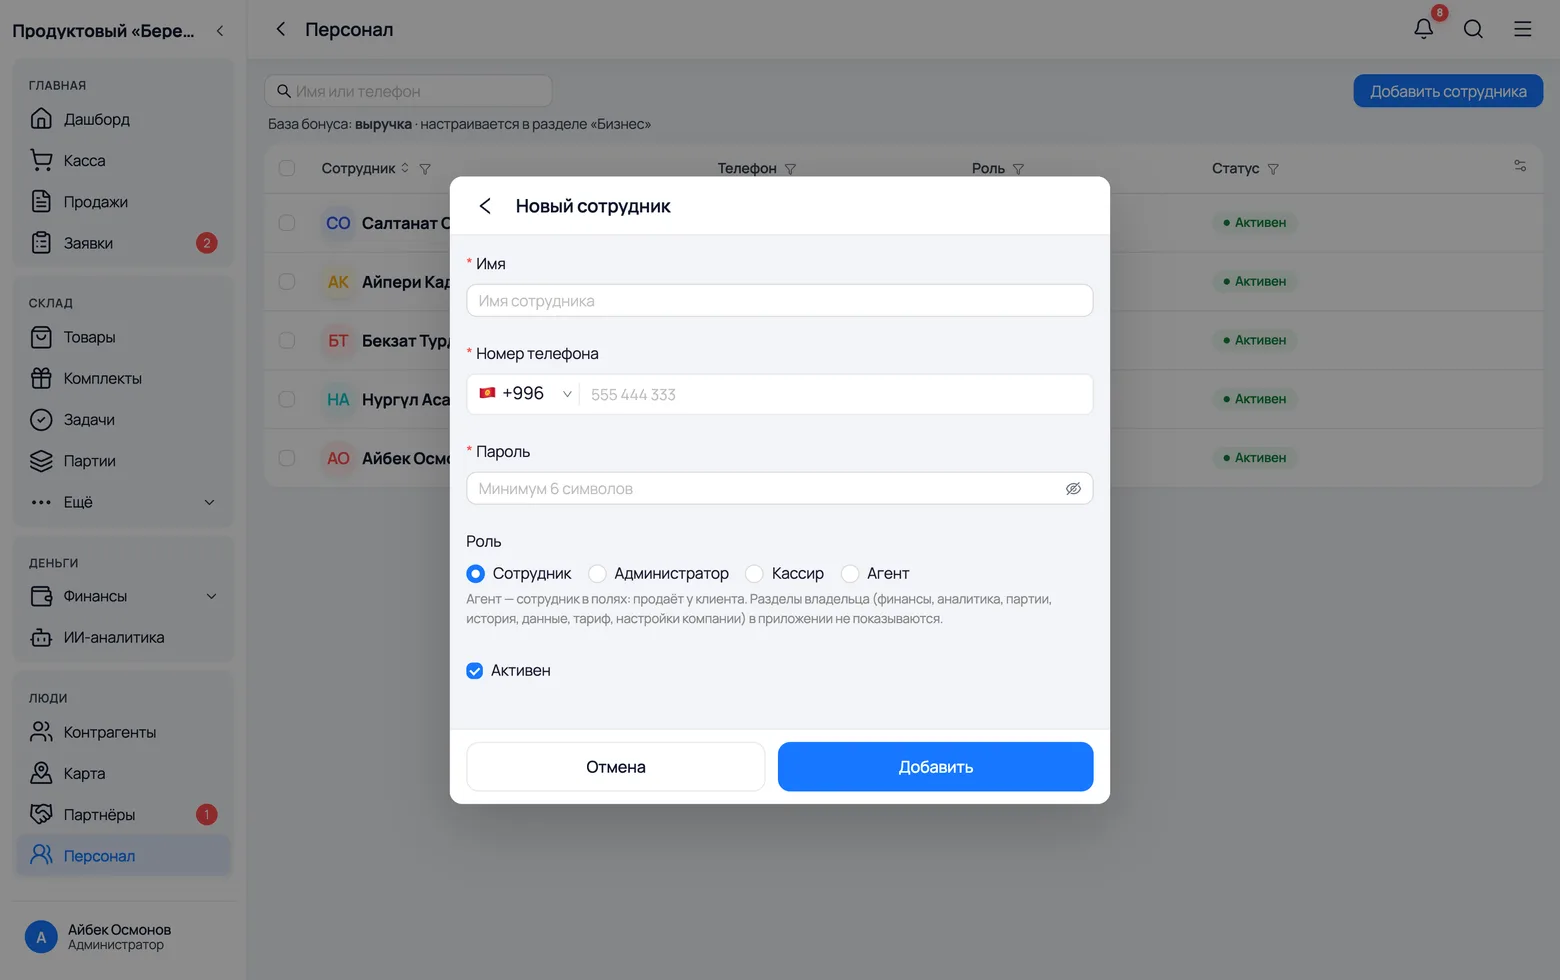
- 1Staff → Add employee.
- 2The name — whatever you call the person in the shop. It goes onto the receipt and into reports.
- 3Phone number: this is their login. The +996 code is already filled in, so enter only 9 digits.
- 4Password — at least 6 characters. Tell it to the person; you can change it at any time.
- 5Role — Cashier. The roles are mutually exclusive: a cashier cannot also be an administrator or a field agent.
- 6Add — the account is ready, and the person can sign in from their phone or from the computer at the counter.
- What a cashier does not have at all: Products, Batches, Finances, Counterparties, Tasks, Staff and company settings. A direct link to any of those simply bounces them back to the Till.
- What they can still do: ring up a sale, process a return, take a debt payment and create a new customer right inside the sale.
- A cashier cannot edit or delete a receipt that has already been rung up — only the owner can.
Connect the printer and fill in the receipt
Printing is done by the computer at the counter, while the shop's contact details are a company-wide setting: phone, address and link are printed at the end of every receipt.
 1
2
3
4
5
6
1
2
3
4
5
6
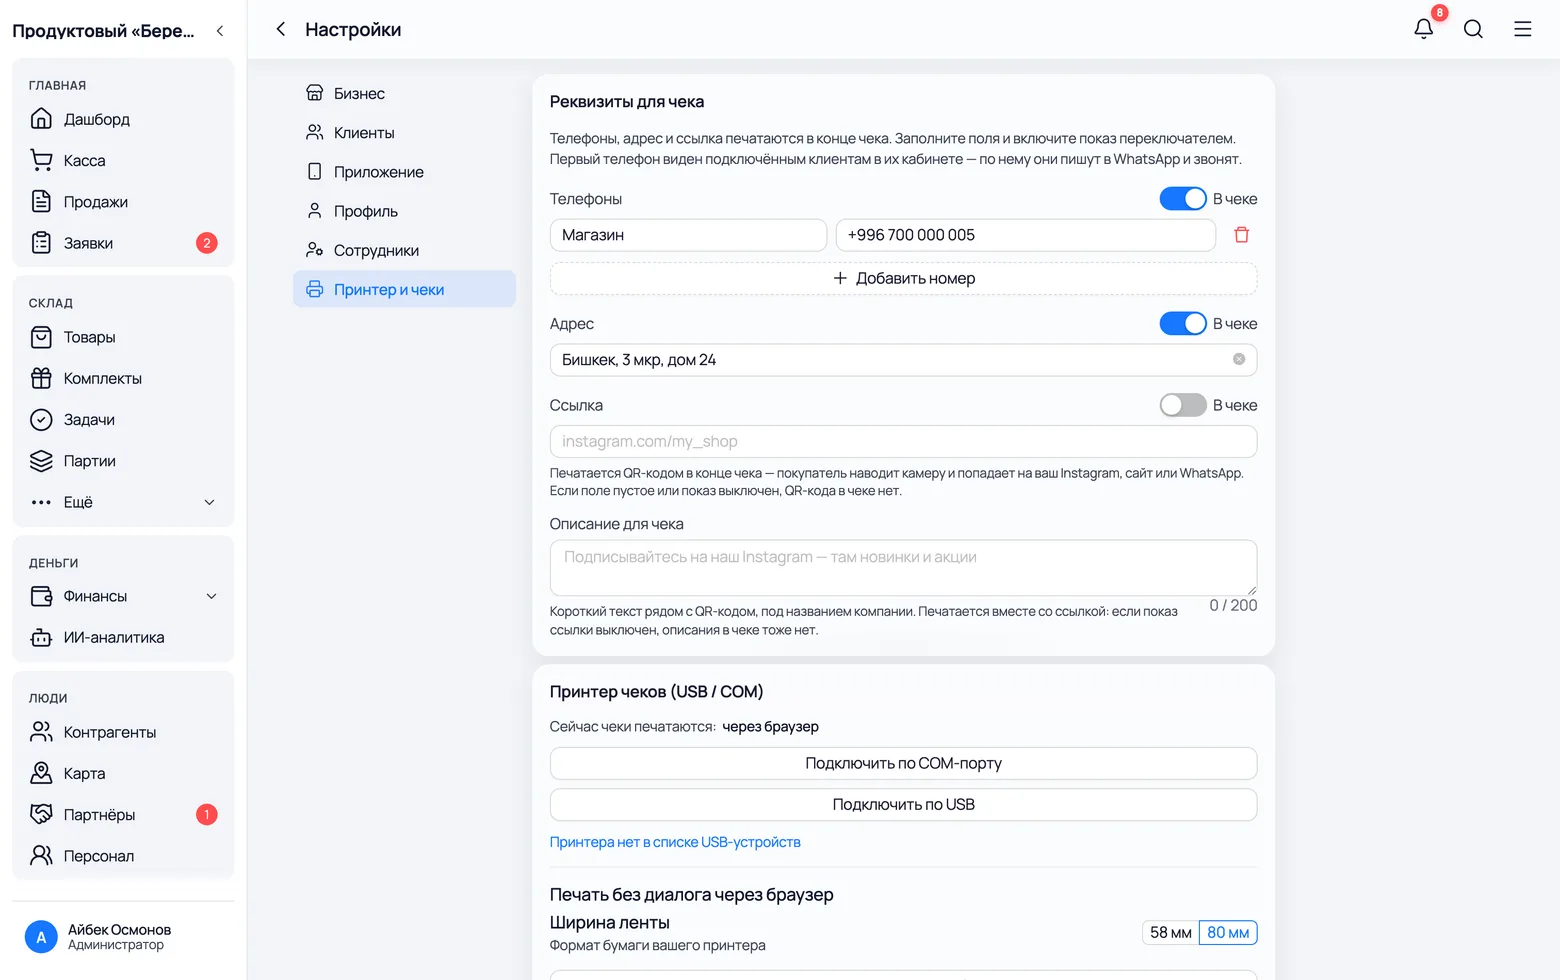
- 1Settings → the Printer and receipts tab.
- 2Receipt details: phone numbers, address and link. The On receipt switch next to each field decides whether it gets printed. The link comes out as a QR code at the end of the receipt.
- 3The line Receipts currently print tells you how a receipt reaches paper right now: straight to the printer, or through the browser's print dialog.
- 4Connect over USB — the browser asks for permission and lists the devices: pick your printer.
- 5An older printer connects by cable: Connect over a COM port. The port speed must match the one set in the printer itself.
- 6Paper width — 58 or 80 mm, whichever your printer takes. Get it wrong and the text runs off the edge.
- Further down the same page there is a Test print. Until a strip of paper with text comes out of the printer, the setup is not finished.
- A Bluetooth printer and a label printer are set up in the phone app — those cards do not appear on a computer.
- Direct printing means a receipt with no print dialog and no extra click. If the printer drops off, the app says so plainly and prints through the browser instead.
The customer display
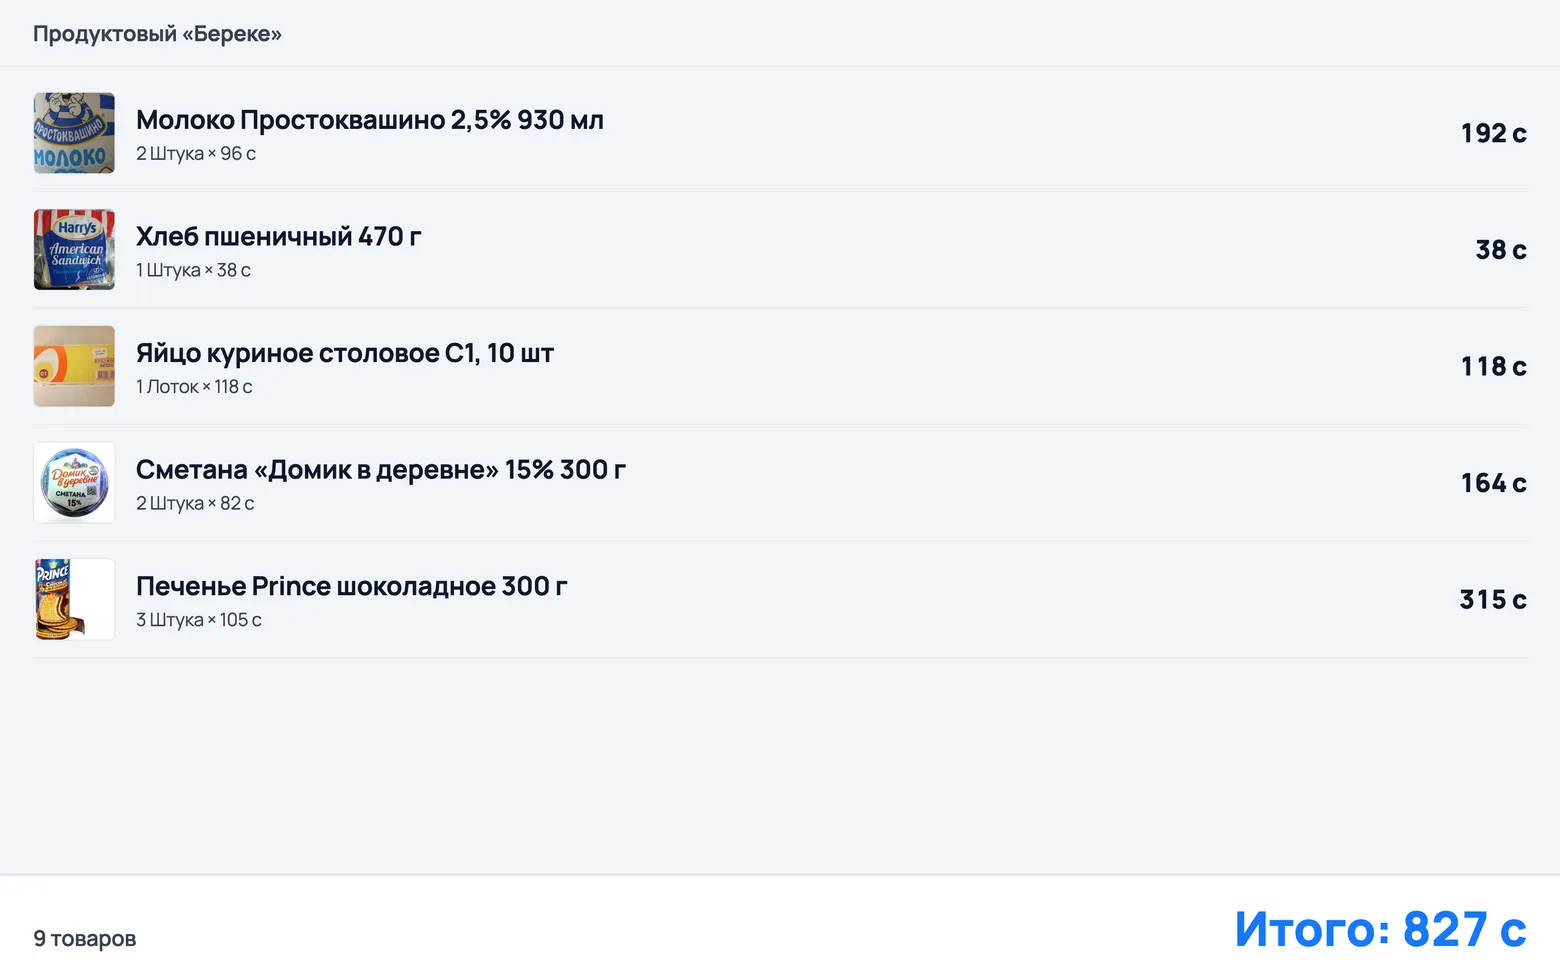
A second window you drag onto a monitor facing the customer. It shows their own basket: photos, prices and the total. Nothing from the cashier's side — no other people's carts, none of your figures.
 1
1
 2
3
2
3
- 1On the till press Customer display — a second window opens. Drag it onto the monitor facing the customer and make it full screen.
- 2Each line shows the product photo, its name, «2 pcs × 96 KGS» and the line total on the right. It all updates live: scan an item and it appears, change the quantity and the sum recalculates.
- 3At the bottom — how many items in total, and the Total. In the screenshot: 9 items for 827 KGS.
- The customer sees only your basket. Other employees' carts, staff bonuses and the shop's takings never appear there.
- The moment you press Sell, the window says «Thank you for your purchase!», shows the total and returns to the welcome screen a few seconds later.
- The window runs on the same sign-in as the till. Log out in the main window and the customer display goes blank; sign in again and reopen it with the button.
At the counter
What you do all day
The Till screen: what is where
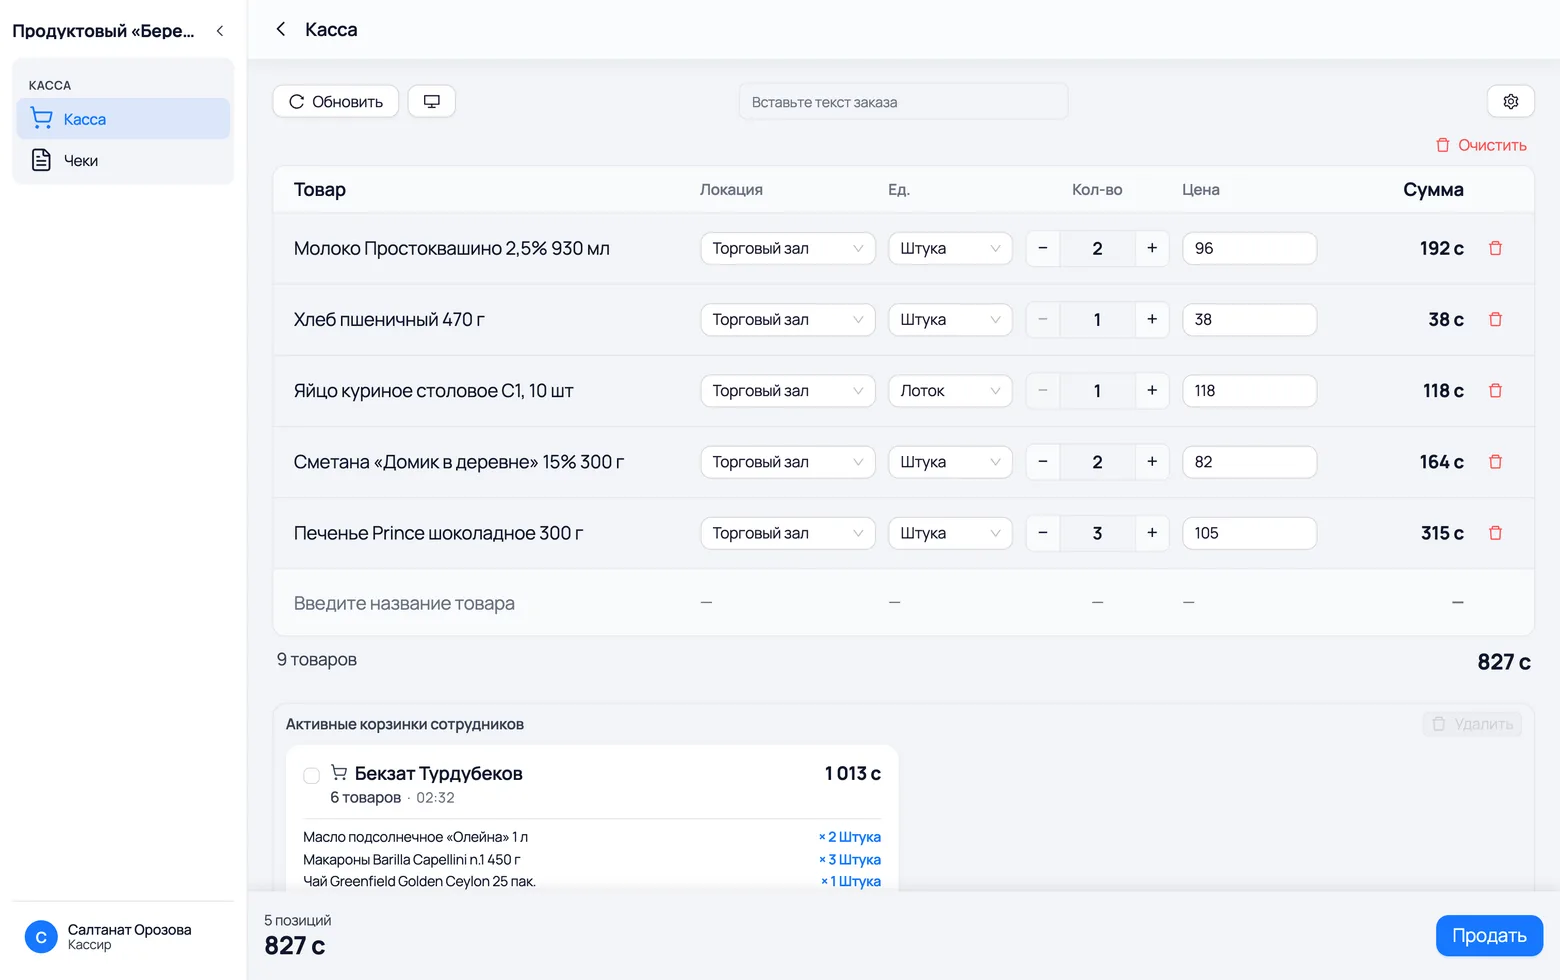
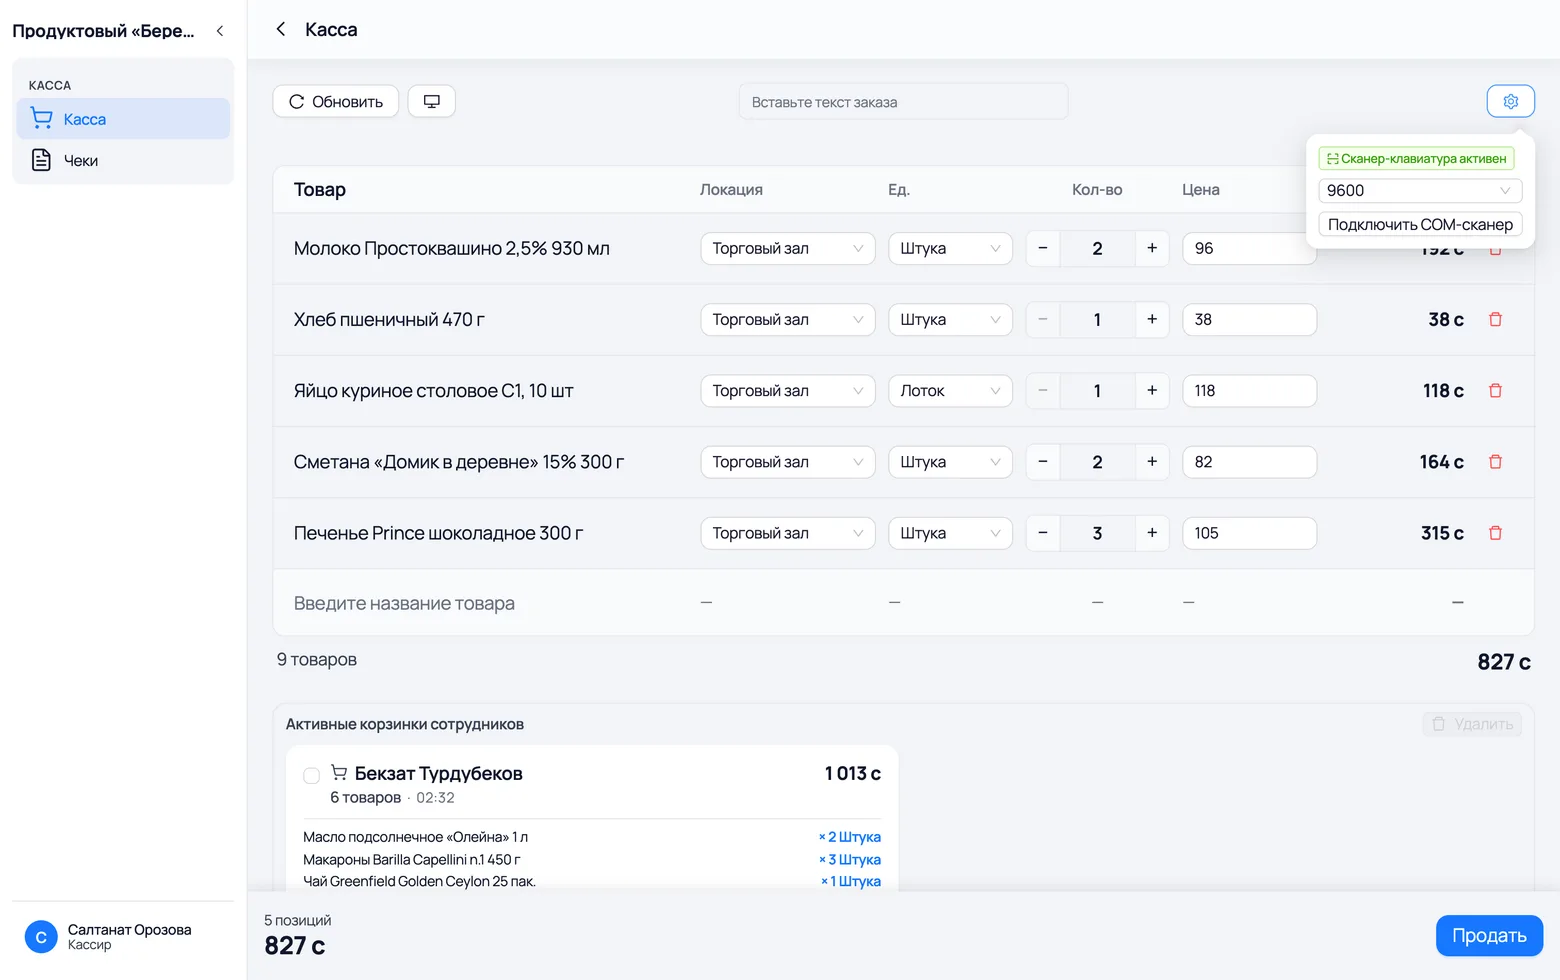
A cashier's whole day happens on one screen. Utility buttons at the top, the basket you are ringing up in the middle, the helpers' carts below it, and the total with one big button at the bottom.
1
2
3
4
5
- 1Just two items on the left — Till and Receipts. Nothing else opens for a cashier, and that is fine: everything a shift needs is right here.
- 2The middle is your basket: product, location, unit, quantity, price and line total. The empty row at the bottom, Enter a product name, adds an item by hand.
- 3Clear wipes the whole basket. Useful when the customer changes their mind right at the counter.
- 4Active employee carts — what the helpers on the floor are scanning right now. You can see whose cart it is, how many items are in it, when they last scanned and for how much.
- 5At the bottom — the number of lines, the total and Sell. The button shows up as soon as there is anything in the basket.
- The bottom left always shows who is signed in: name and role. Check it at the start of a shift — the receipt is issued by whoever is logged in.
- The basket lives on the server, not in the browser: reload the page or move to another computer and everything you scanned is still there.
- An abandoned cart disappears on its own after about two hours without a single scan.
How a product gets into the basket
The main way is the scanner. But the till does not force you to scan: the same product can be found by name and adjusted by hand.
 1
2
3
4
5
1
2
3
4
5
- 1An ordinary USB scanner works straight away, with no setup: plug it in and scan. The Scanner settings cog is only there so you can check that.
- 2A scanner with an older connector is attached with Connect a COM scanner under the same cog.
- 3No barcode, or it will not read — type into the Enter a product name row and pick the product from the suggestions.
- 4The quantity is edited right there: − and +, or type a number. The price in the row can be edited too — for a marked-down item, say.
- 5The bin icon at the end of the row removes anything you do not need.
- Scanning the same product twice does not create a second line — the quantity on the first one goes up.
- If the barcode belongs to a category rather than one specific product, the app asks which product from it you mean.
Ring up the sale
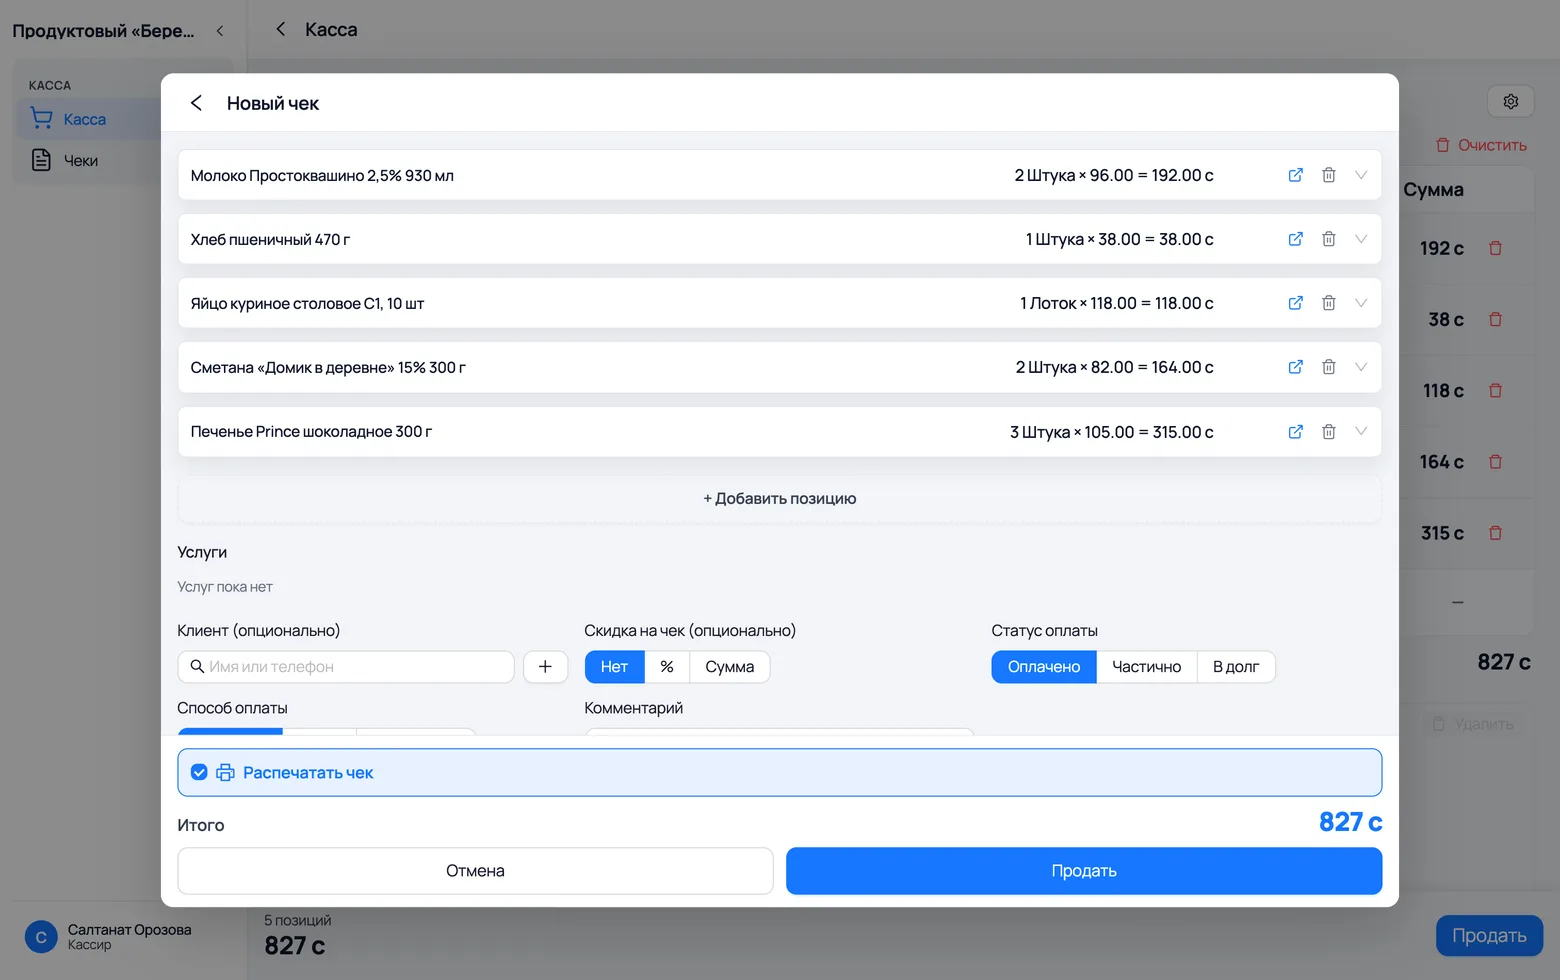
Once the basket is full there is a single window, «New receipt». It only decides the money side: who it is for, discount or not, how they pay and whether to print.
 1
2
3
4
5
6
7
1
2
3
4
5
6
7
- 1Press Sell at the bottom of the screen — «New receipt» opens with the items already in it.
- 2Customer — only when you need one: for credit, for purchase history, for bonuses. For plain retail the field is left empty.
- 3Discount on the sale — as a percentage or an amount. «None» means no discount.
- 4Payment status: Paid, Partial or On credit. Choose Partial and a field appears for how much they are paying now.
- 5Payment method: cash, card or mixed. This is exactly what the end-of-day reconciliation is built on.
- 6Print receipt is ticked in advance — the receipt goes to the printer right after the sale, with no need to open its card.
- 7Sell — the sale is posted, stock is written off, the basket is cleared and the till is ready for the next customer.
- There is no paste field and no microphone in this window: the list is already in the basket. The paste field lives at the top of the Till screen.
- The total at the bottom already includes the discount — 827 KGS in the screenshot.
Receipts: find, reprint, refund
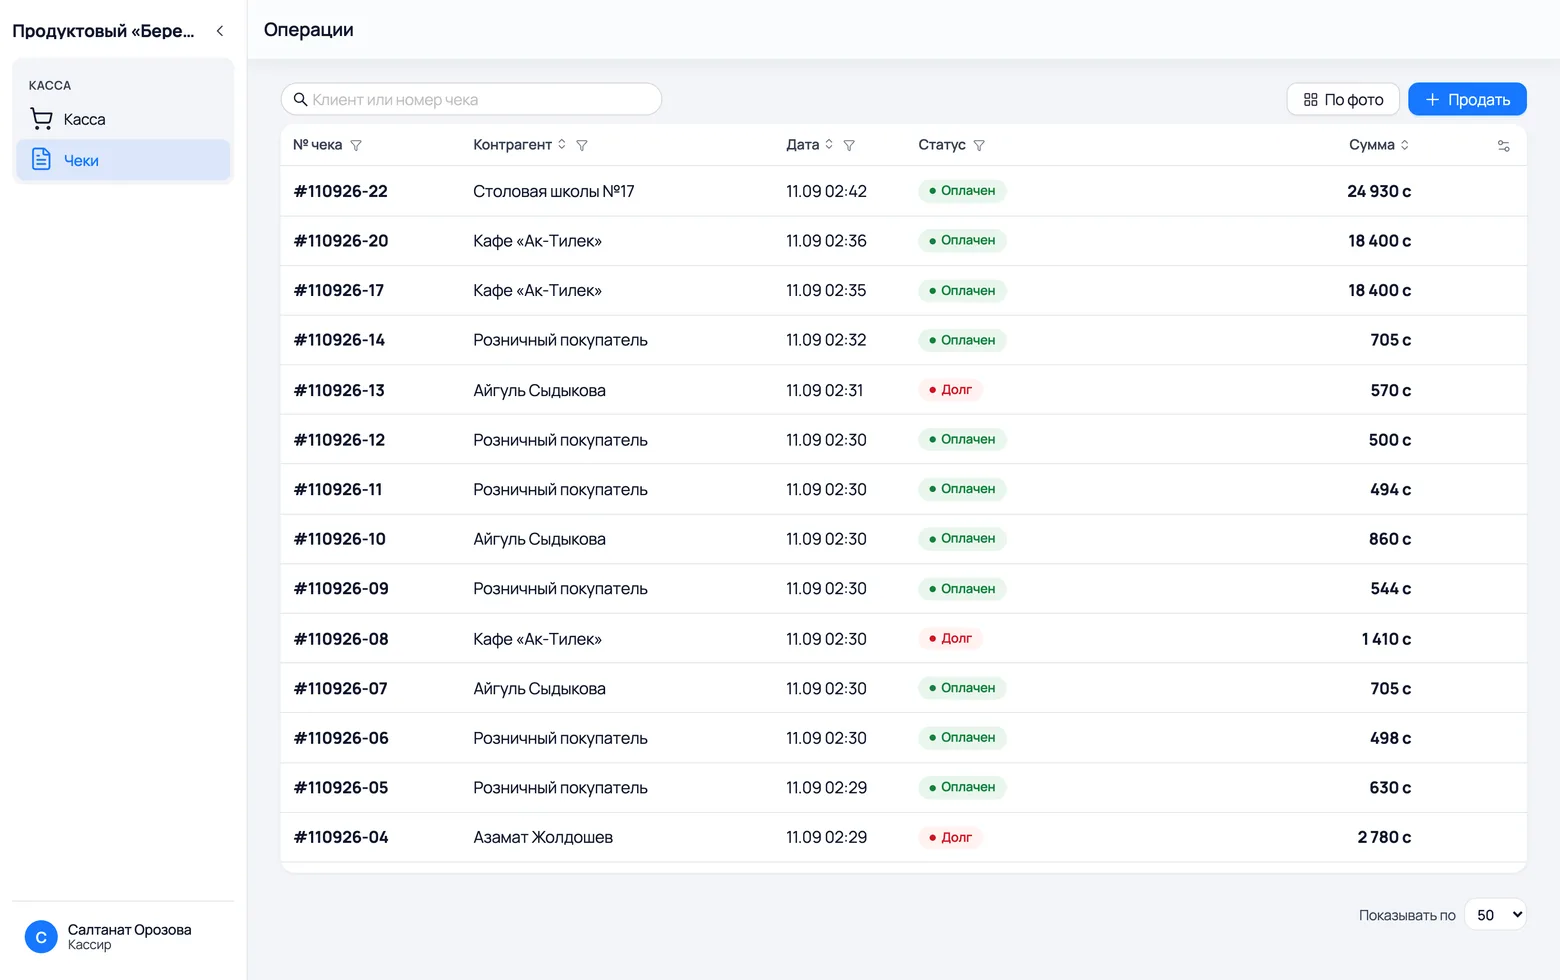
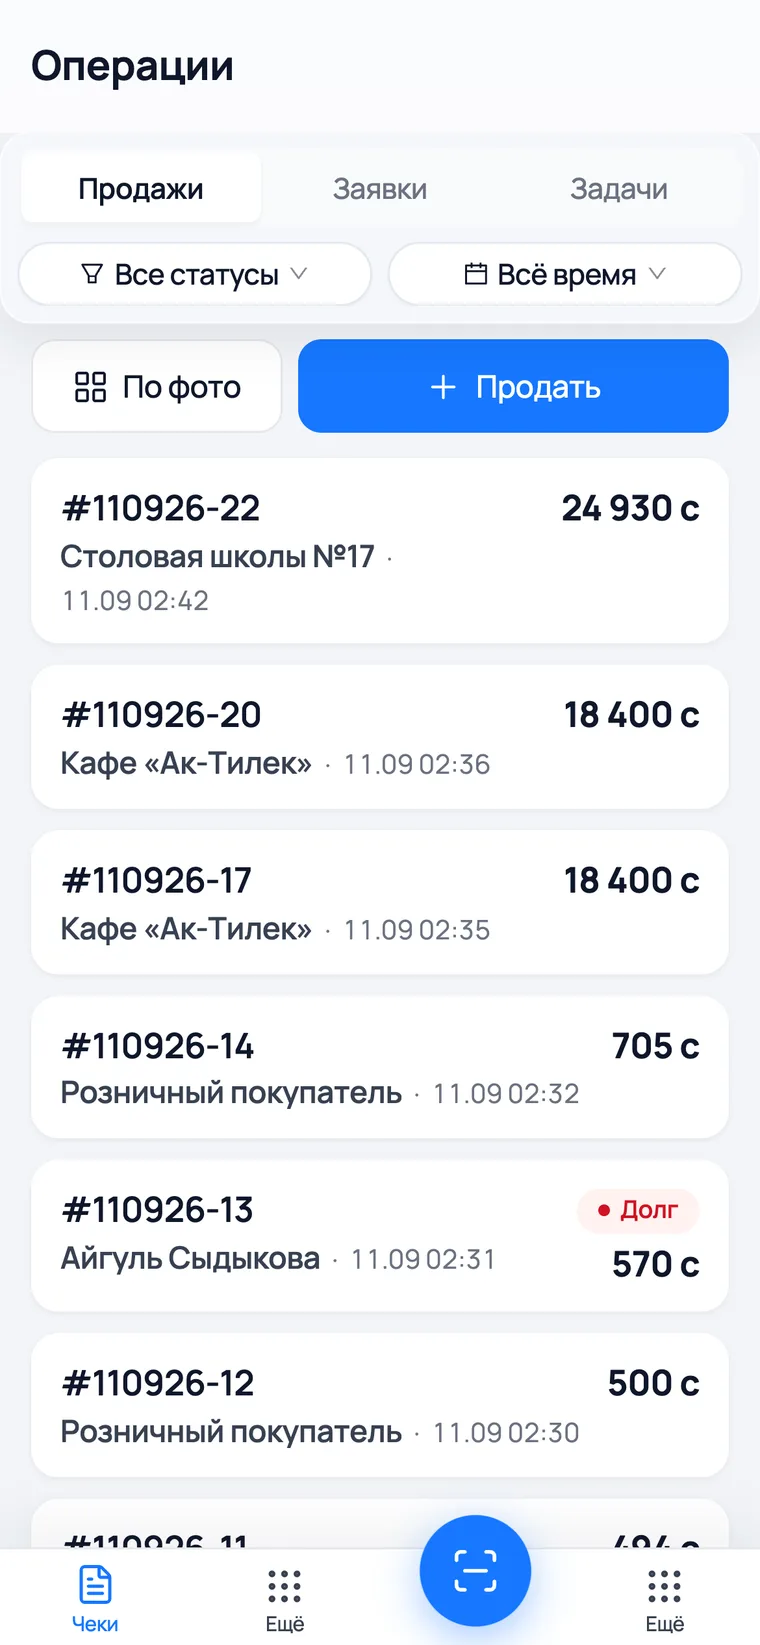
The cashier's second and last screen. Every sale of the shift is here: this is where you find a receipt, print it again and process a refund.
 1
2
3
4
5
1
2
3
4
5
 6
6
- 1Receipts on the left. It is the same list the owner sees, just without the editing buttons.
- 2Search works on the receipt number and the customer's name — you do not have to type the whole thing.
- 3The Status column shows at a glance how the sale ended: «Paid» or «Debt».
- 4The printer icon in the row prints the receipt again — for the customer who comes back for it an hour later.
- 5Sell opens the same «New receipt» but with an empty list — handy for a customer with one item and nothing to scan.
- 6It is the same on a phone: the All statuses and All time filters at the top, receipts as cards below.
- A refund is made inside the receipt: tap the row and choose the refund in the card that opens.
- A cashier can take a debt payment, but cannot edit the debt amount by hand.
- A cashier cannot edit or delete a receipt once it is rung up — those buttons do not exist for them. Made a mistake? Refund it and ring it up again.
When there is a queue
Ways to keep the line moving
The helper picks, the cashier rings up
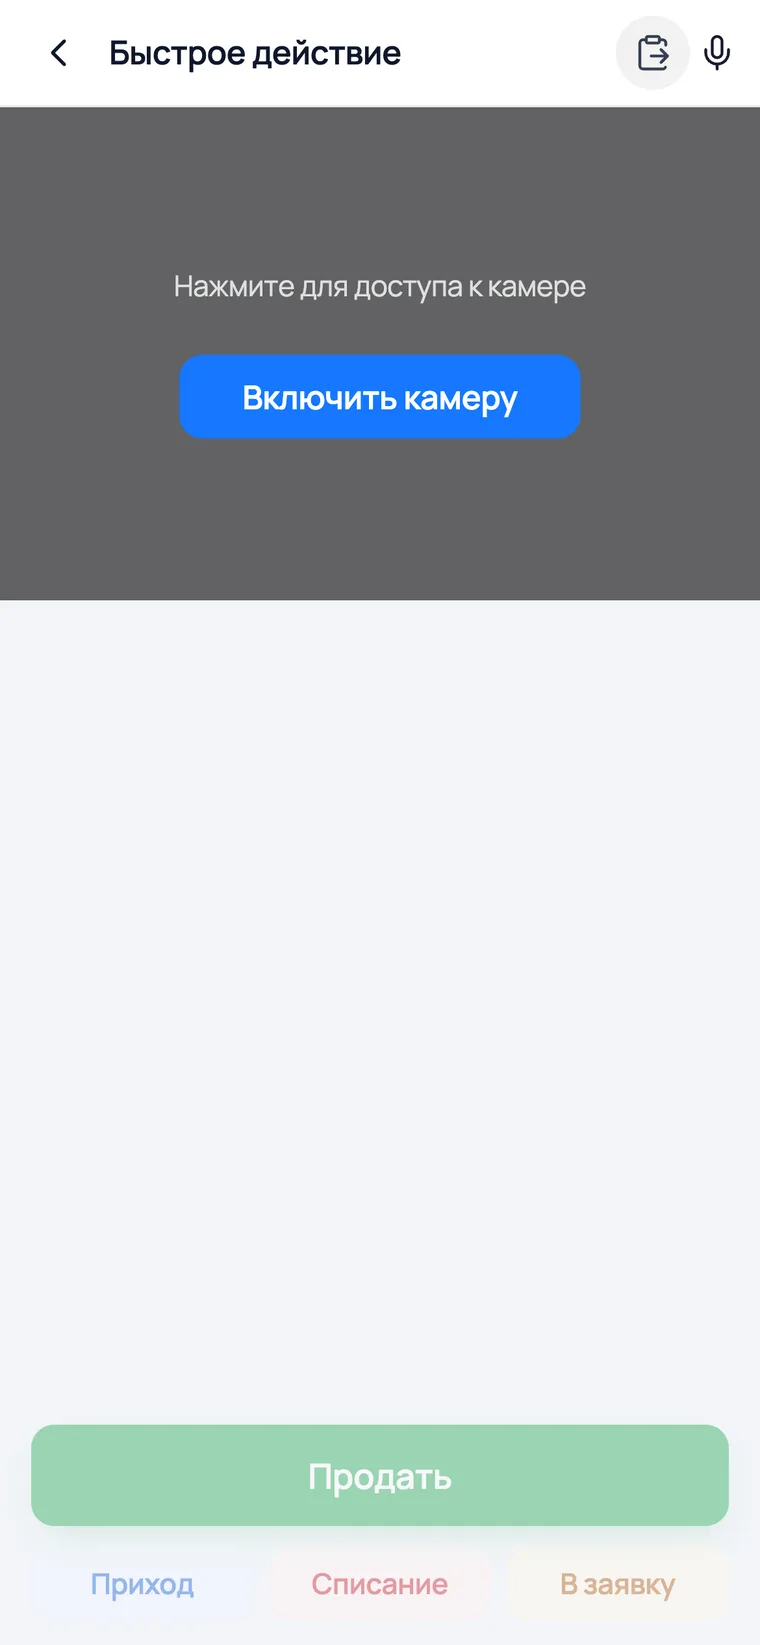
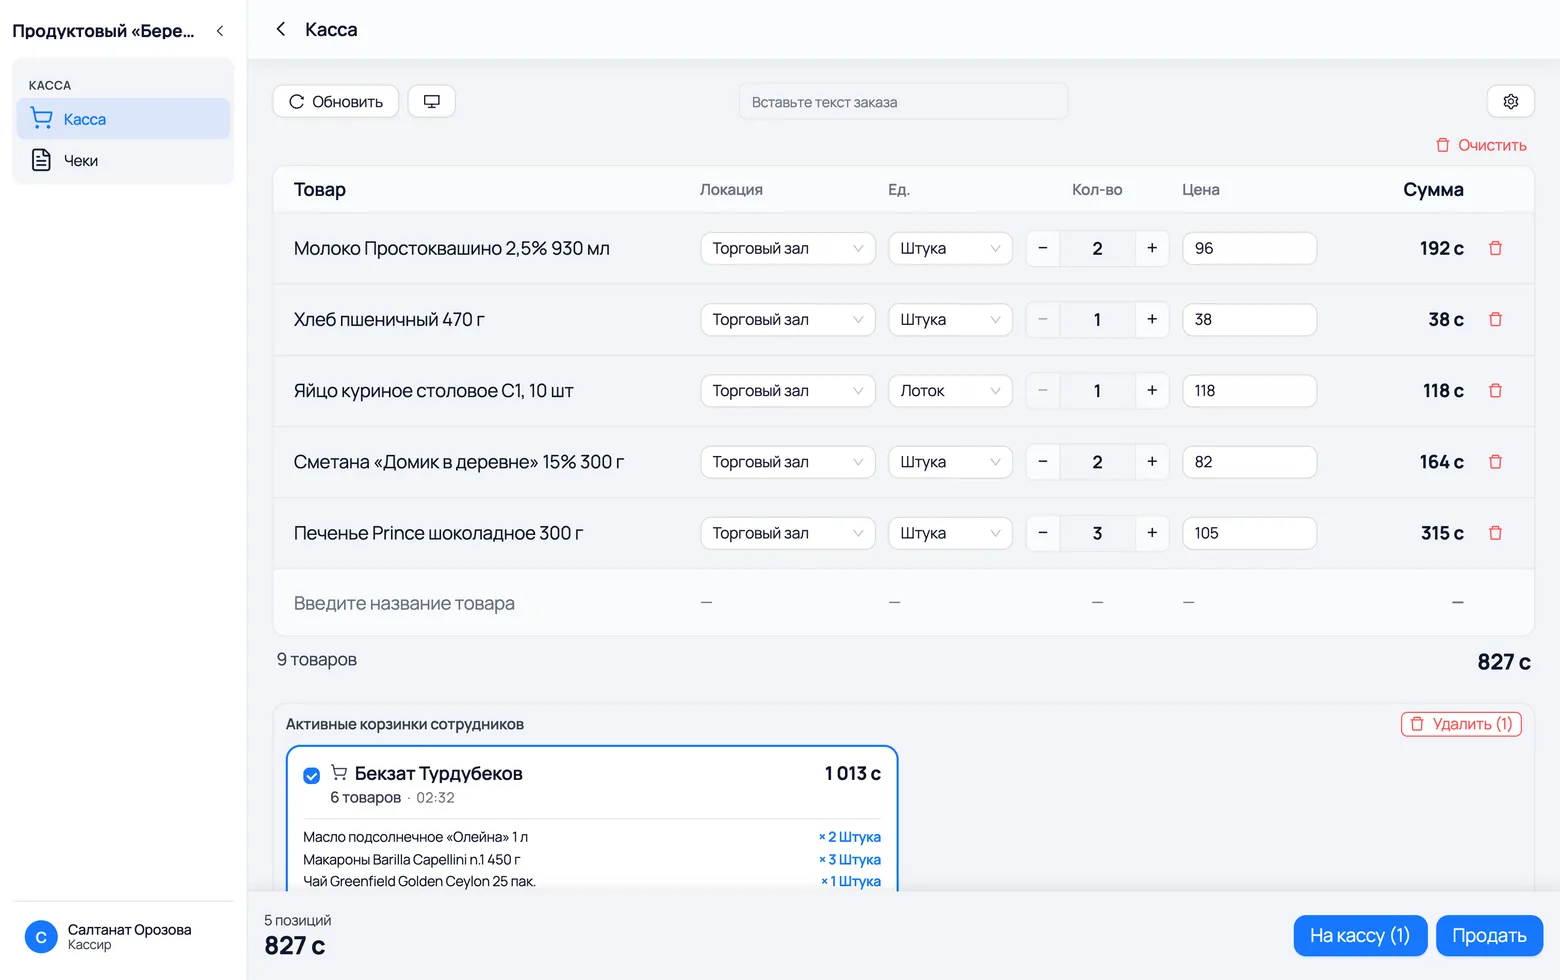
At the busiest hour one person walks the floor with a phone and scans, while the cashier just takes over the cart and the money. The helper's cart reaches the till by itself — nothing needs to be sent.
 1
2
1
2
 3
4
5
3
4
5
- 1The helper opens Quick action on the phone and presses Turn on camera — then just points it at barcodes.
- 2They can also finish the sale themselves with Sell at the bottom. But if there is a queue at the till, scanning and moving on to the next customer is enough.
- 3On the cashier's side it turns up under Active employee carts: whose cart, how many items, the time of the last scan and the amount.
- 4Tap the card to select it and press To the till — the lines move into your basket and merge with whatever is already there.
- 5Picked for nothing, or the helper used the wrong cart — Delete removes it entirely.
- Each employee has exactly one live cart — they cannot open a second one.
- Until the helper's cart is taken over at the till, the goods in it are not reserved: anyone else can still sell them.
When there is no time to scan
The customer sent a list in a chat, or the product has no barcode, and the queue is waiting. There are two ways to build a sale without touching the scanner.
1
3
- 1The Paste the order text field at the top of the till: drop the list from the chat straight into it. The app breaks the lines down into products and quantities and puts them in the basket.
- 2Lines where the app did not recognise your product are not dropped in silence: they appear as a separate list under the table, and you can pick the product by hand.
- 3The second way is By photo: a grid of picture cards instead of searching by name. Useful where staff know the product by sight but struggle to recall its name.
- Parsing text is a metered paid service: a few dozen parses a month are included in the plan, beyond that you top it up. Ordinary scanning and searching by name cost nothing.
- Voice input exists in the app, but it does not work for a cashier: the role will not let the recording through for transcription. The owner or a regular salesperson can dictate a list with the microphone button on a phone.
End of the day
Counting the money
Closing the day
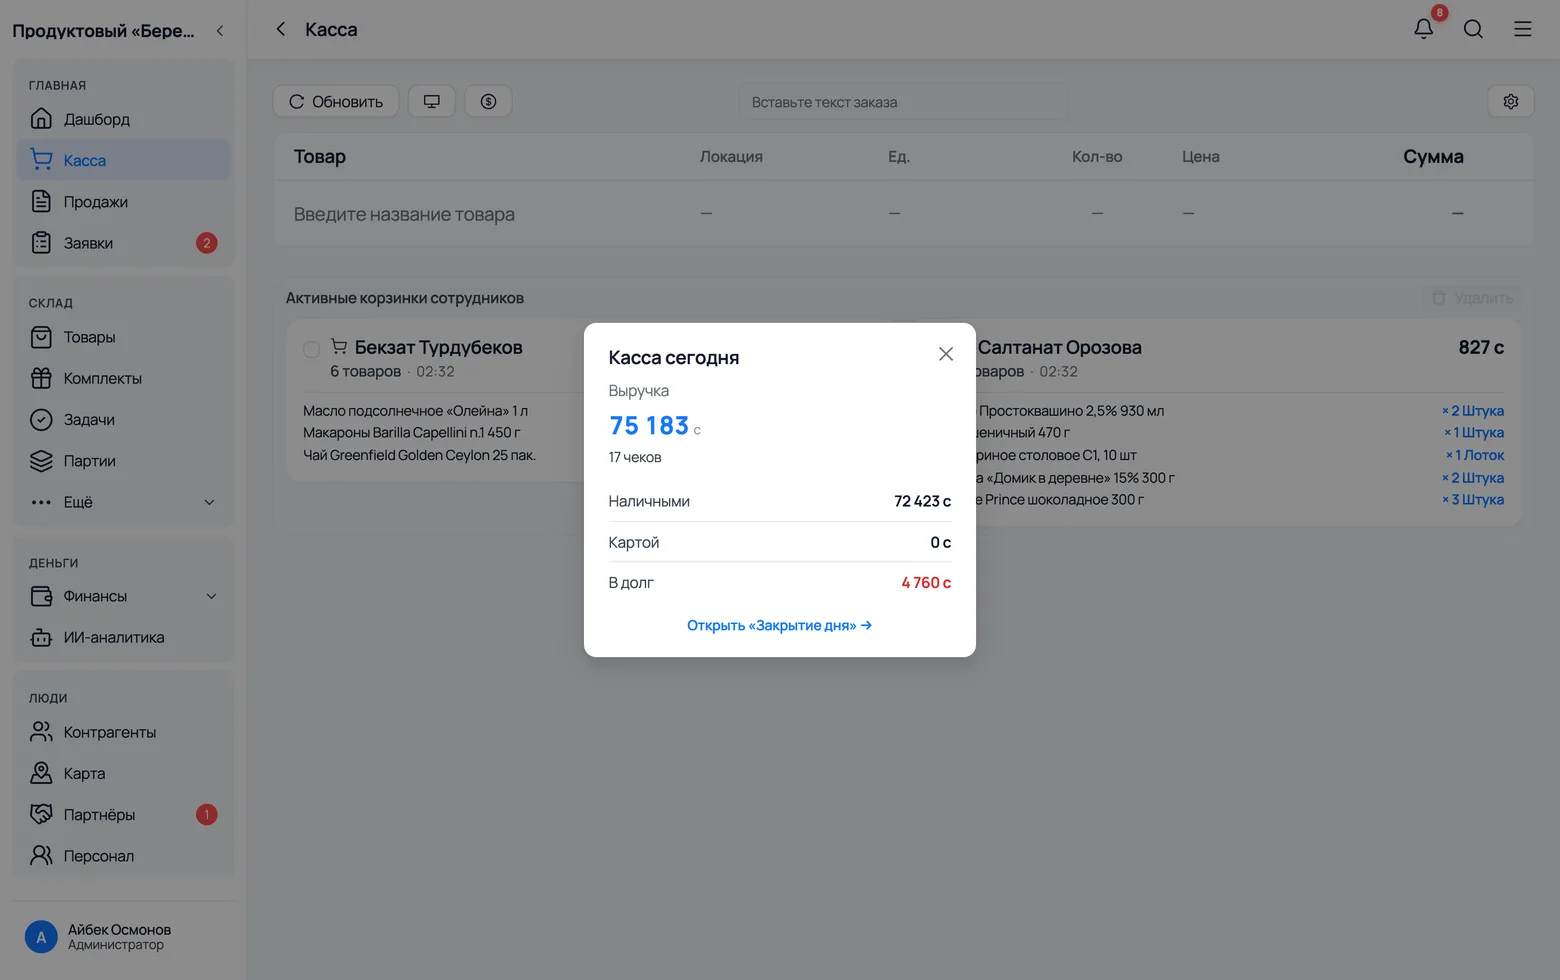
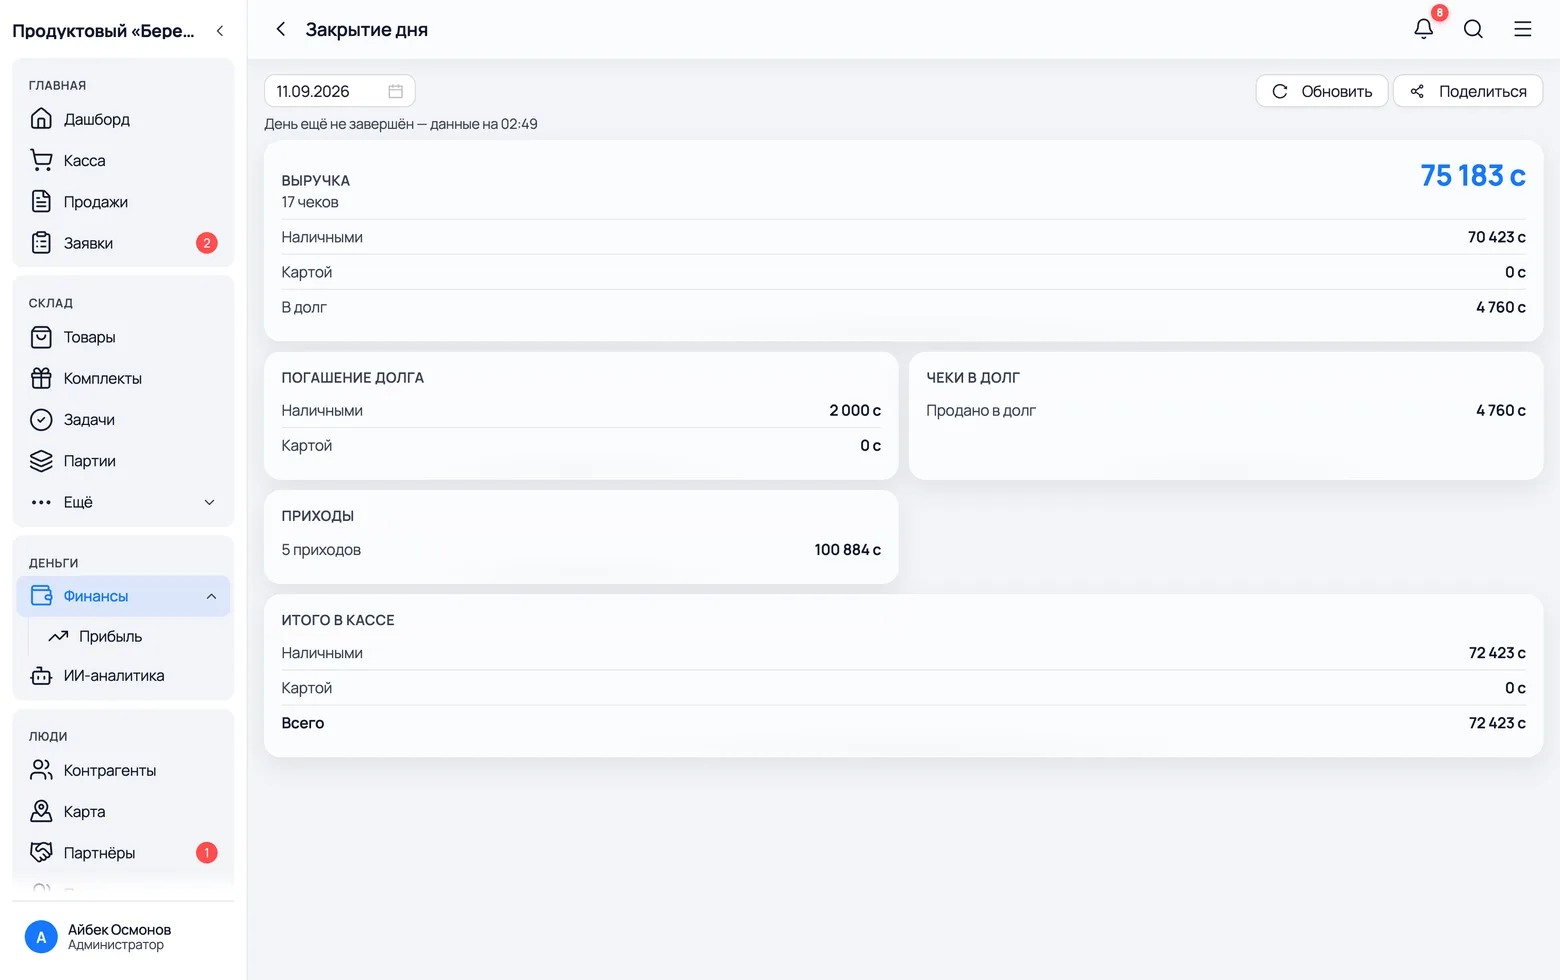
At the end of a shift you reconcile the money in the drawer with what the app shows. There is no separate «close the day» button, and none is needed: the day is closed when the numbers agree.
 1
2
1
2
 3
4
5
6
7
3
4
5
6
7
- 1Without leaving the till you can glance at Till statistics — a short summary for today. The button exists only for the owner: a cashier is not shown the shop's takings.
- 2From there the link Open «Closing the day» takes you to the same figures in full detail.
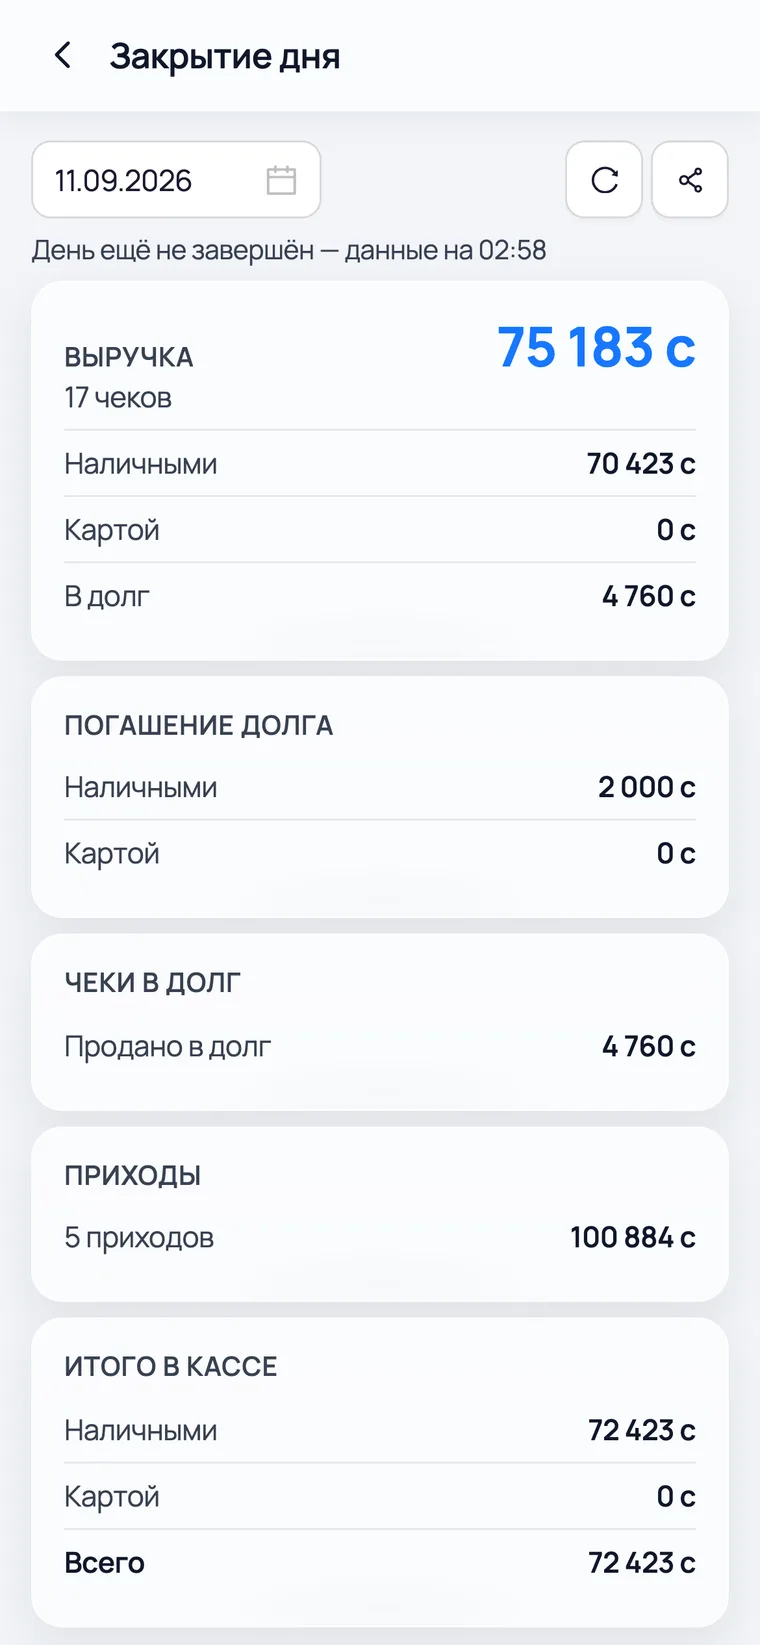
- 3Revenue — how much you sold today and how it was paid: cash, card, on credit. In the screenshot 75,183 KGS across 17 receipts.
- 4Debt repayments — money that came in against old debts. It is not today's sale, but it is in the drawer.
- 5Credit sales — how much went out today without payment. That money is not in the drawer.
- 6Total in the drawer — the number you count the cash against. In the screenshot 72,423 KGS: 70,423 of cash revenue plus 2,000 of repaid debt. Credit sales are not included.
- 7Share sends the summary as a message — handy when the owner is not in the shop.
- Arrivals show how much went to suppliers during the day. They are not subtracted from the drawer total — if you paid a supplier out of the drawer, subtract it yourself.
- A previous day opens through the date field at the top. Today's report is counted on the fly — under the date it says what time it was calculated for.
- This screen does not open for a cashier: it is about the shop's money, not about their shift.