Barcodes and labels: from one sticker to the whole warehouse
How to give your products barcodes and print the stickers: one from the product card, a batch of them by category or by the delivery you have just received. Every screen is real, captured in the working app.
The codes
Where a product's barcode comes from
A product's barcode: factory, your own, or generated
A barcode is not about the sticker, it is about speed at the counter: your salesperson points the scanner instead of hunting for the item in a list. The code can be a factory one from the packaging, or your own if the manufacturer never printed one.
 1
2
3
4
1
2
3
4
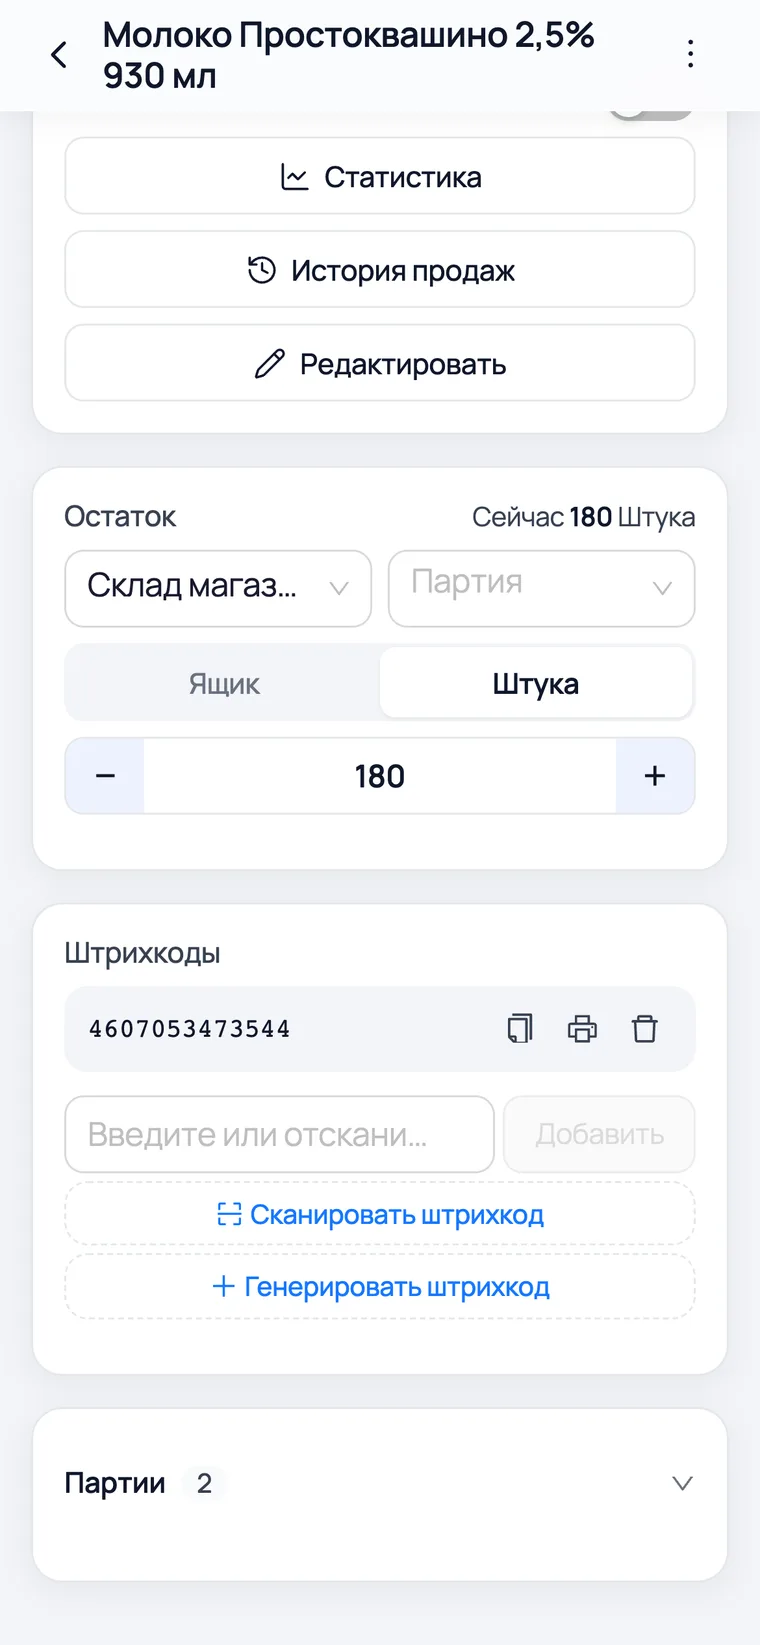
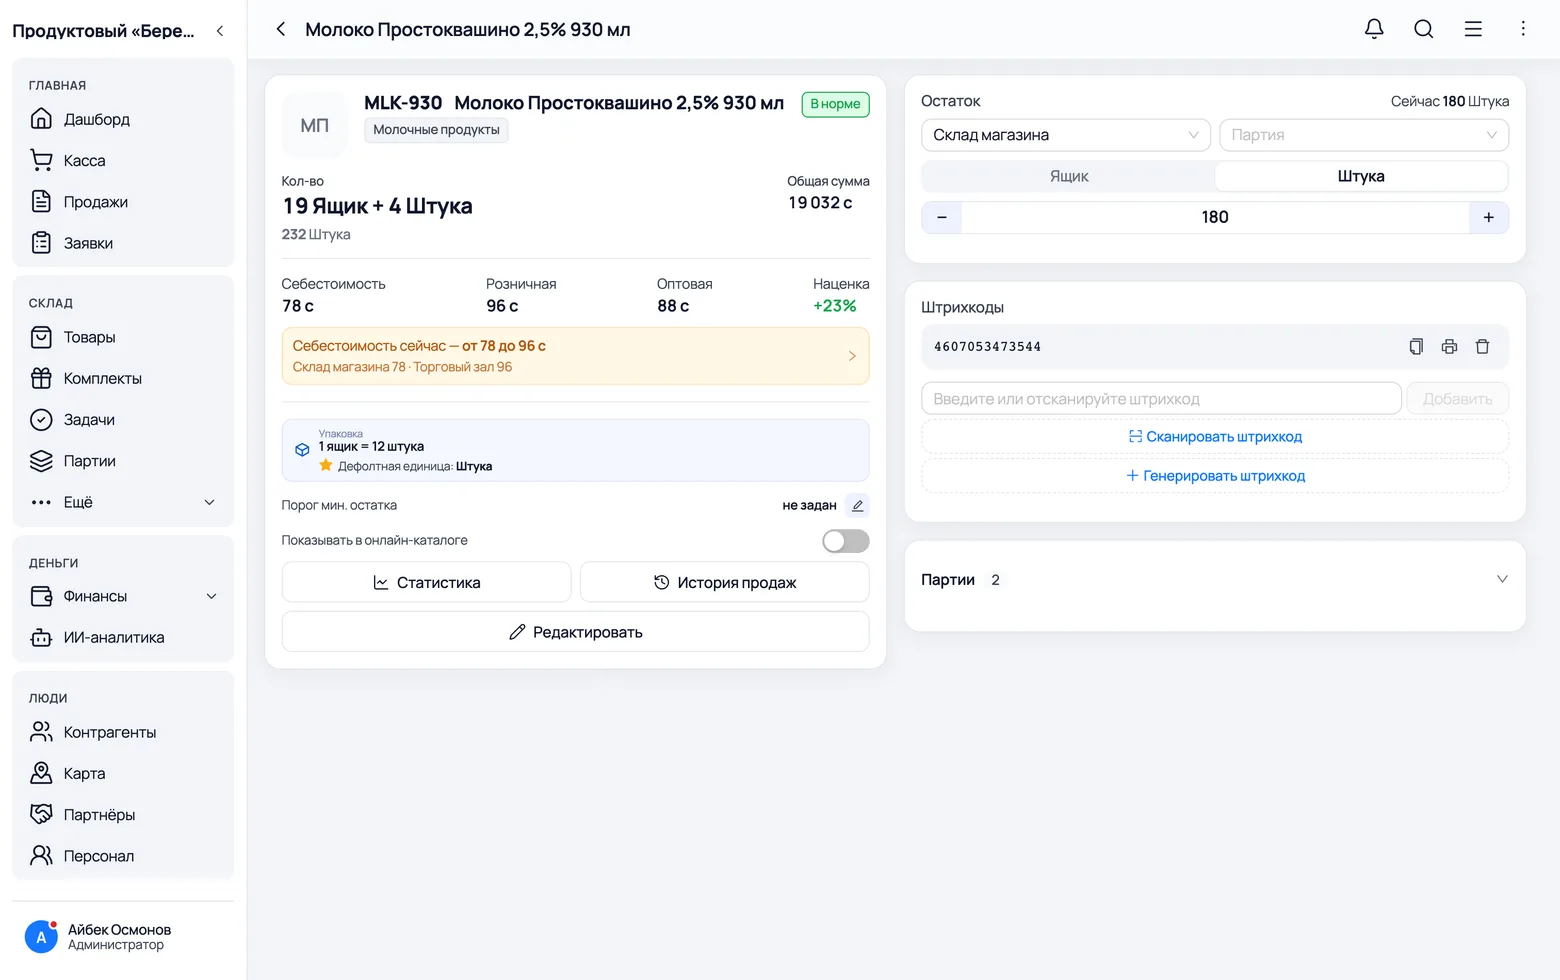
- 1Open the product and find the Barcodes block. Every code for this product lives here — there can be more than one.
- 2Type the factory code from the packaging into the field and press Add. If a wired scanner is plugged into the computer, just point it at the packaging: it types the digits and presses Enter for you.
- 3Generate barcode — for when the packaging has no code at all: loose goods, bakery, your own production. The app issues a real EAN-13 and prints that same code on the label.
- 4Scan barcode opens the binding feed from the next chapter. The feed needs a camera, so people use it from a phone — although the button is there on a computer too.
- A product can carry any number of codes. This is not a just-in-case feature: suppliers change packaging, and the old pack with the old code sits on the shelf next to the new one for another month. One product, both scan.
- A generated code is marked auto, so you can tell at a glance that the digits are yours and not from the packaging.
- Deleting a code does not delete the product — the code is simply unlinked; the product and its stock stay where they were.
Binding with the scanner: codes for the whole catalogue
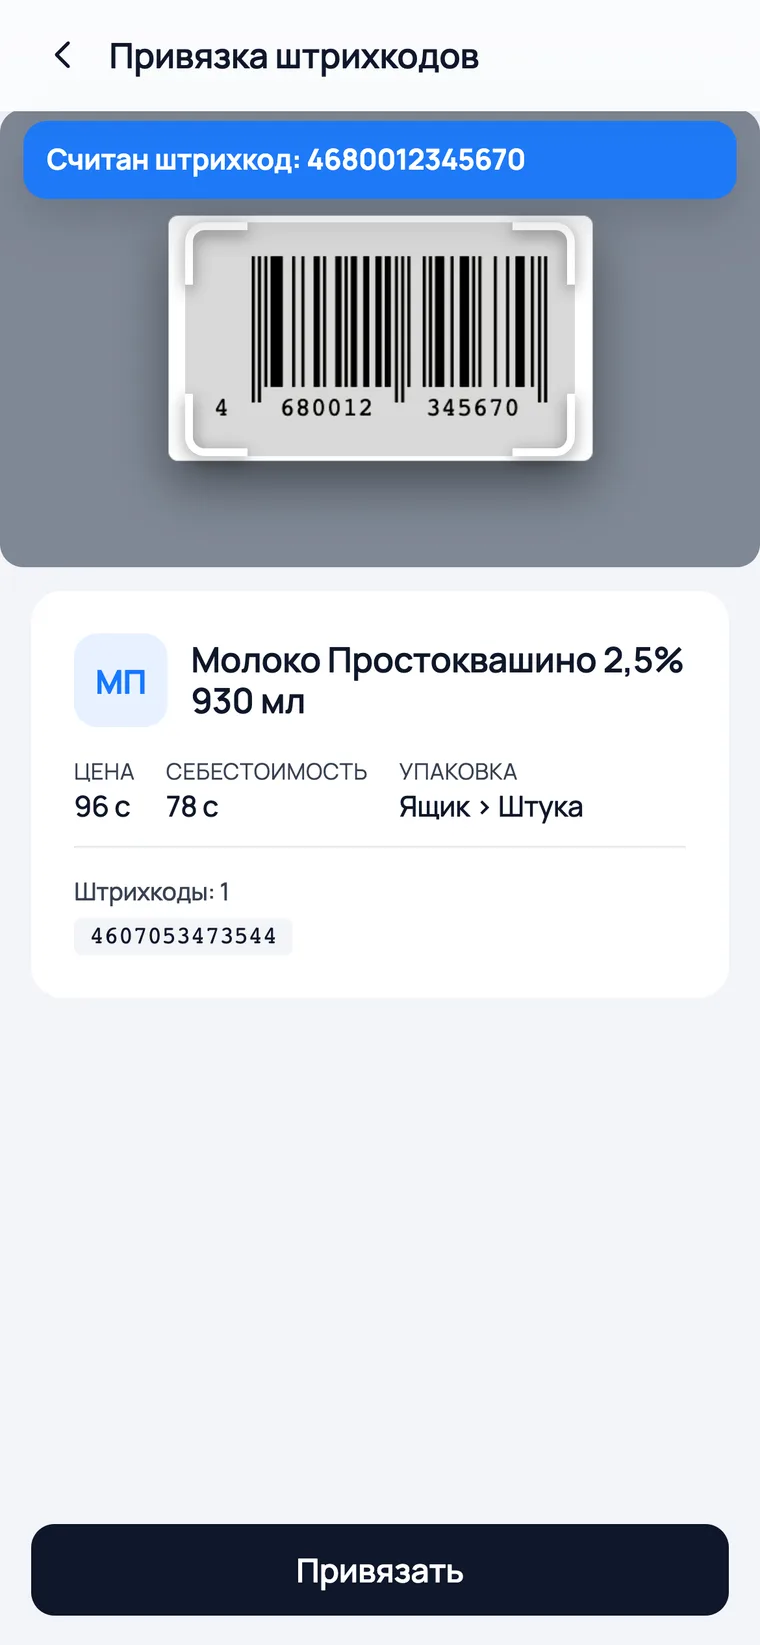
Entering codes one card at a time is an evening's work. The binding screen works differently: camera on top, product card below. Scan the packaging and the code goes into the product; swipe up for the next one. Your hands never leave the box. You open it from a product card with Scan barcode — it has no menu entry of its own.
 1
2
3
1
2
3
- 1The camera is on top. Point it at the barcode on the packaging — no need to line up a shot, the code reads itself.
- 2Below is the product card: name, category, price and how many codes it already has. It tells you whether you are binding the code to the right product.
- 3Bind — the code goes into the product. Swipe up for the next product, and on through the box.
- The screen is made for a phone: it needs a camera. On a computer you type codes on the product card, or use a wired scanner — it behaves like a keyboard.
- The feed shows the whole catalogue, not only products without codes: a product with a factory code often needs a second one from a second kind of packaging.
- The app will not take someone else's code: if the barcode already belongs to another product, it says so and binds nothing.
The labels
From a single sticker to printing by filter
A single sticker from the product card
One item arrived, a price tag fell off, a price changed — there is no reason to build a list for a single sticker. You print it on the spot, in two taps.
 1
2
3
4
1
2
3
4
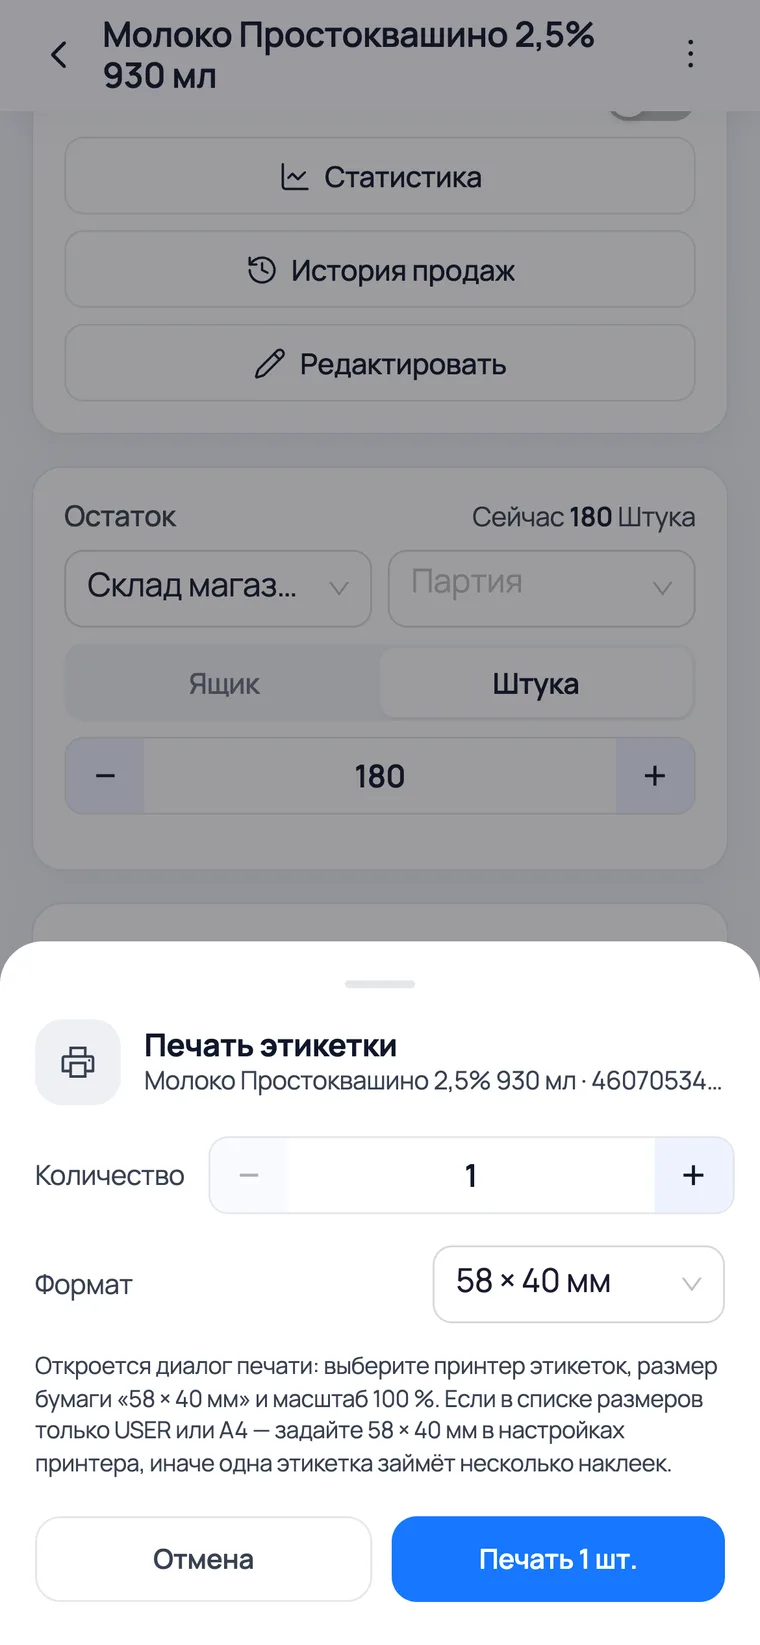
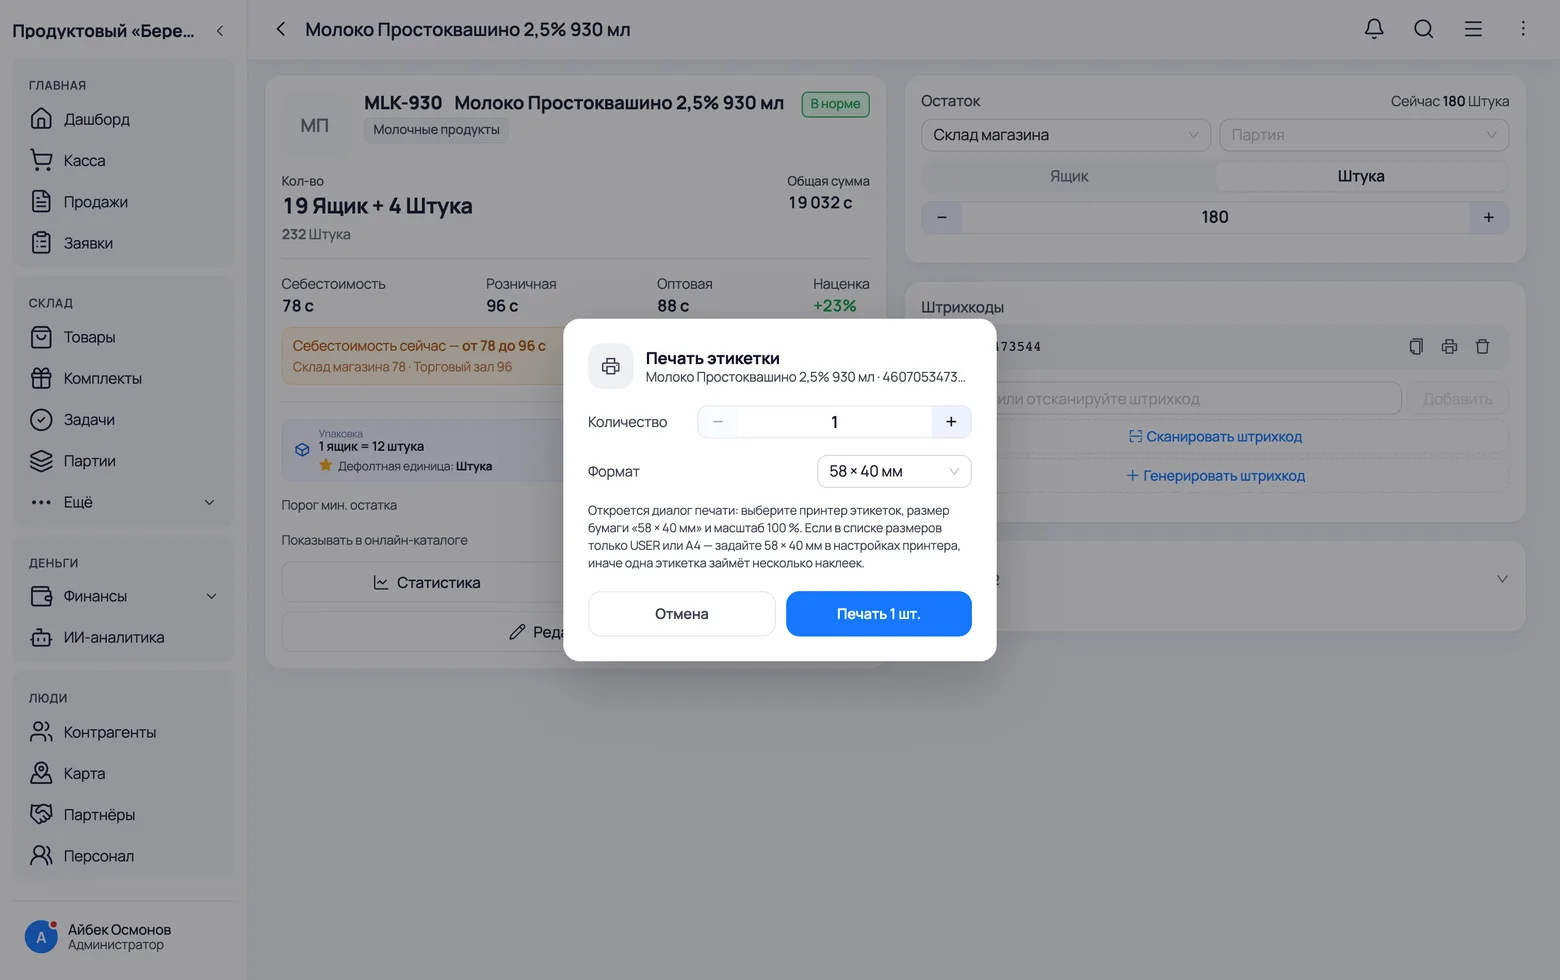
- 1The sheet opens from the printer icon next to a code in the Barcodes block. Its header says exactly what you are printing — the product name and its barcode; check that it is the right code.
- 2Quantity — how many stickers to print. Up to a hundred at a time: that is a guard against an accidental extra zero, which would otherwise run off the whole roll.
- 3Format — the physical size of the sticker, from 30 × 20 to 80 × 50 mm. The default is 58 × 40, the most common roll.
- 4Print and you are done. On a phone the labels go to the Bluetooth printer; in a browser the usual print dialog opens.
- The label carries the product name, article, barcode and price — exactly as in bulk printing: a sticker from the card and a sticker from a list look identical.
- For a product with variants the label carries the variant's name, not the parent's. Otherwise a stack of stickers for different sizes would be indistinguishable.
Barcode printing: lists you never rebuild
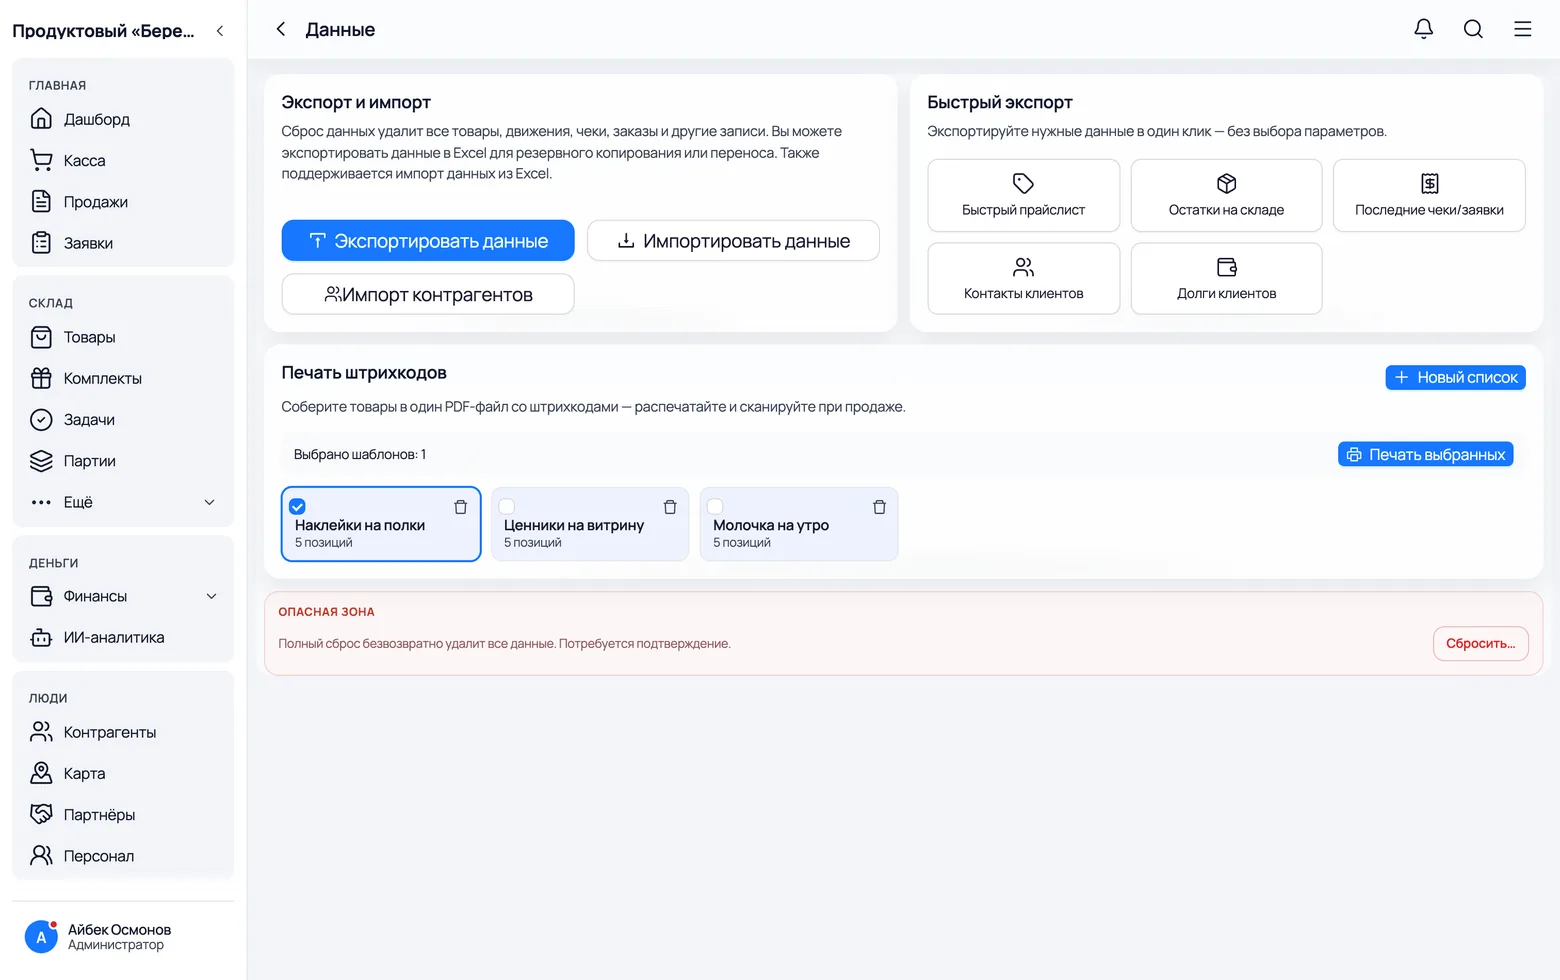
Bulk printing lives on the Data screen: on a phone it is Menu → Data, on a computer it is in the sidebar, under Business. The important part is not the print button but the saved lists: 'morning display', 'dairy', 'window price tags' are assembled once and printed as often as you like.
 1
2
3
4
1
2
3
4
- 1On the Data screen, find the Barcode printing section. The neighbouring sections on that screen are about export and import and have nothing to do with labels.
- 2New list — build a set from scratch. That is what the next chapter is about.
- 3Saved lists appear as cards with a name and an item count. Tapping one opens it for editing — reprint it, add a product, or change the quantities.
- 4Tick the cards and press Print selected — several lists go into one file. That is how you print the whole morning display at once, instead of opening each list in turn.
- A list stores not just the products but how many stickers each one needs. Otherwise the template would be useless: you would re-enter the quantities every time you opened it.
- A list is a template, not a print history. Once printed, it stays where it was, waiting for the next time.
Building the list: search, Add all, quantities
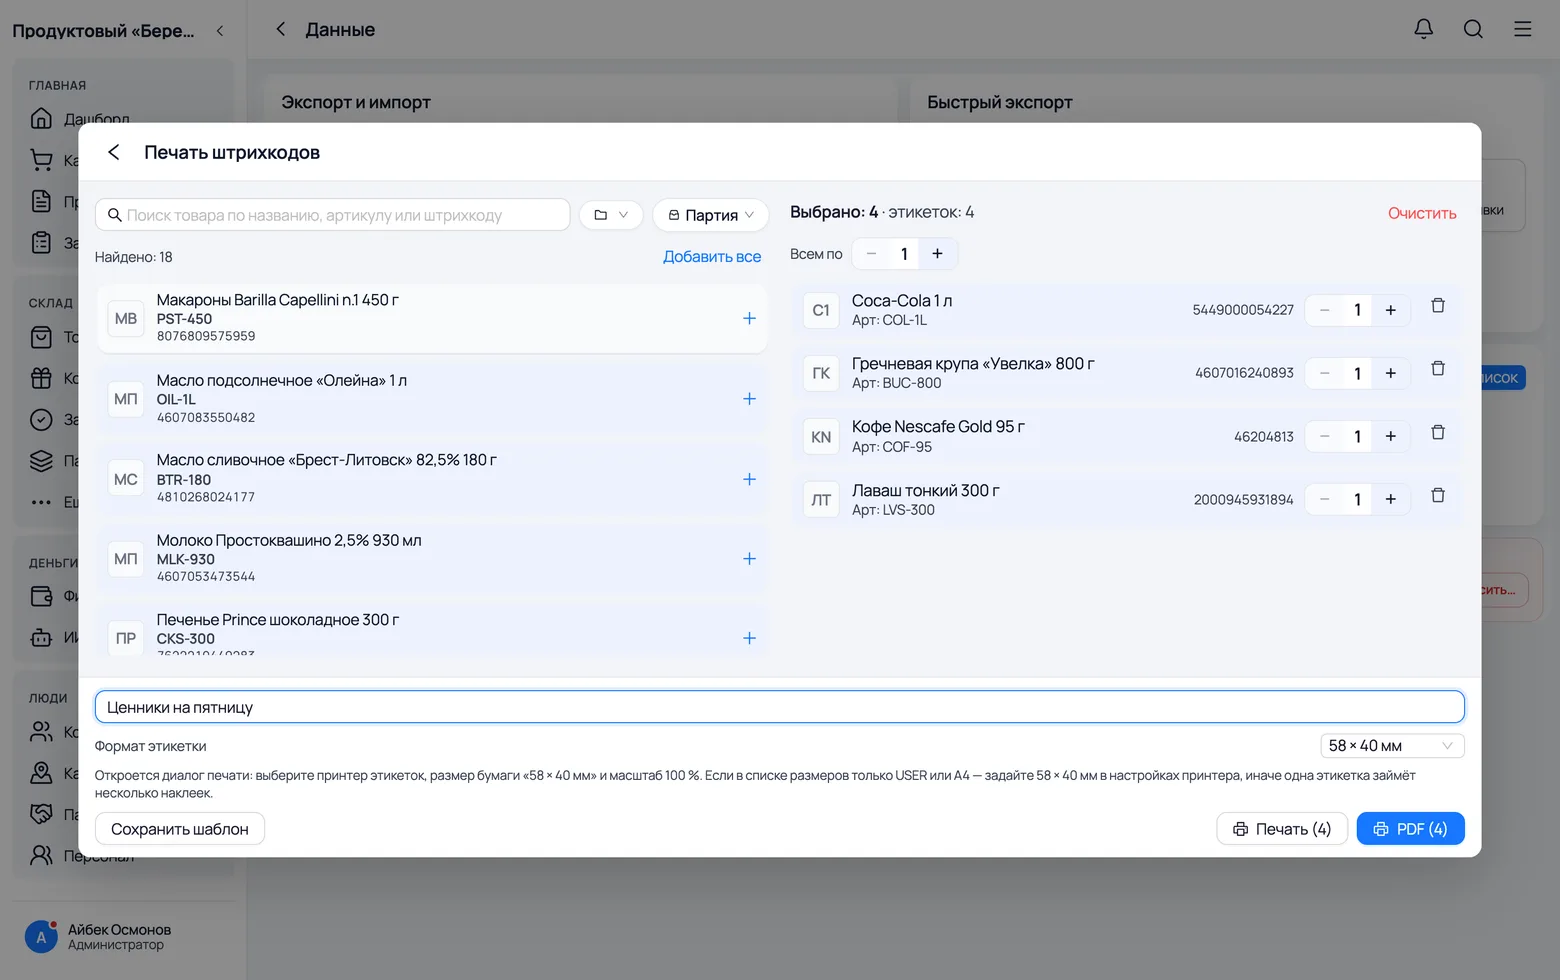
The builder is split in two: on the left what you can add, on the right what is already in the list. On a phone there is a single column, and quantities are edited right in the added row.
 1
2
3
4
5
6
1
2
3
4
5
6
- 1On the left is everything that has a barcode: products and categories. Search works by name, article and by the barcode itself — you can simply scan the code.
- 2Tapping a row adds it to the list on the right; tapping again removes it. An added row stays highlighted, so the left-hand list shows what you have already taken.
- 3Add all takes everything currently shown on the left. Together with the filters from the next chapter, this is what printing by filter means.
- 4Top right: Selected and how many labels that adds up to. Quantities are edited per item, while All at sets one number for every item at once.
- 5Label format — the same list of sizes as when printing a single sticker.
- 6Save template with a name, so you do not rebuild this tomorrow. Next to it are two print buttons: one to the label printer, the other builds a PDF for an ordinary printer.
- If a product has several codes, a selector appears next to it: which one goes on the label.
- The PDF is the same set of labels in a single file: you print it on an ordinary printer onto sheets of self-adhesive paper, rather than on a roll label printer.
By category and by delivery: printing a whole shelf
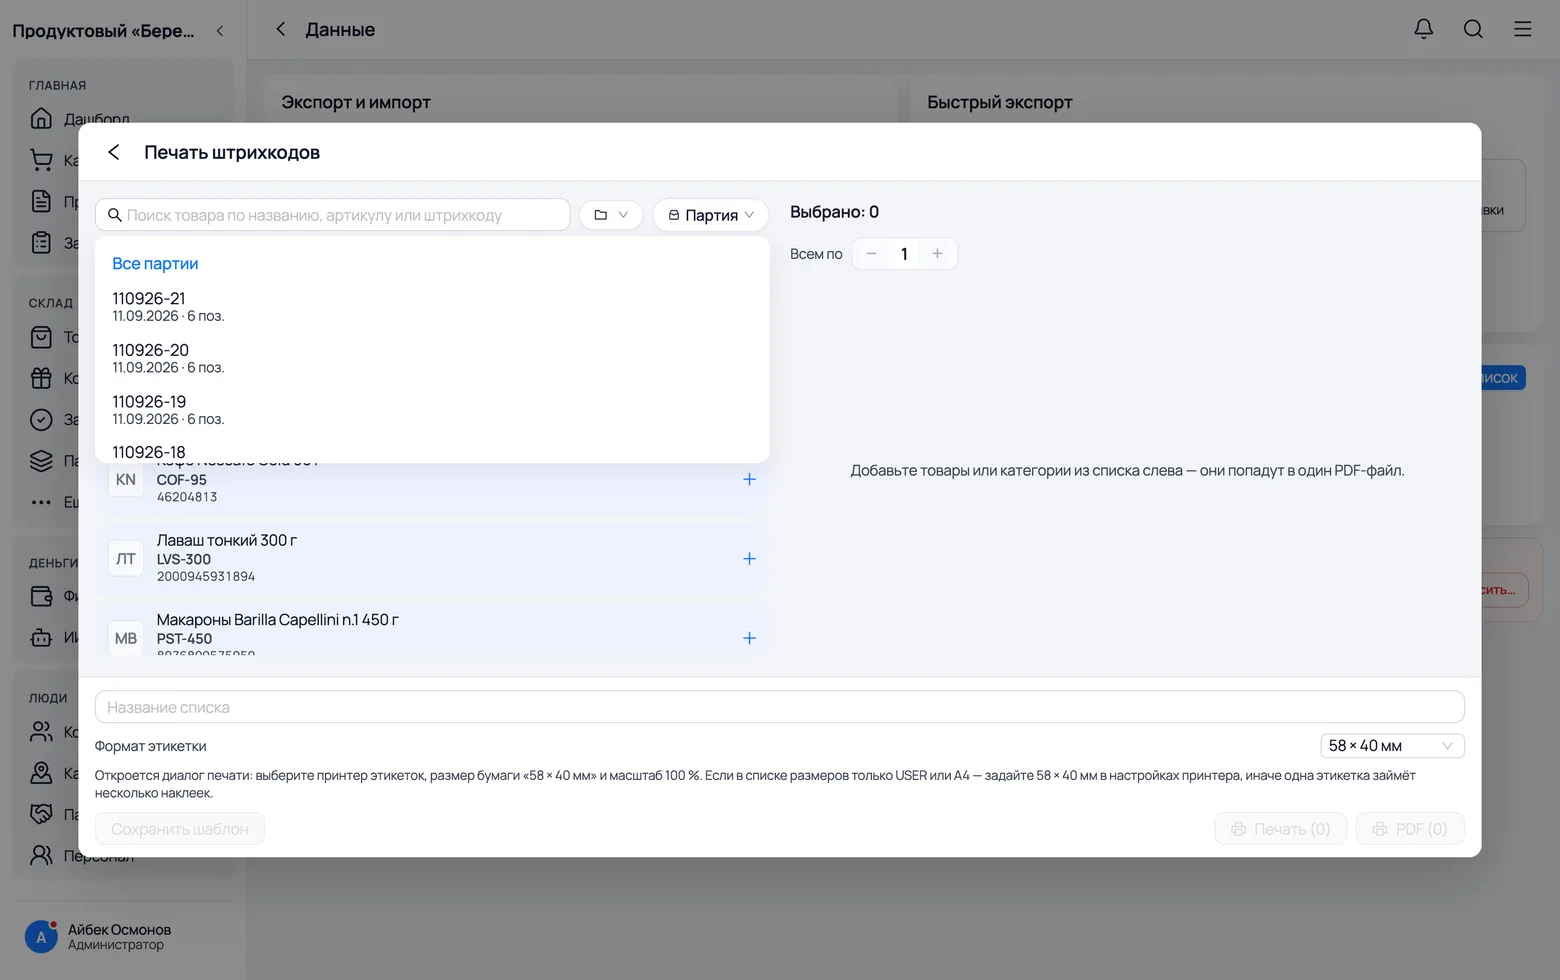
Two filters answer two different questions. Category — 'sticker the whole dairy shelf'. Delivery — 'sticker what came in this morning'. In both cases what follows is a single press: Add all.
 1
3
1
3
 2
2
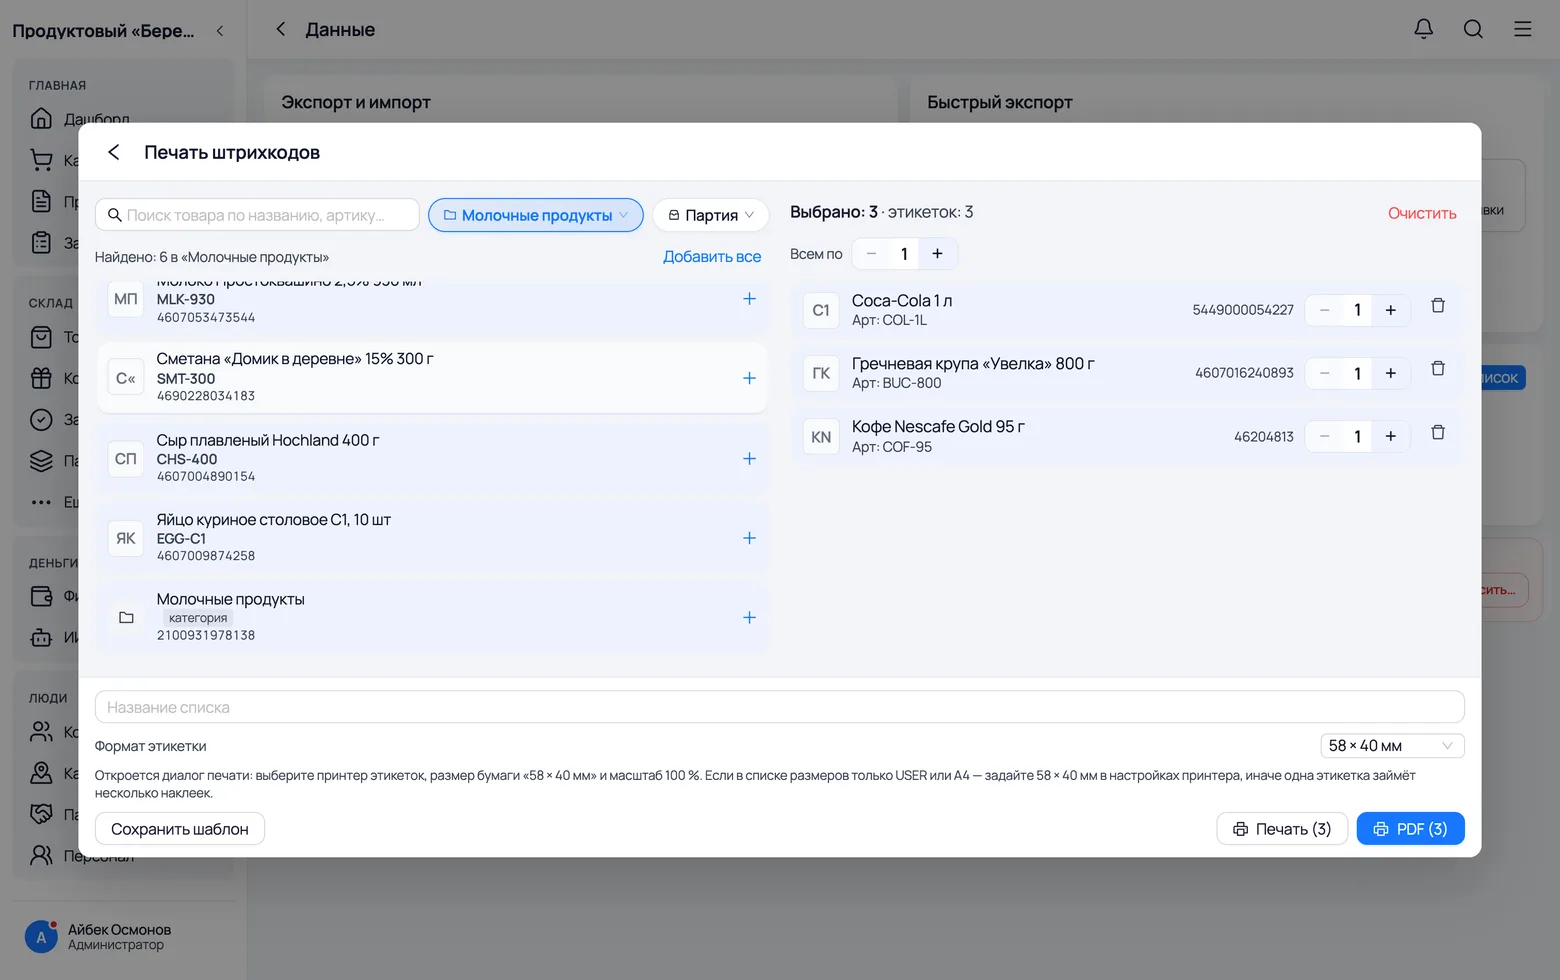
- 1The Category chip leaves only that category's products on the left, and the counter above the list says it plainly: 'Found: N in Dairy'. Then Add all — and the shelf is done.
- 2The Delivery chip lists the ten most recent deliveries with their date and item count. Pick one and only its products stay on the left. This is the main scenario: you receive an invoice for fifty items and print their price tags right away.
- 3Some rows are marked category — a category has a barcode of its own. That sticker does not go on a product but on a shelf, a crate or a container: scan it and you land straight in the right category.
- The filters do not add up to a report and change nothing about the products — they only narrow the list on the left. Pick the wrong filter and you simply choose another; what you have gathered on the right stays.
- The delivery filter is available in full mode — the same place the deliveries screen itself lives.