Grocery shop: from your first product to your first sale
A step-by-step guide built on a real example — the Bereke shop: 17 products, a warehouse and a sales floor, suppliers, credit sales and cash sales. Every screen is real, captured in the working app.
Getting in
Once
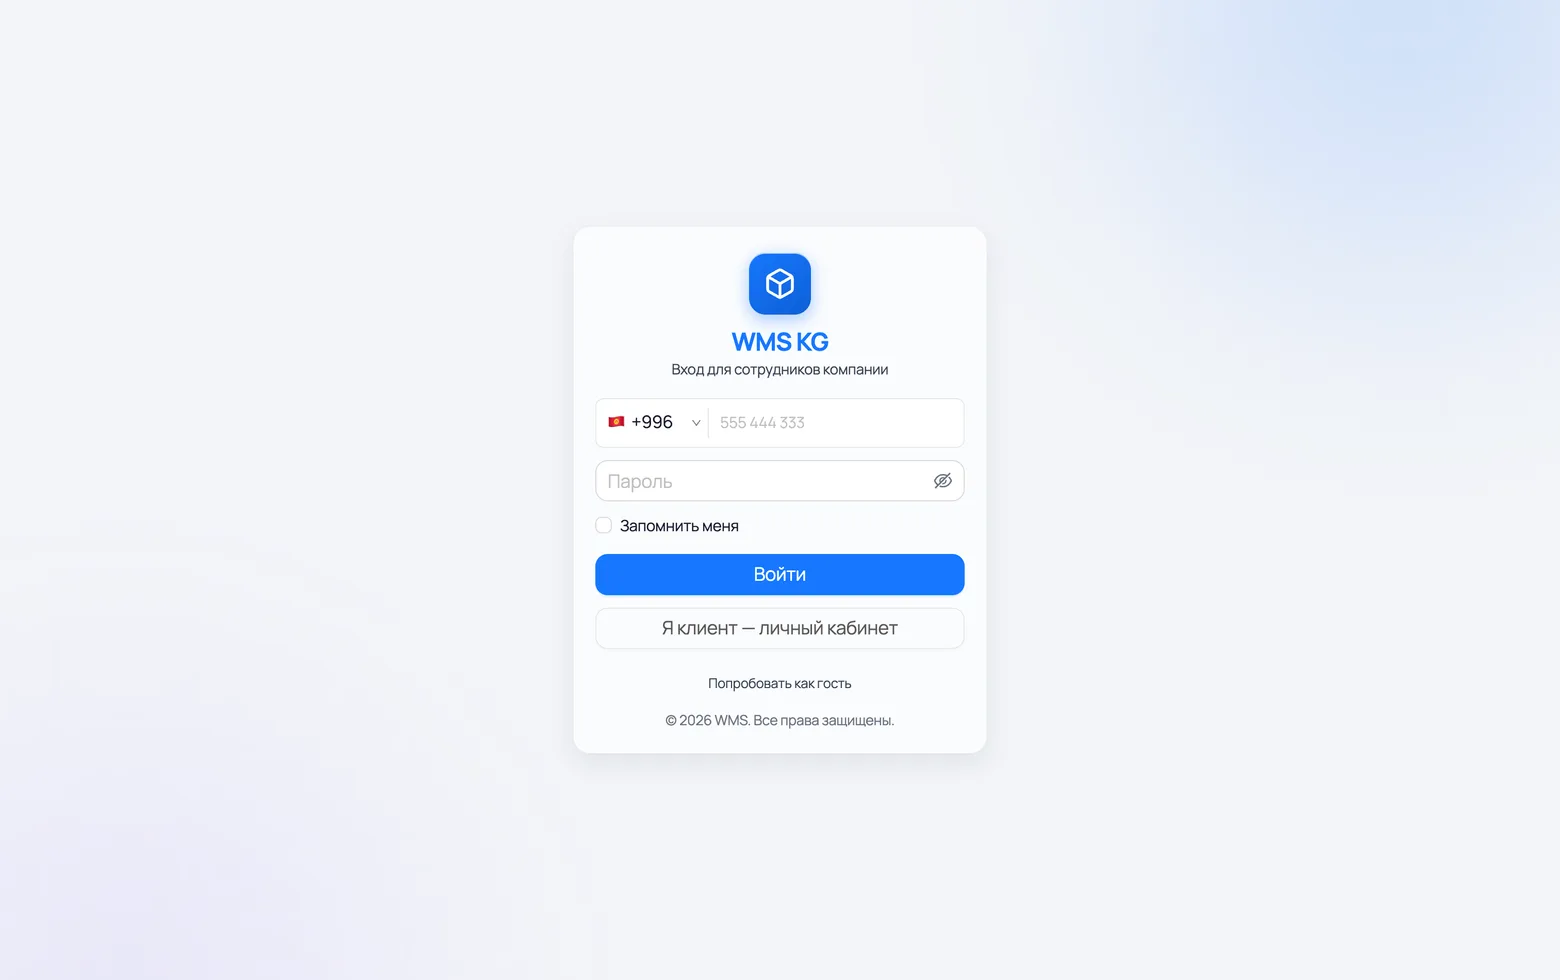
Signing in to the app
One account — one person. Give your salesperson their own login, so you can see exactly who rang up a sale.
 1
2
3
1
2
3
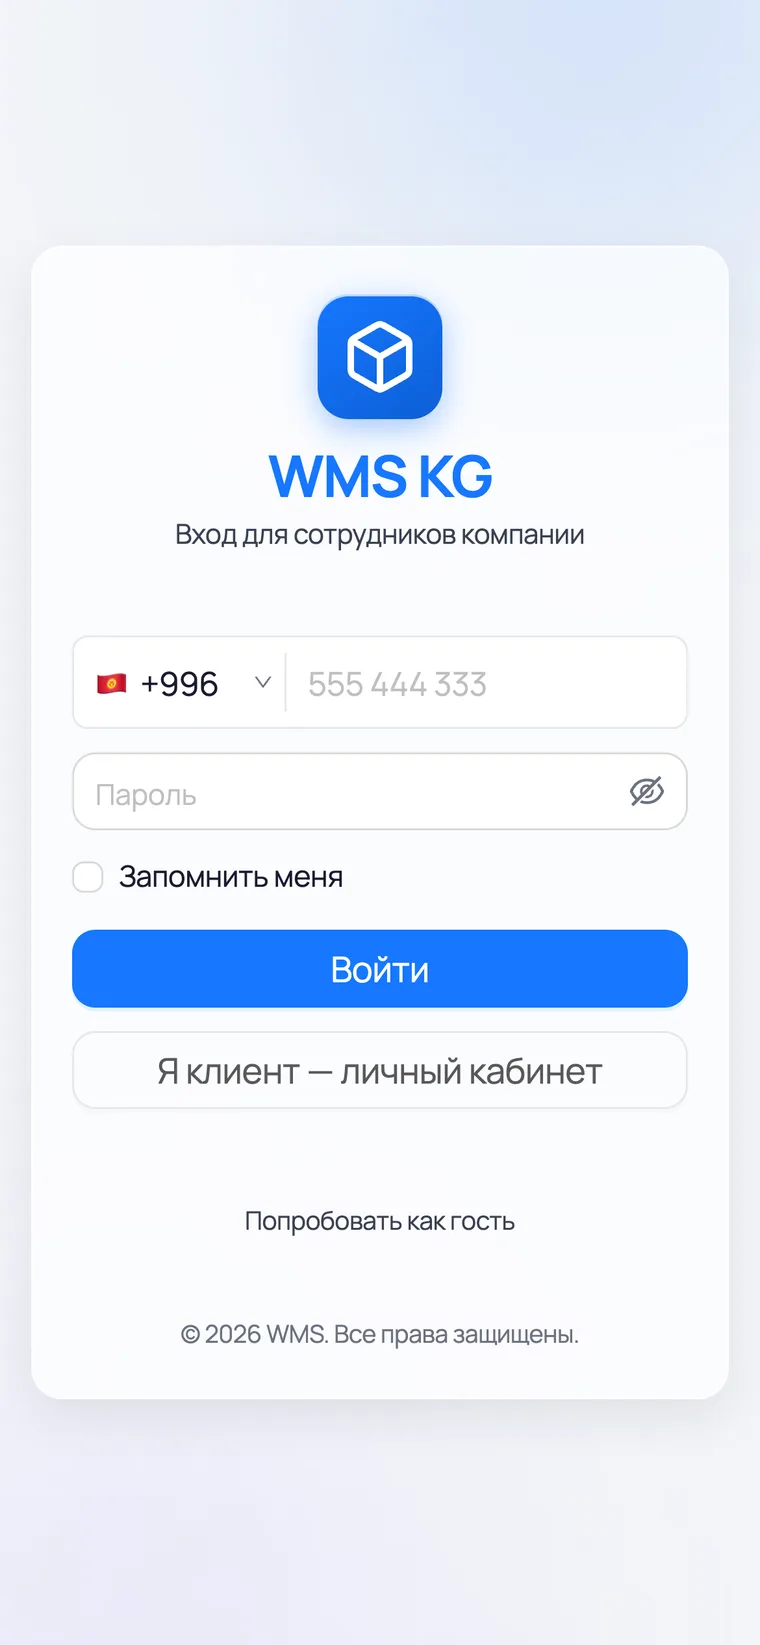
- 1Phone number — the one the shop is registered on. The +996 code is already filled in, so enter only 9 digits.
- 2Password. If you tick 'Remember me', the sign-in is kept on this device.
- 3Press Sign in — the Home screen opens.
Setup
Five steps, in order
Set up a warehouse and a sales floor
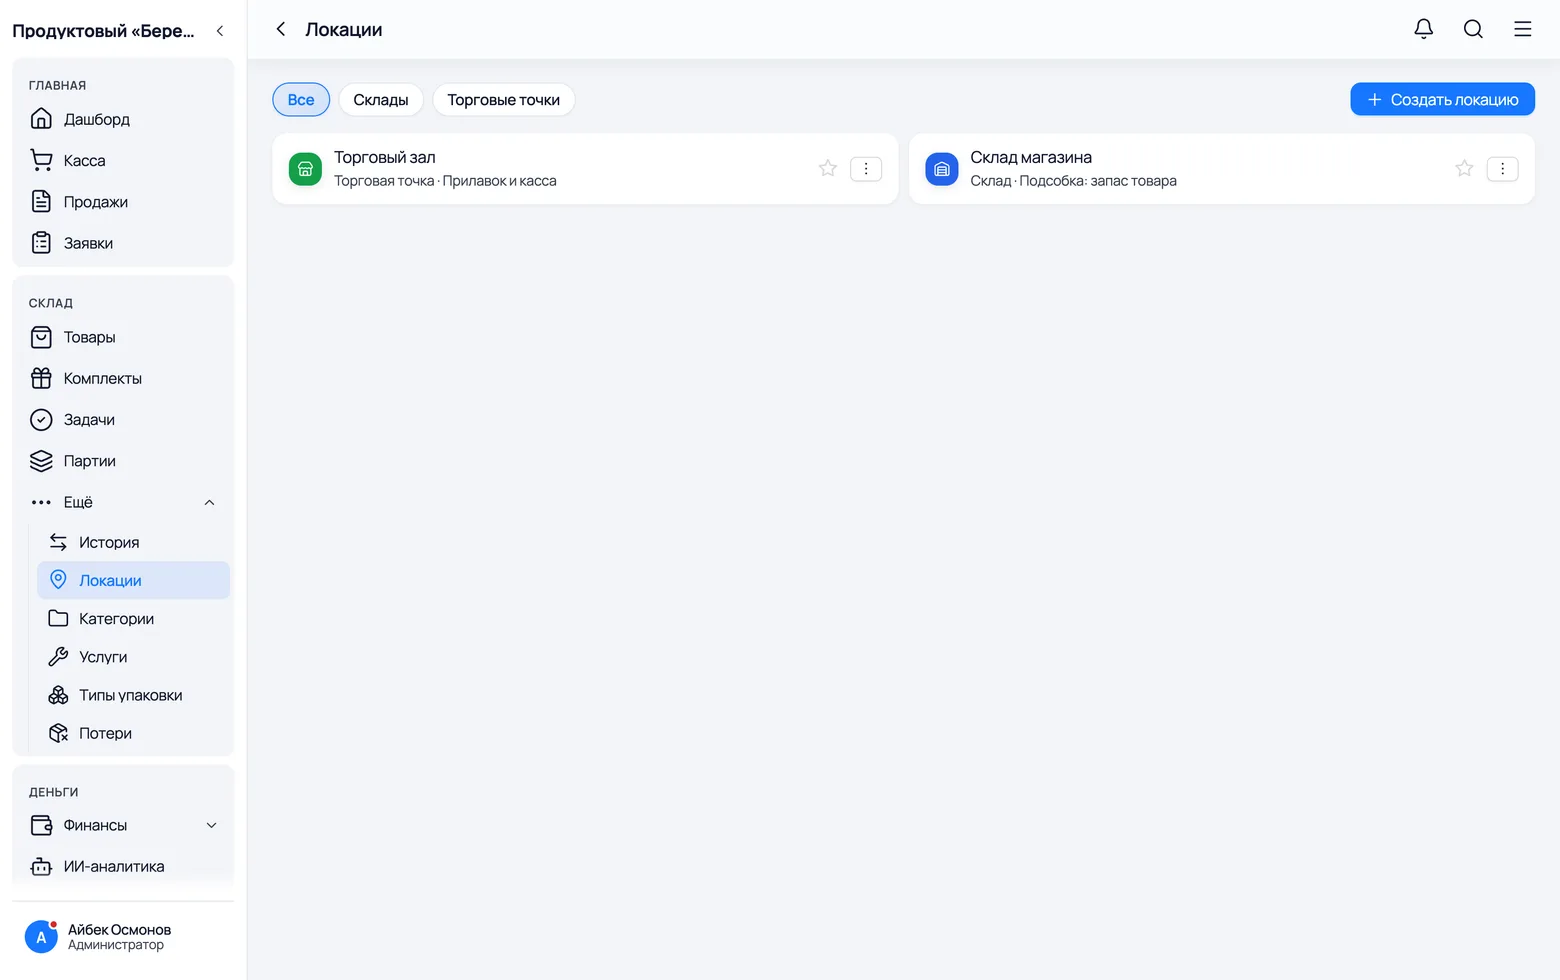
The app counts stock by storage place. Two are usually enough for a shop: the back room (warehouse) and the counter (sales floor). Then you see at once what has run out on the floor but is still in the back.
 1
2
3
1
2
3
- 1In the menu on the left: Warehouse → More → Locations. On a phone: More → Warehouse → Locations.
- 2Create location → choose the type: 'Warehouse' for the back room, 'Sales point' for the floor. Give it a clear name — 'Store warehouse', 'Sales floor'.
- 3Mark the location where you sell most often with a star — the app will fill it into forms for you.
Sort your products into categories
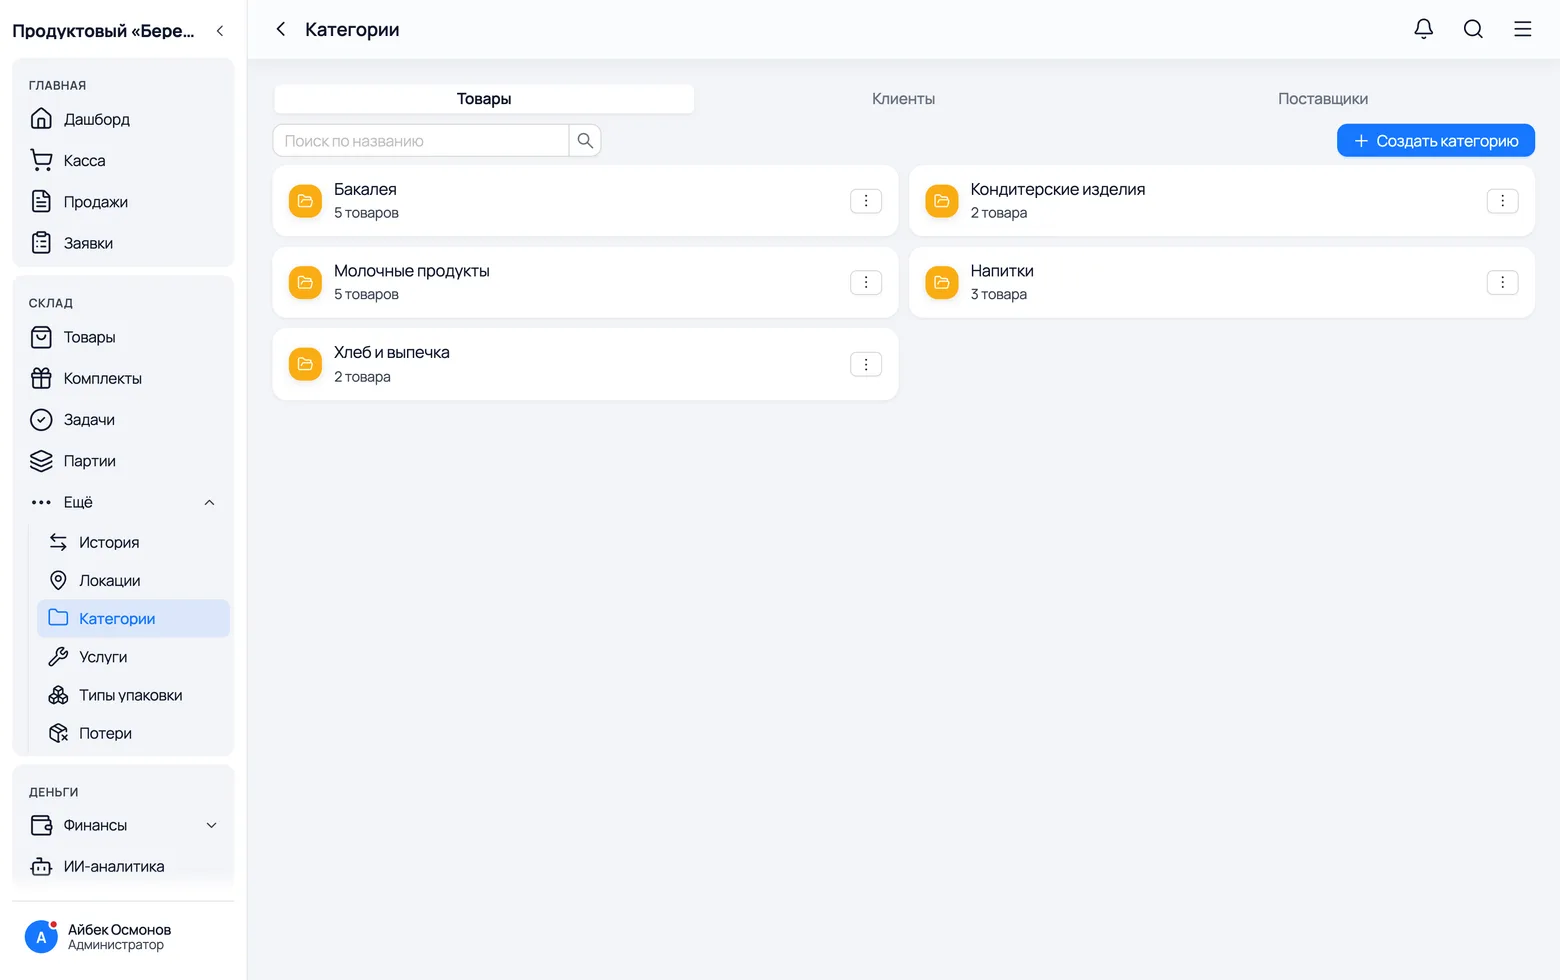
Categories are the shelves of your shop: dairy, groceries, drinks, bread, sweets. Without them a list of 300 items turns into a mess; with them your salesperson finds a product in a second.
 1
2
3
1
2
3
- 1The Products tab holds product categories. The neighbouring tabs split customers and suppliers into groups.
- 2Create category → the name. For a grocery shop 5–8 are enough: dairy, bread, groceries, drinks, sweets.
- 3You can create a category later as well — right in the product form, without leaving it.
Create a product
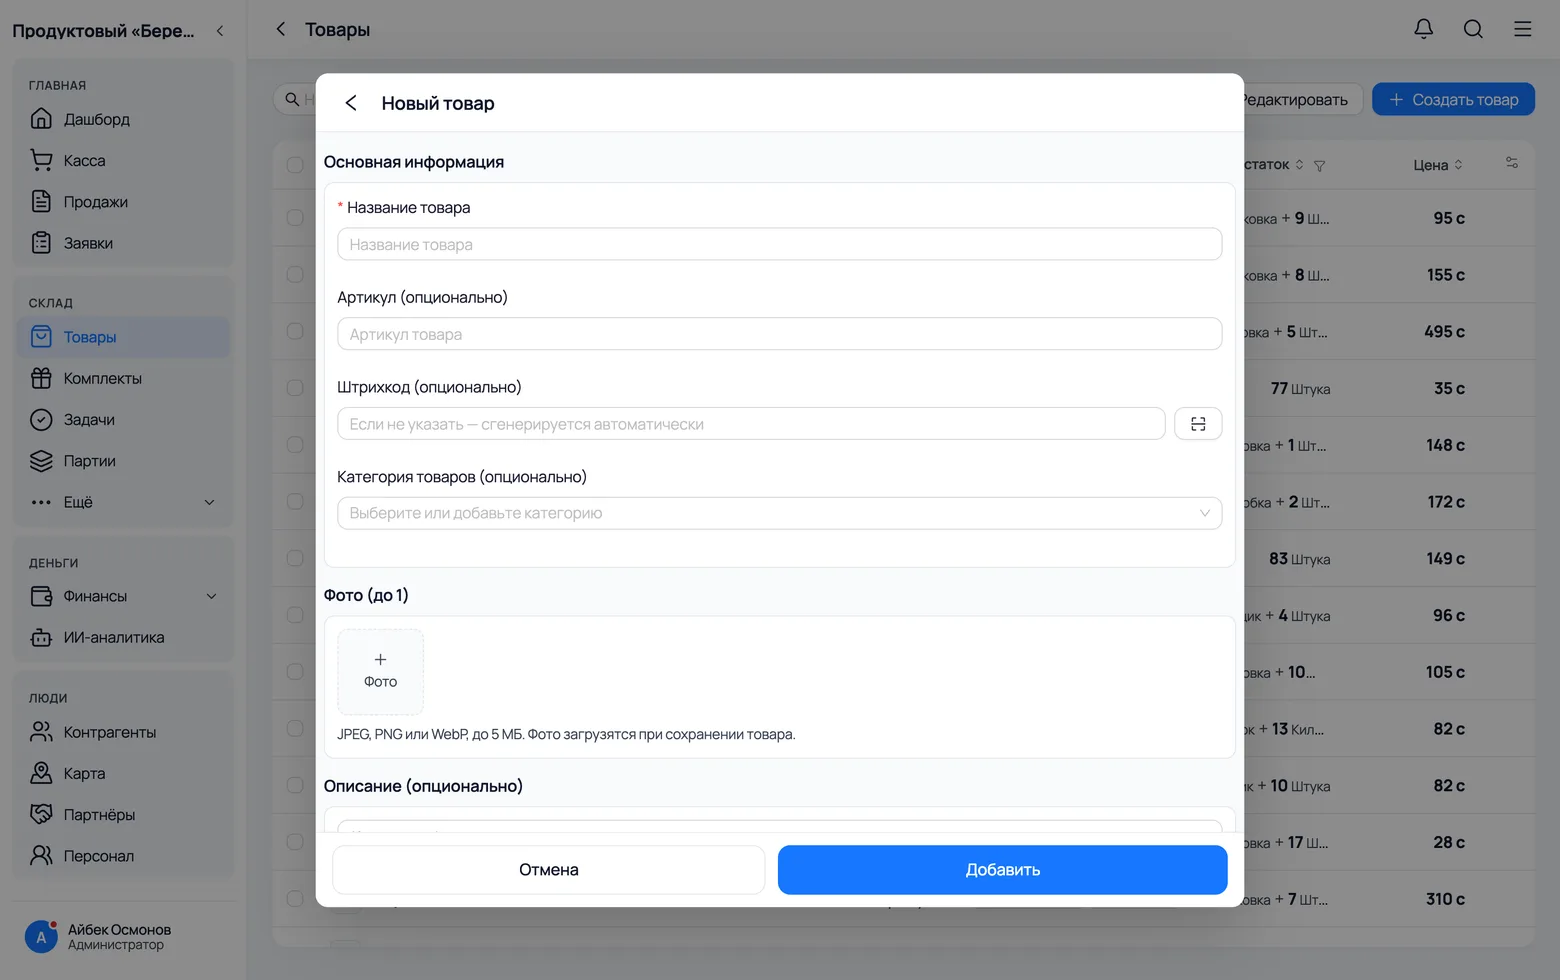
You fill in a product card once. After that the app fills it into arrivals, sales and write-offs by itself, so five minutes here save hours later.
 1
2
3
4
5
1
2
3
4
5
- 1Product name — the way a customer asks for it: 'Prostokvashino Milk 2.5% 930 ml'. A name with the volume and fat content saves you from mixing up neighbouring items.
- 2SKU — your own short code (MLK-930). It makes searching fast and it is printed on the label.
- 3Barcode — scan the code from the pack with the scanner button. Leave it empty and the app generates its own, which you can print on a label.
- 4Photo — take a picture of the product. On a phone your salesperson recognises an item by the picture faster than by reading the name.
- 5Below are Prices (cost and sale price) and Units of measure. Press Add to save.
- Units of measure are exactly what a grocery shop needs: milk arrives in crates of 12 but sells by the piece. Set up 'Crate = 12' and 'Piece = 1' — then you enter arrivals in crates and sales in pieces, and the app does the maths.
- Low stock threshold — 10 pieces of bread, for example. When the stock drops below it, the product is highlighted on the Home screen with a 'running out' badge.
Receive goods from a supplier
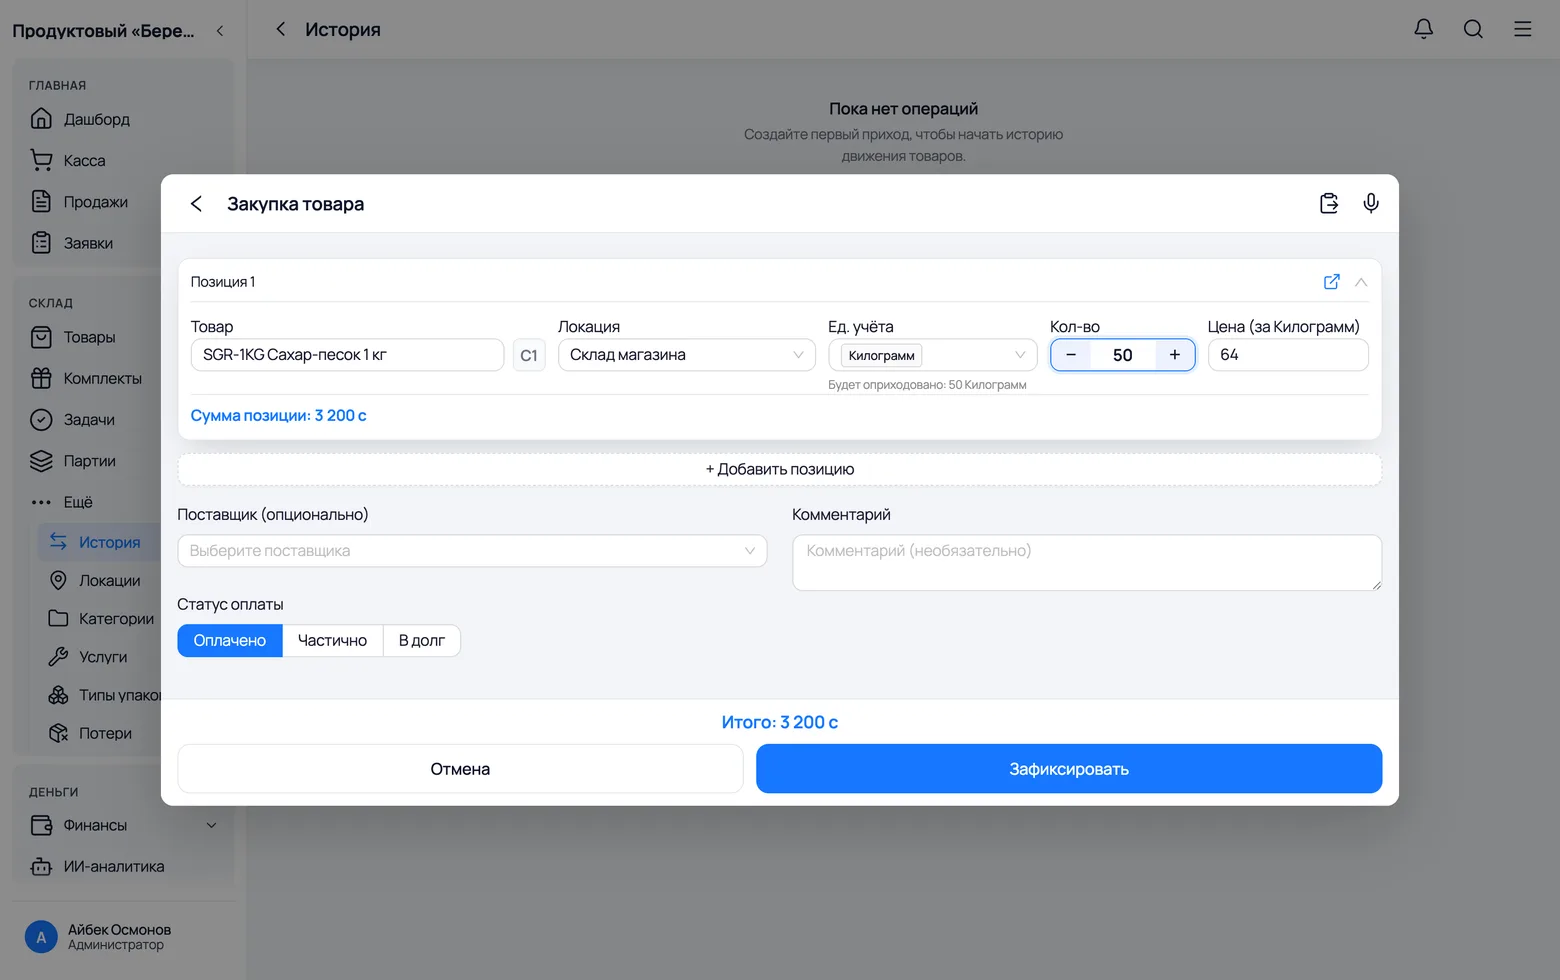
An arrival is where stock begins. Until goods are received, you cannot sell them: the app will say there are none.
 1
2
3
4
1
2
3
4
- 1Open Home → Arrival (or Products → '…' → Arrival for a single item). Choose the product, the location, the unit and the quantity.
- 2Price here is the purchase price you paid for the goods. The app uses it later to work out your profit.
- 3Supplier — pick one from the list or create a new one right here.
- 4Payment status: 'Paid' — you settled up straight away; 'On credit' — you took the goods and will pay later; 'Partial' — you paid part of it. The debt to the supplier is calculated for you.
- Every arrival creates a batch with its own purchase price and its own date. How the app works out cost and delivery profit from them is covered in the batches guide.
- If a supplier brought 15 items on one delivery note, add rows with the 'Add item' button. The supplier, the payment status and the comment are shared by the whole document.
- You can dictate a delivery note by voice or paste it as text from a chat — the app reads the list itself, and all you have to do is check it.
Sell a product
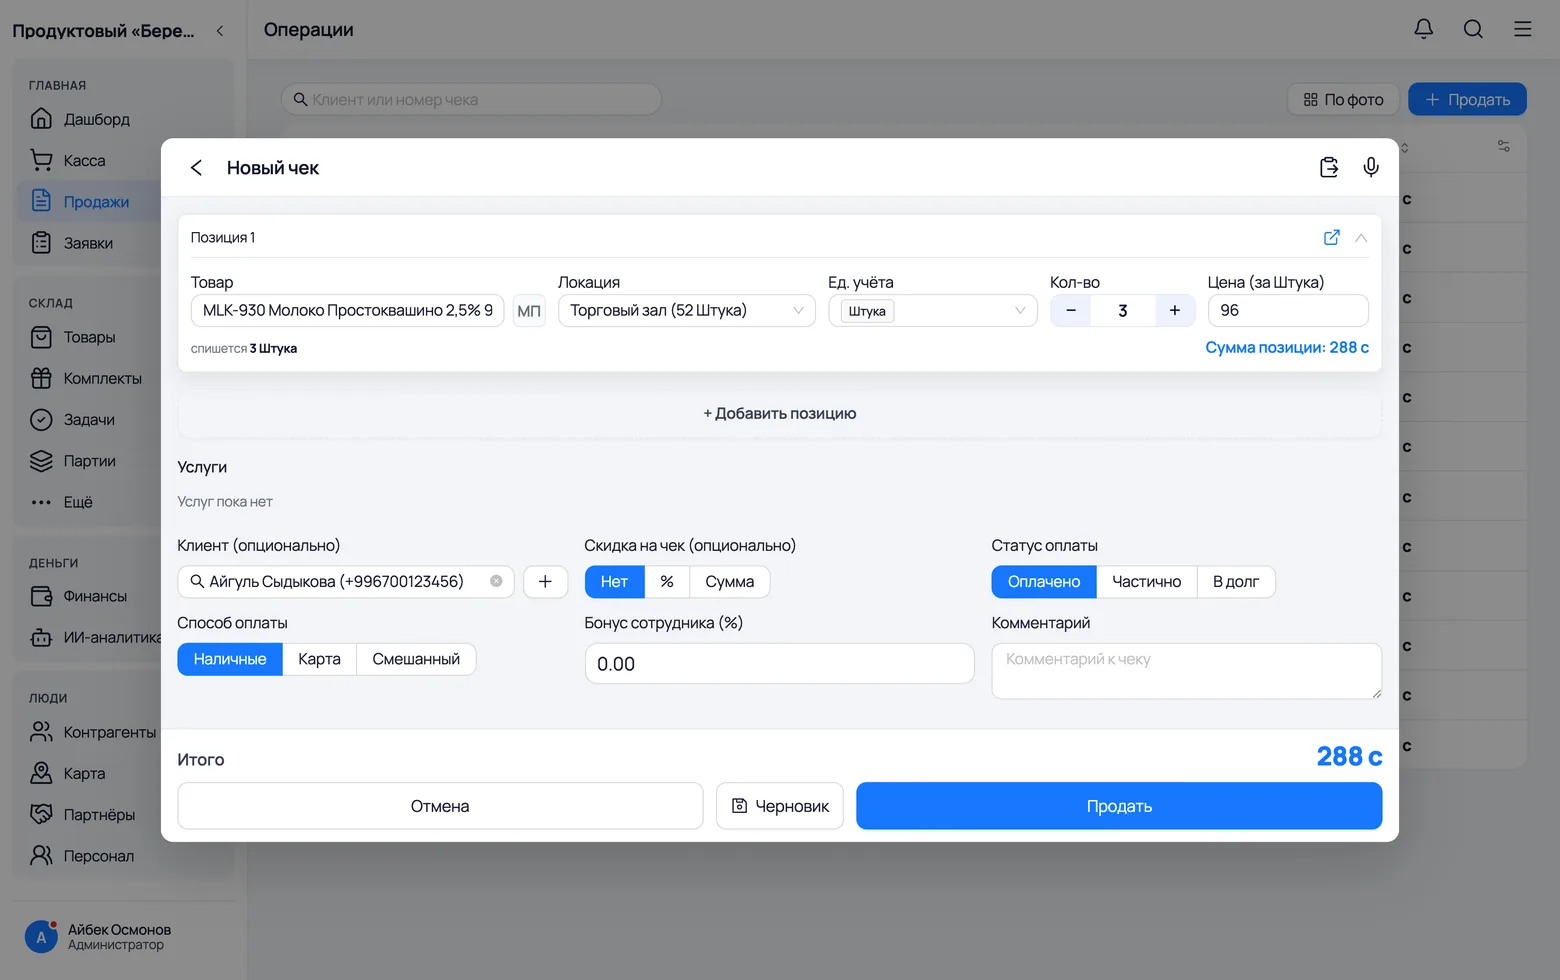
A sale takes the goods off the shelf, puts the money in the cash drawer and works out the profit on the batch the goods came from. All of it on one screen.
 1
2
3
4
5
6
1
2
3
4
5
6
- 1Product — start typing the name and pick it from the suggestions. You can add as many rows as you need.
- 2Qty and unit: selling by the piece — set pieces; giving away a whole crate — switch to crates. The stock is checked right away.
- 3Customer — fill it in if you are selling on credit or the person is a regular. For a walk-in buyer you can leave it empty.
- 4Payment status: 'Paid', 'Partial' or 'On credit'. The customer's debt is calculated automatically and shows up in the Counterparties section.
- 5Payment method: Cash, Card or Mixed. You need it so that in the evening the cash drawer matches the money in the box.
- 6Sell — the receipt is posted. The 'Print the receipt' tick box next to it sends it to the printer.
Every day
The screens you will live in
Home: what is happening in the shop right now
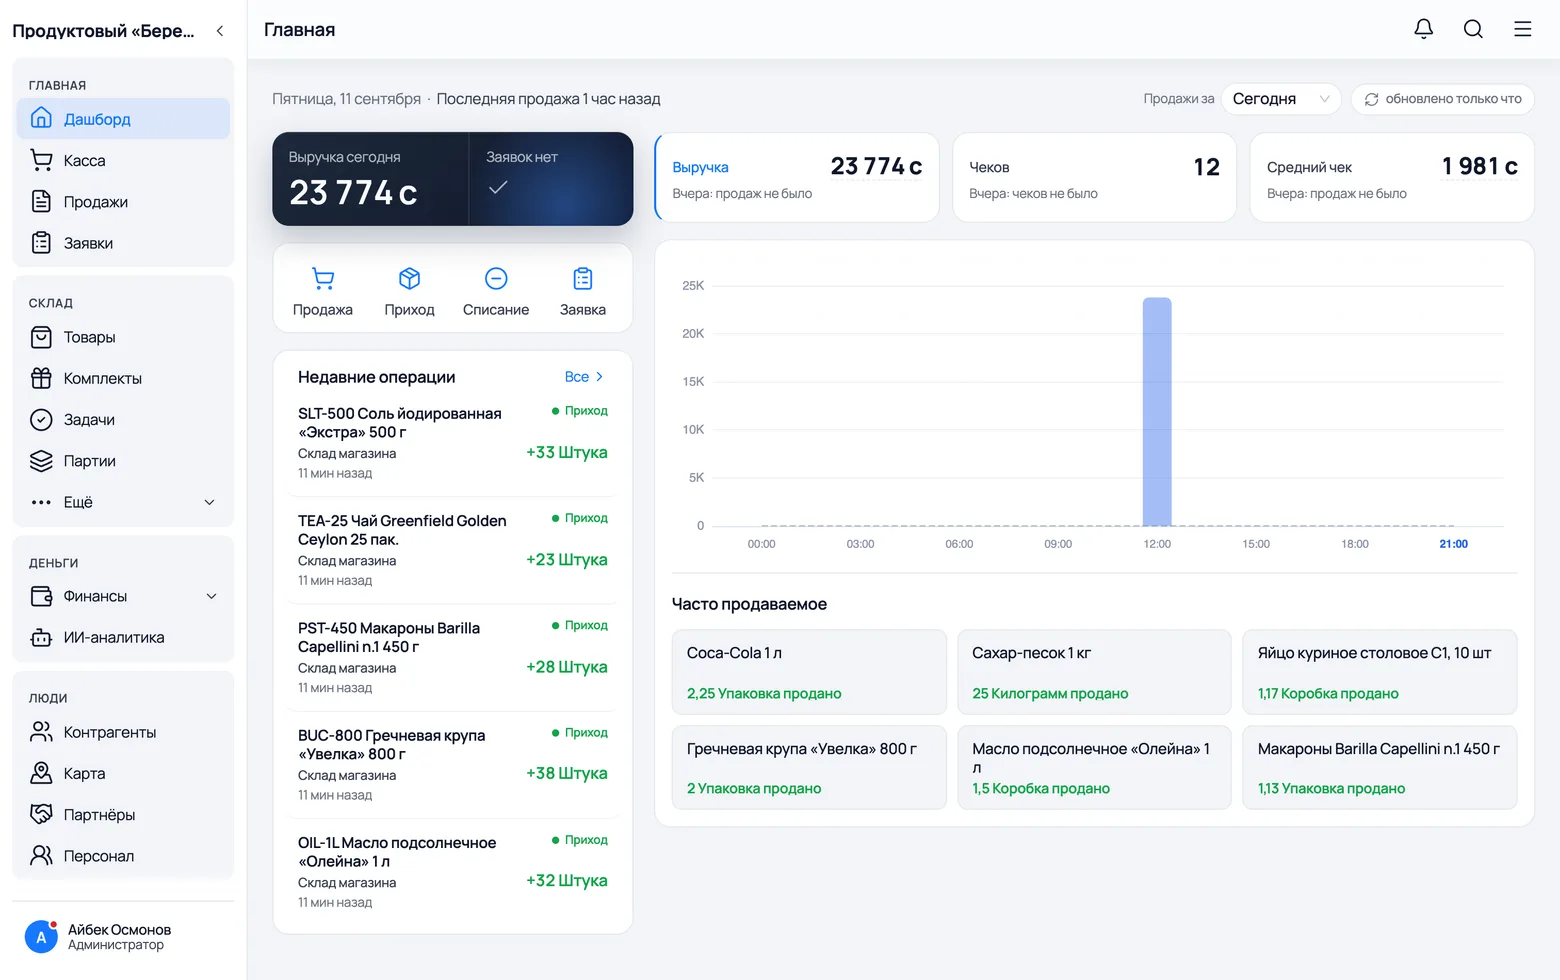
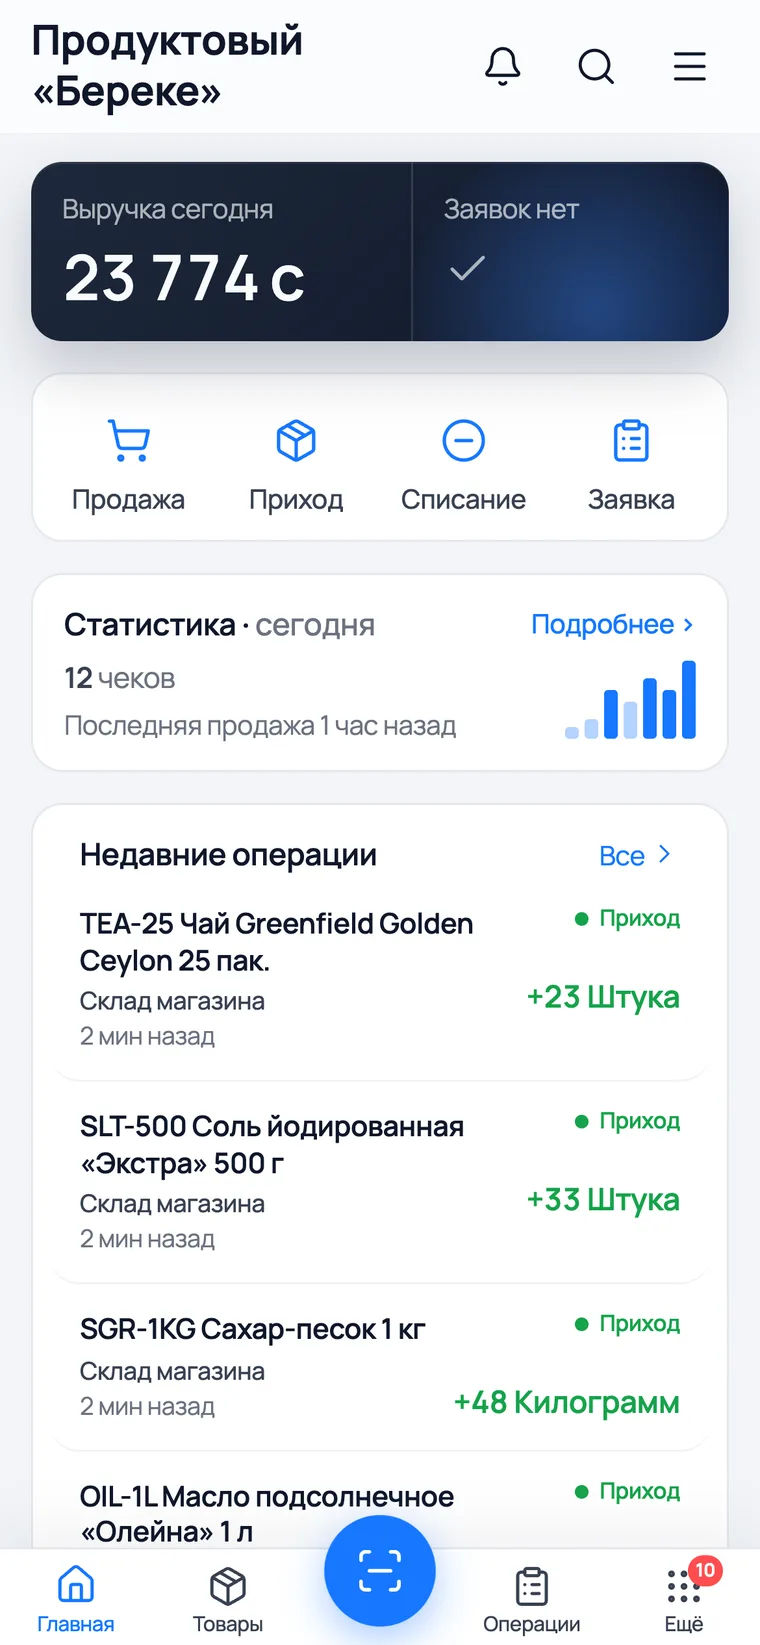
The first screen after sign-in answers the owner's three questions: how much you sold today, what sells best and what happened last.
 1
2
3
4
5
1
2
3
4
5
 6
6
- 1Revenue today — how much money has gone through the cash drawer since the start of the day.
- 2Four buttons for everyday work: Sale, Arrival, Write-off, Order. Every operation starts here.
- 3Revenue · Receipts · Average sale for the selected period, compared with yesterday.
- 4Best sellers — the items that move. Tap a tile to open a sale of that product straight away.
- 5Recent operations — a feed of the latest movements: arrivals, sales, write-offs.
- 6At the bottom of the phone there are 5 tabs: Home, Products, the round Scanner button, Operations and More.
Catalog: all your products and stock on one screen
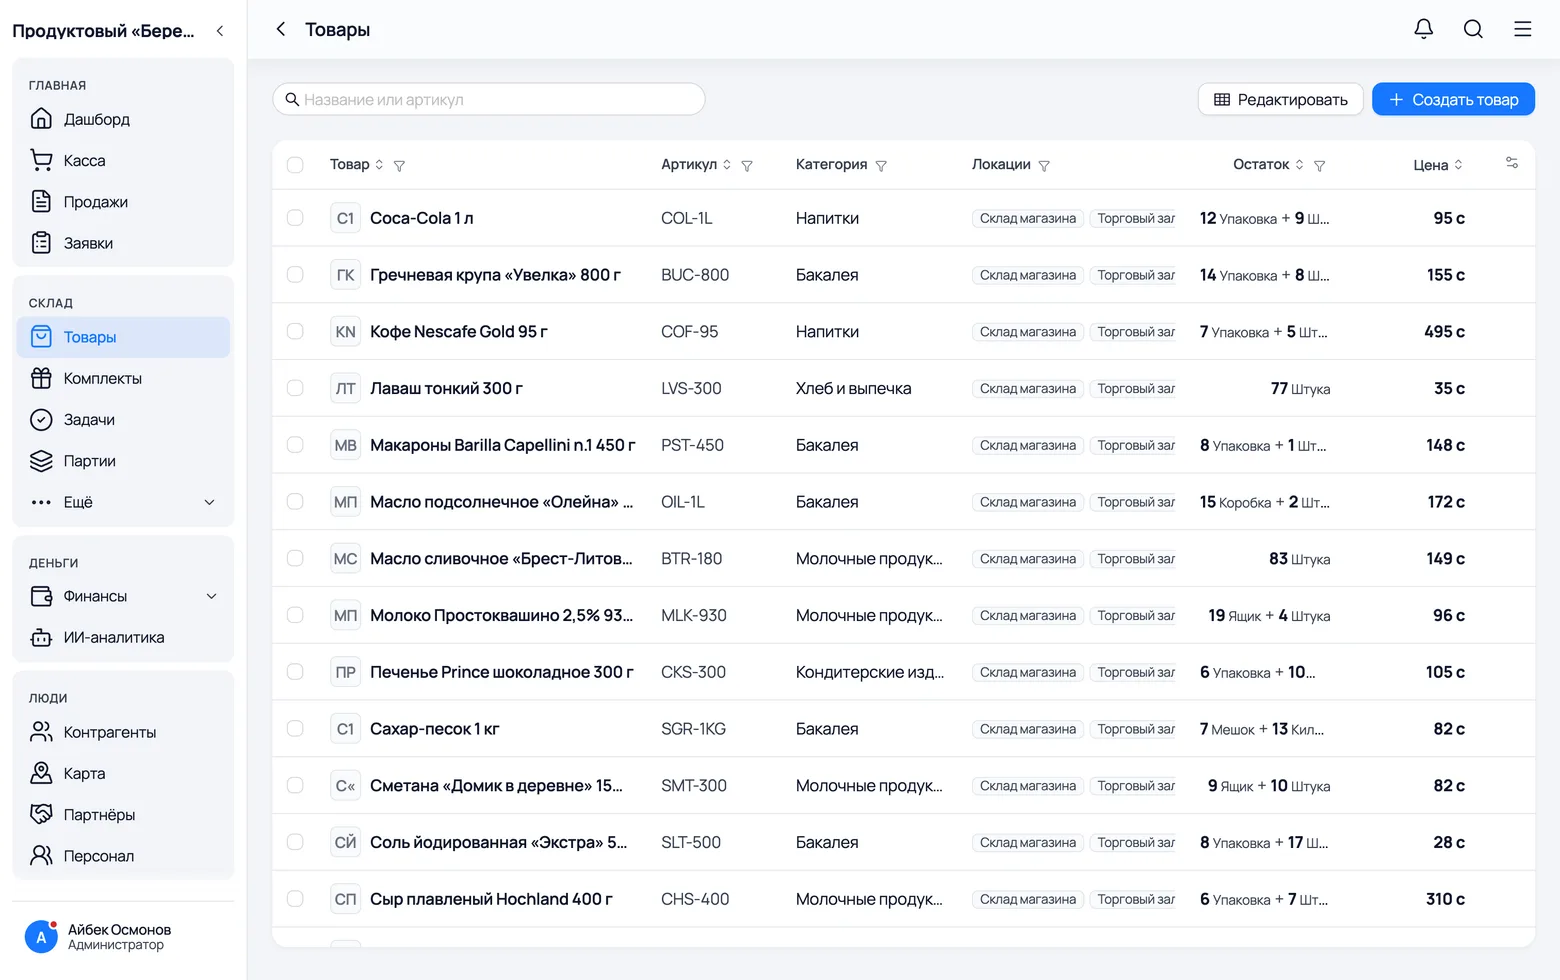
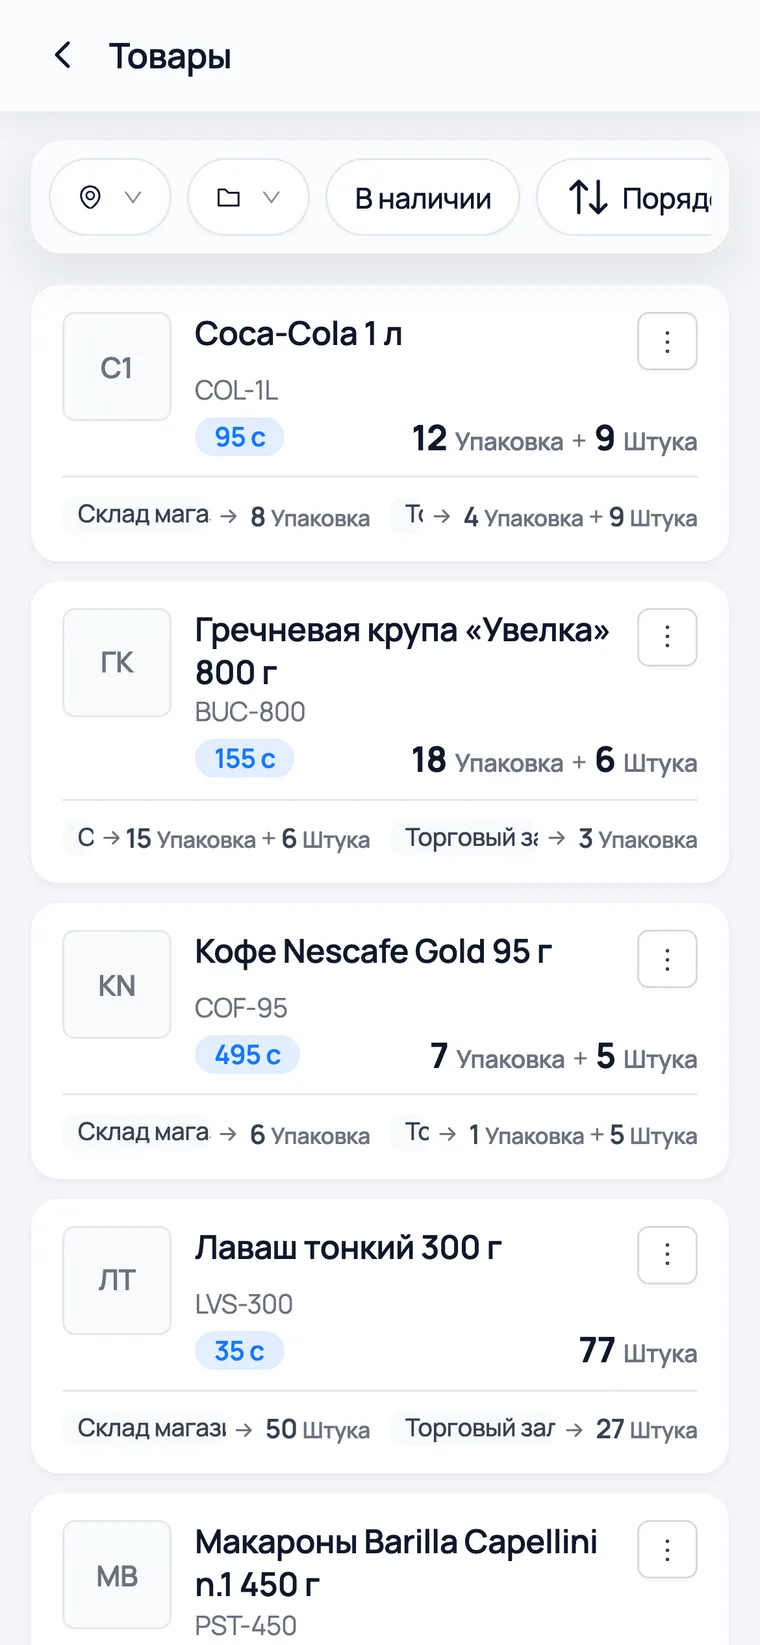
This is the main working screen. Here you see what is in stock, how much is in the warehouse and how much is already on the floor.
 1
2
3
4
5
1
2
3
4
5
- 1Search by name or SKU — it searches the whole database and forgives typos.
- 2Locations — where exactly this product is. You see at once what is on the floor and what is in the back room.
- 3Stock is shown in convenient units: '19 Crate + 4 Piece' instead of a confusing 232 pieces.
- 4Create product — add a new item to the catalog.
- 5The '…' button in a row holds every action for the product: Sell, Arrival, Write-off, Change qty, Edit.
Scanner: selling by barcode
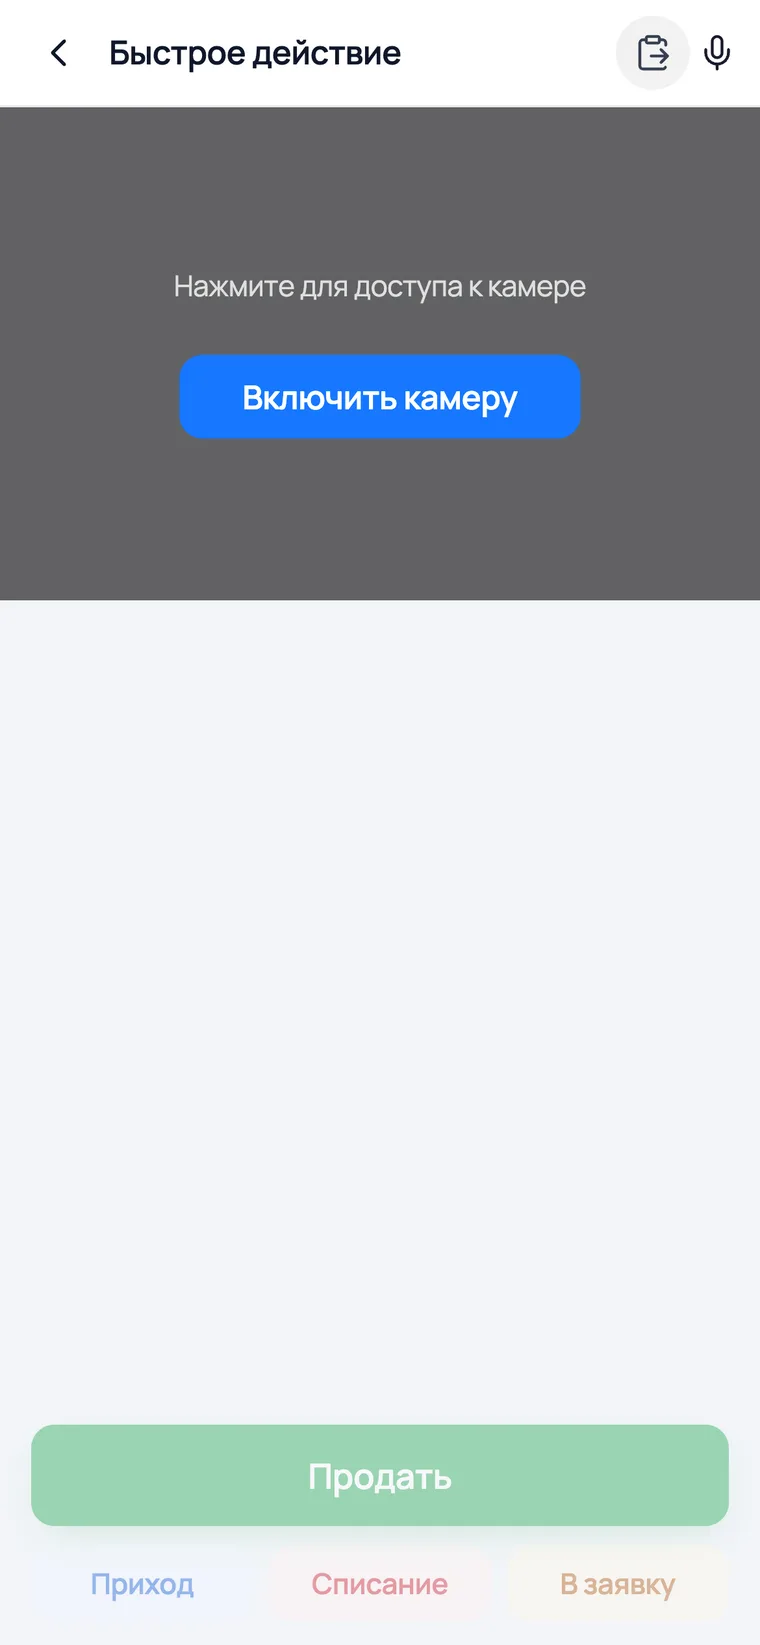
The round button in the middle of the bottom bar opens the scanner. Point the camera at one barcode after another — the products drop into a shared cart, and you decide at the end what document to make from it.
 1
2
3
4
1
2
3
4
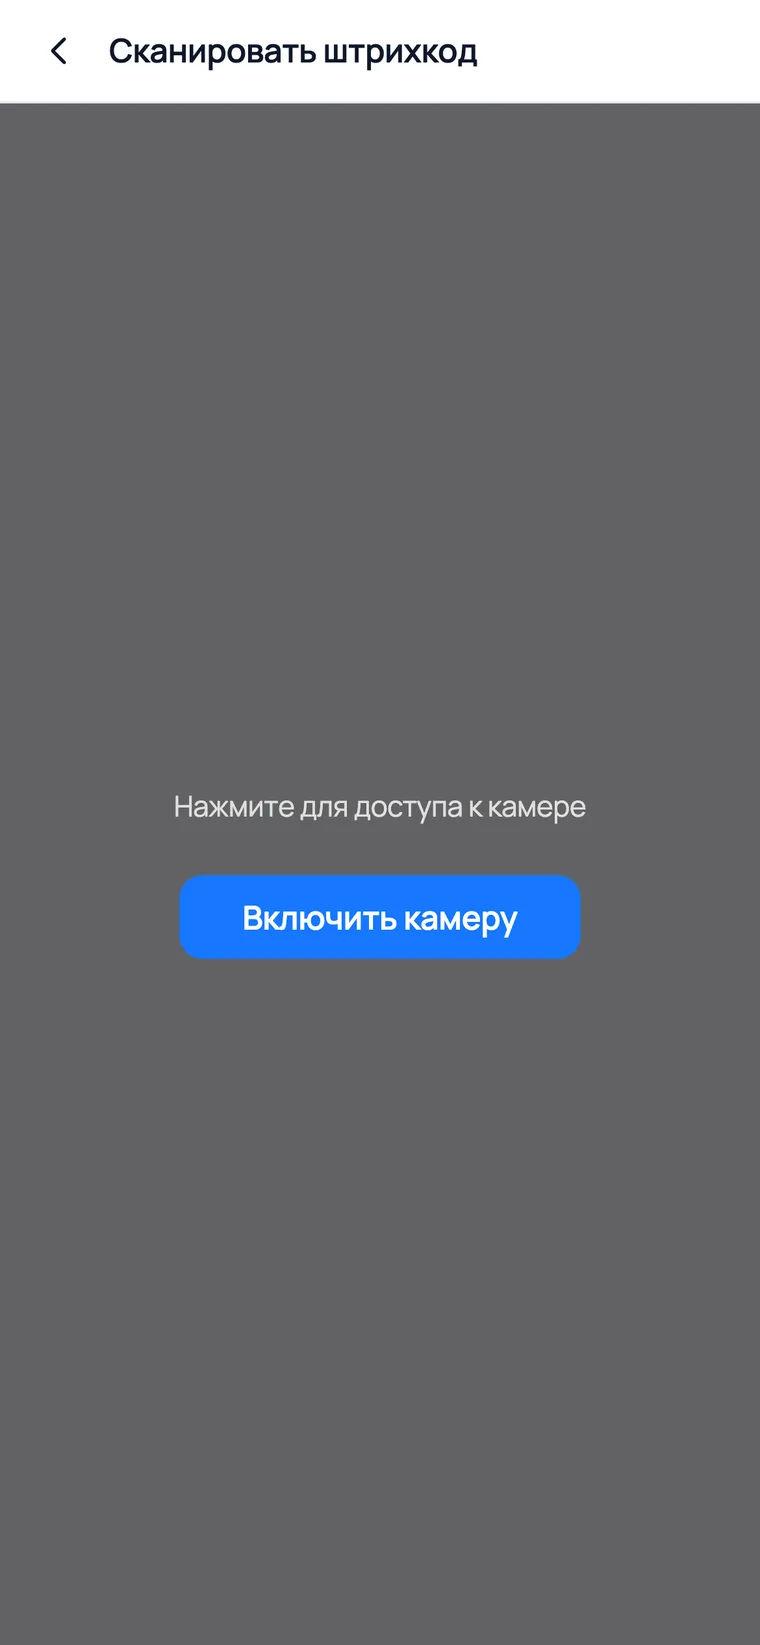
- 1Enable camera — the first time, the phone asks for permission. Give it once and after that the scanner opens straight away.
- 2If the barcode is rubbed off or the product is not at hand, you can paste the list as text from a chat or dictate it by voice.
- 3Sell is the main button: the cart you have collected goes into a receipt.
- 4The same set can be turned into an Arrival, a Write-off or an Order — the choice is in the bottom row.
- The quantity is changed with the −/+ buttons right on the card of the scanned product.
- If a barcode is not found, the app offers to create a new product with that code without leaving the scanner.
- The separate Scanner screen in the menu is for write-offs only: scan it, enter the quantity, write it off.
Product card: stock, prices, batches
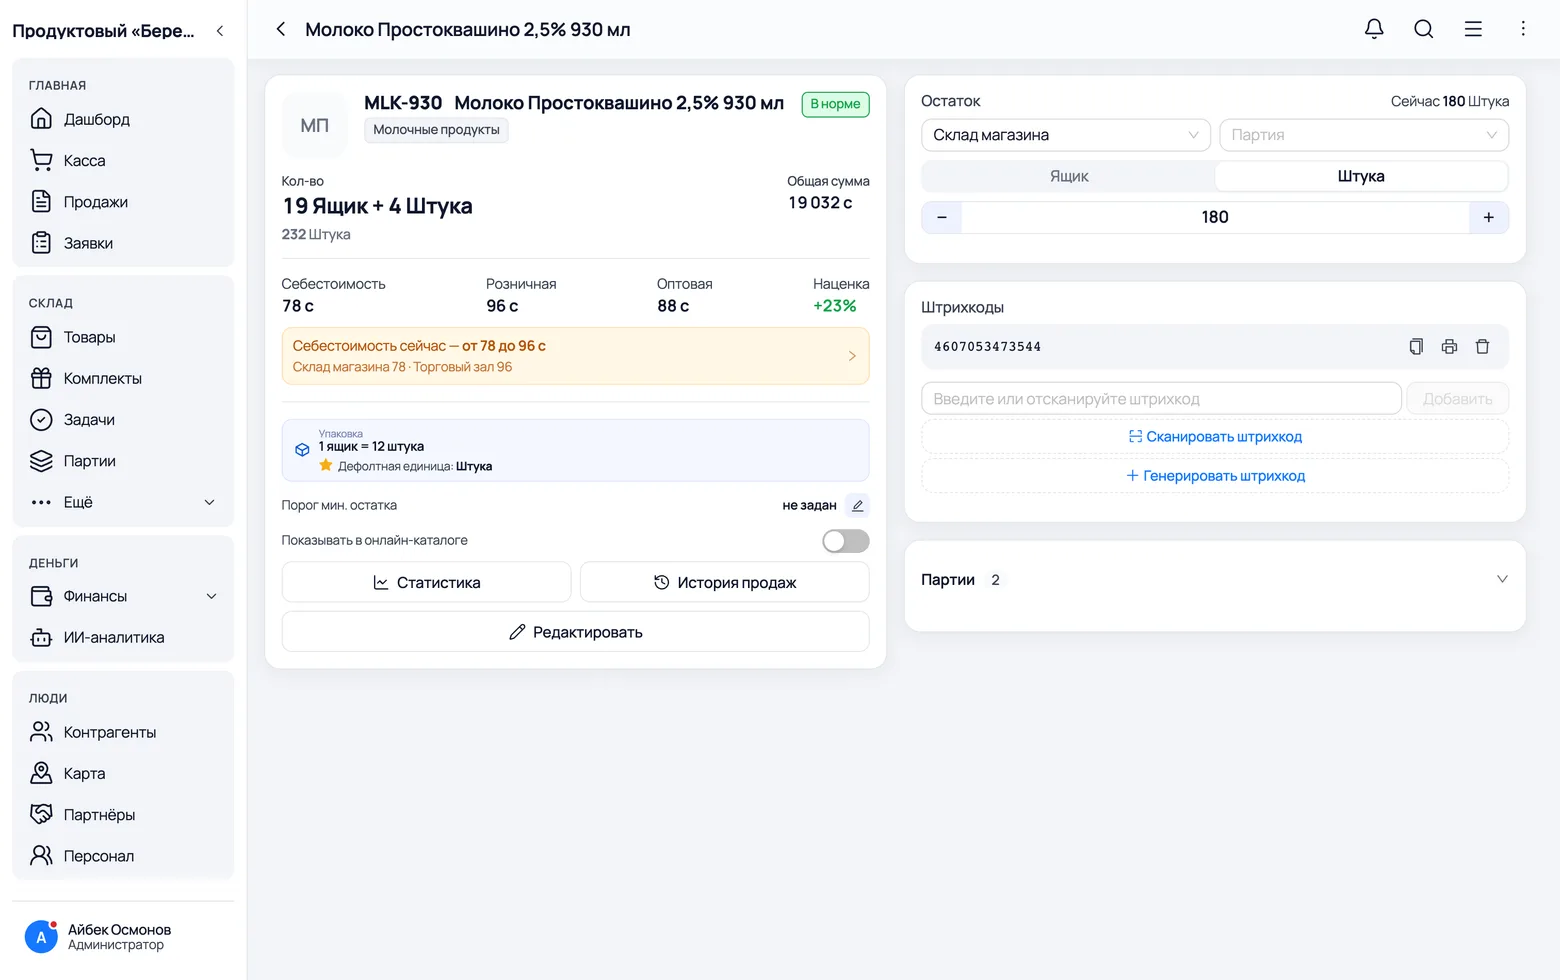
You come here when you need to answer the question 'how much of it is left, and how much do we earn on it'.
 1
2
3
4
5
1
2
3
4
5
- 1Qty — how much you have in total, in crates and pieces at once.
- 2Total value — how much this product on your shelves is worth.
- 3The Stock block is where you correct the quantity after a recount. A reason is always required: 'Stocktake', 'Recount', 'Accounting error'.
- 4Barcodes — you can add another code, scan a new one or print a label.
- 5Batches — which batch was bought at which price. The oldest batch is always sold first, and the profit is counted on it.
Sales: every receipt of the day
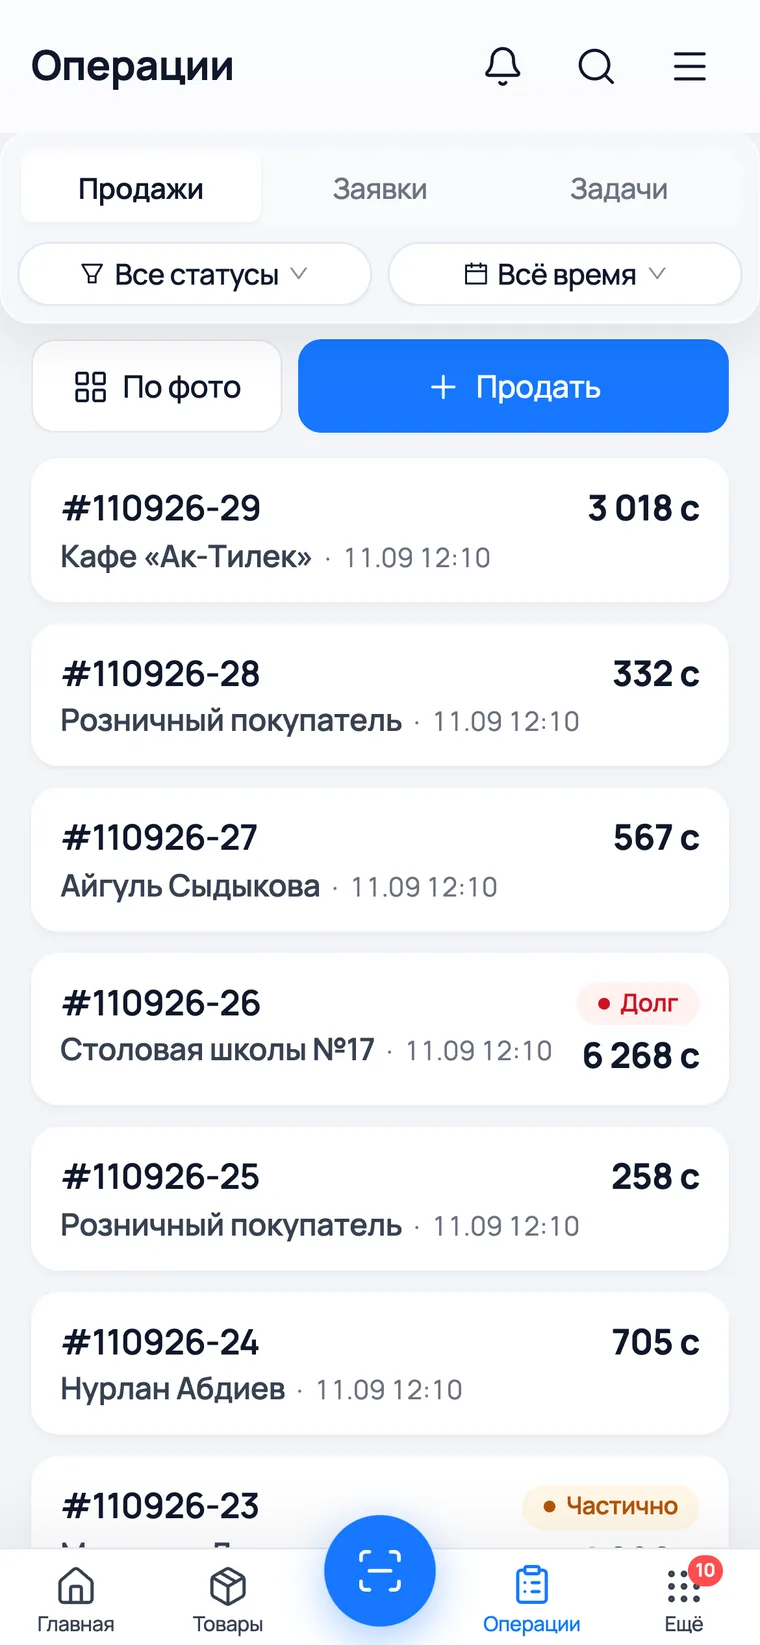
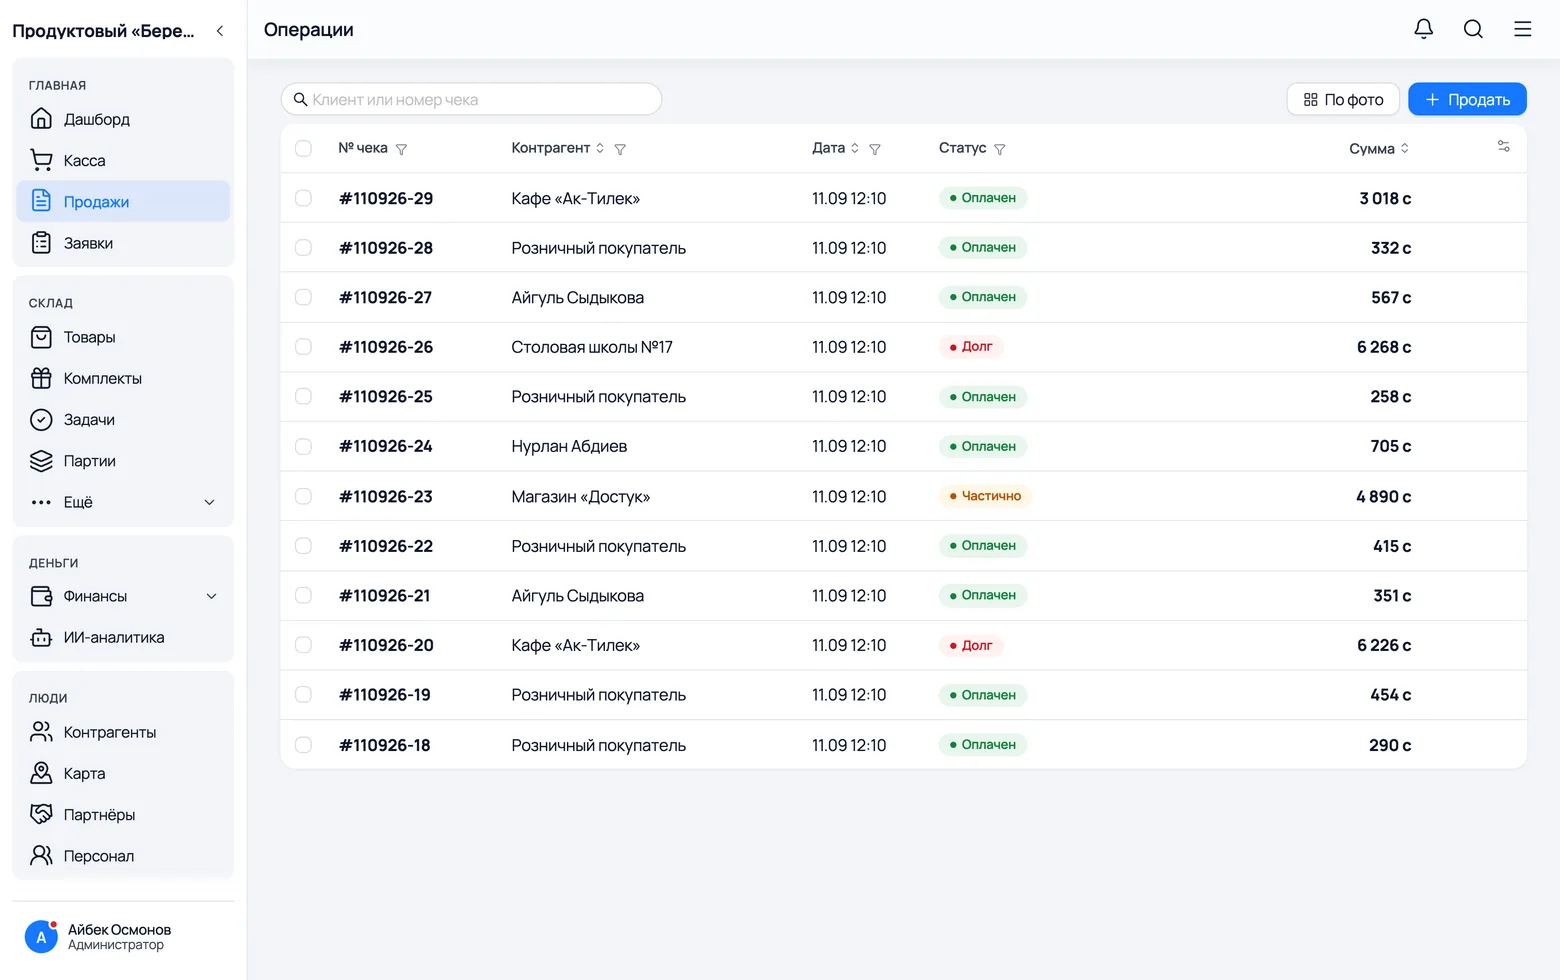
A list of every receipt you have rung up. This is where you look for yesterday's sale, process a return and print an invoice for a customer.
 1
2
1
2
- 1Search by customer name or receipt number.
- 2Sell — a new receipt. The button on this screen is your cash register.
- If a cashier with a scanner is at the counter, sales are easier to ring up on the Till screen — there is a separate guide about it.
- Tap a receipt to open the details: what was sold, to whom, who rang it up, how much you earned. The return and the printing (tape or an A4 invoice) are done from there too.
- You can set an unfinished receipt aside with the Draft button and come back to it later — the goods are not reserved while it waits.
Debts: who owes you and whom you owe
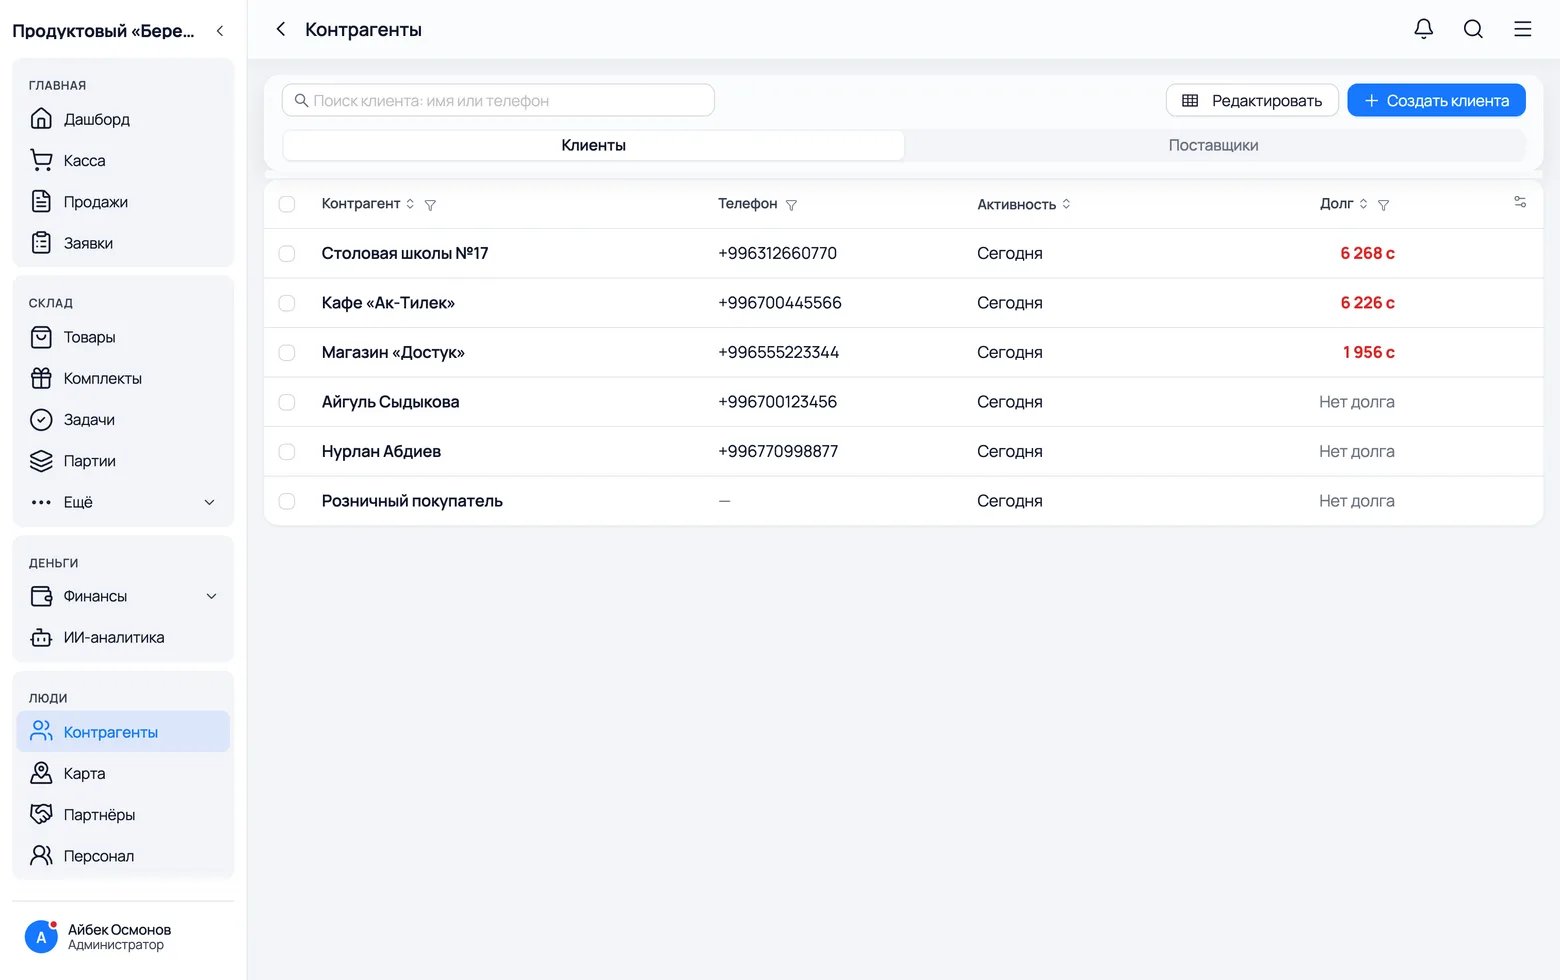
In a grocery shop there is almost always something 'on the book': the cafe takes crates, the neighbour buys until payday. The Counterparties section keeps these amounts in one place, so you do not have to search through notebooks.
 1
2
3
4
1
2
3
4
- 1Customers and Suppliers are the two sides of one section: who owes you and whom you owe.
- 2Debt is calculated from receipts with the 'On credit' and 'Partial' statuses. You do not need to keep it by hand.
- 3The icons next to it are WhatsApp and a call: remind someone about a debt in one tap.
- 4Create a customer — add your regulars, so you can see who buys how much from you.
- Inside a customer card: Repay the debt (partly or in full), the purchase history, statistics and printing the debt history — print it and hand it over.
Finance: revenue, profit, expenses
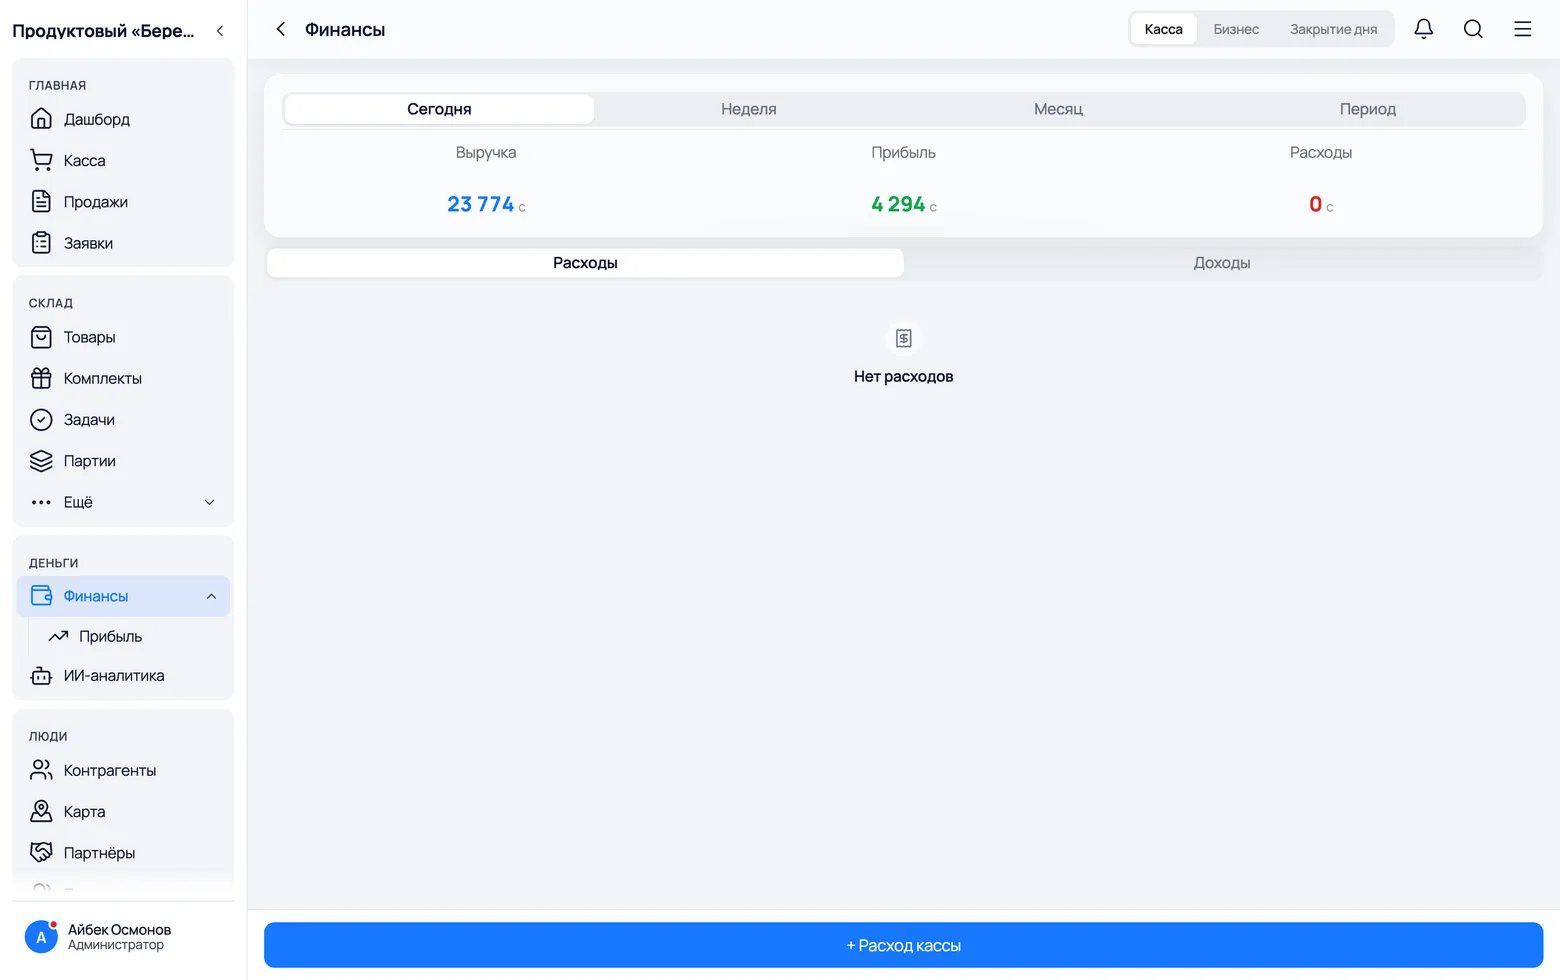
Revenue and profit are different things, and a grocery shop feels it especially sharply: the markup is small and there are many write-offs. Here you see how much is left after purchases and expenses.
 1
2
3
4
5
1
2
3
4
5
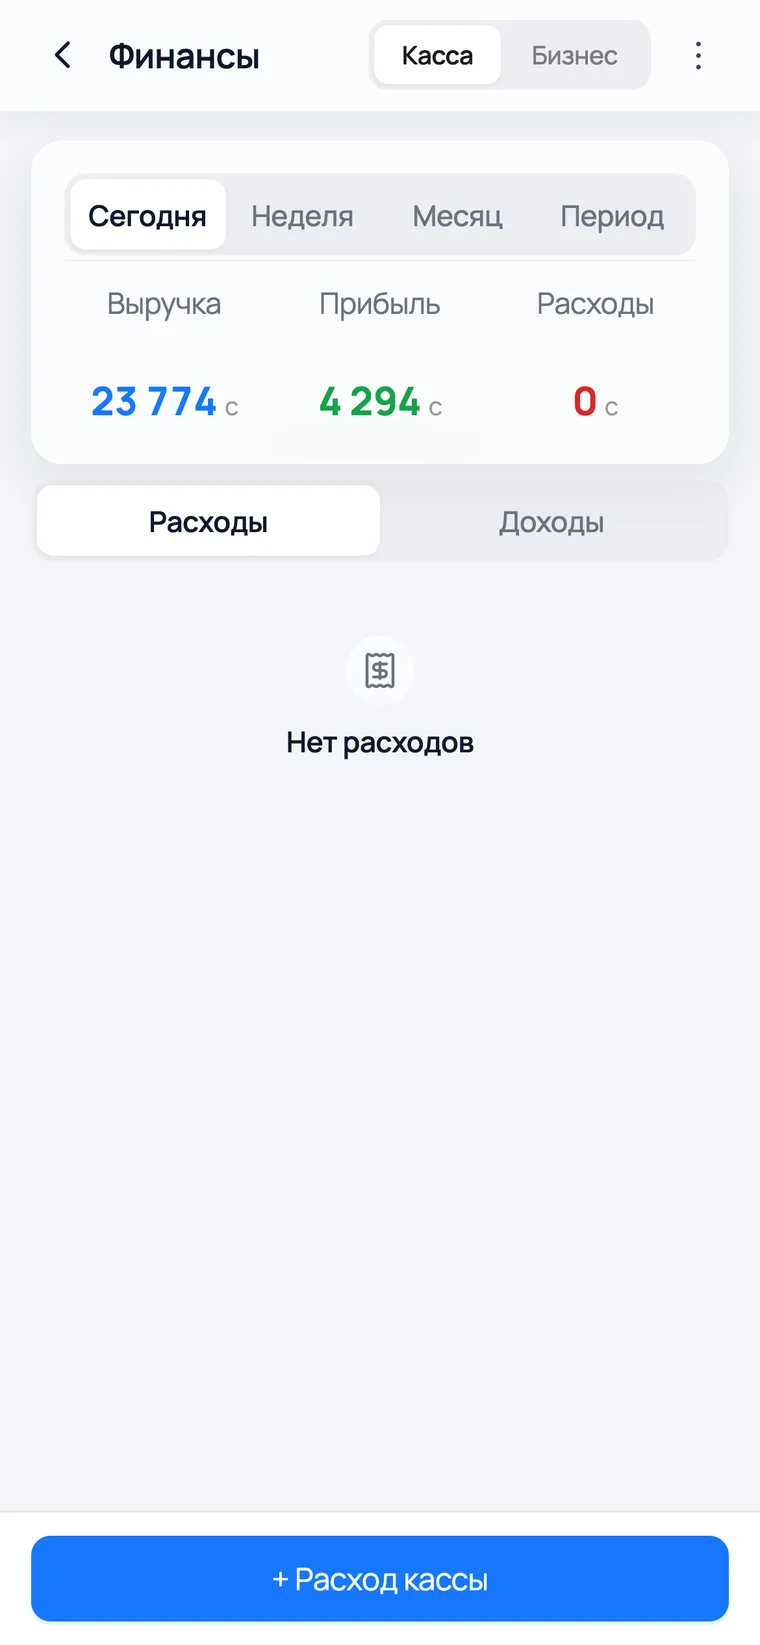
- 1Two money circuits: Cash drawer — what went across the counter; Business — the overall balance, purchases and the value of the goods in the warehouse.
- 2Revenue — how much money you took from customers.
- 3Profit — revenue minus the purchase cost of what was sold. This is what you really earn.
- 4Period: Today / Week / Month or any date range you choose.
- 5Cash drawer expense — record a spend: rent, wages, fuel, bags. Without them the profit on the screen is overstated.
- Day close — the evening check: how much cash should be in the box and how much went through by card. A gap shows up at once, not a month later.
History: who did what and when
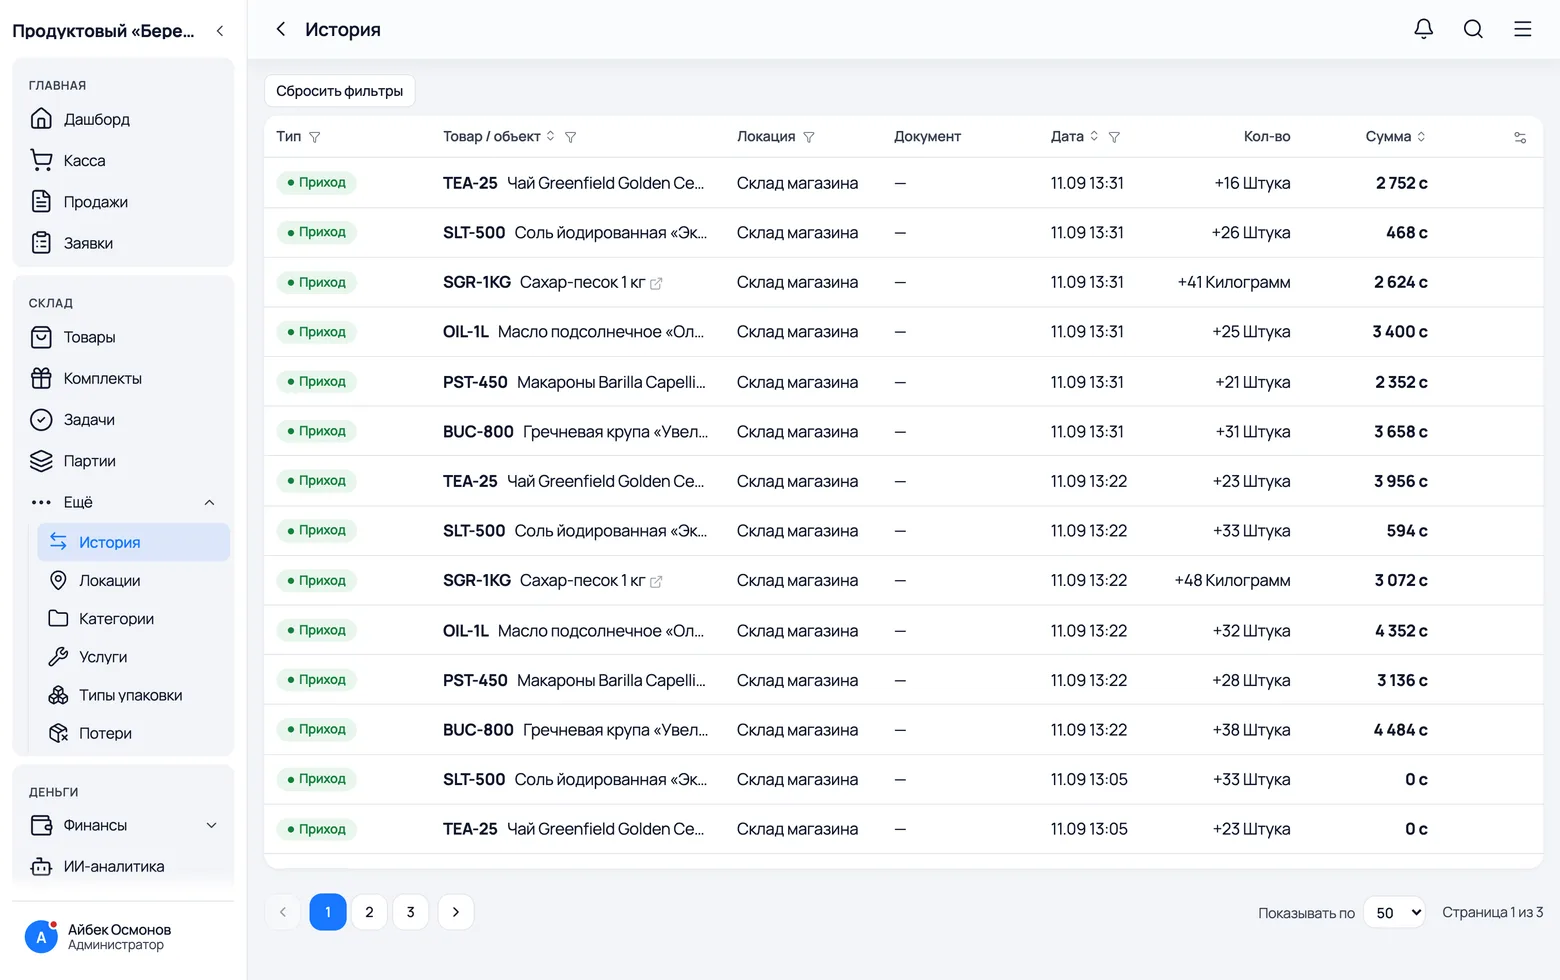
A log of every stock movement. When the stock does not add up, this is where you look for the answer: every action and its author are visible.
 1
2
3
4
1
2
3
4
- 1The Type of operation: arrival, sale, write-off, transfer, return, quantity change.
- 2Product / object — what exactly was moved, and by how much.
- 3Document — a link to the receipt or the arrival the movement came from.
- 4Filters by type and period are at the top; Reset filters brings back the full list.
Shop and people
When you get to it
Salespeople: access rights and who sold how much
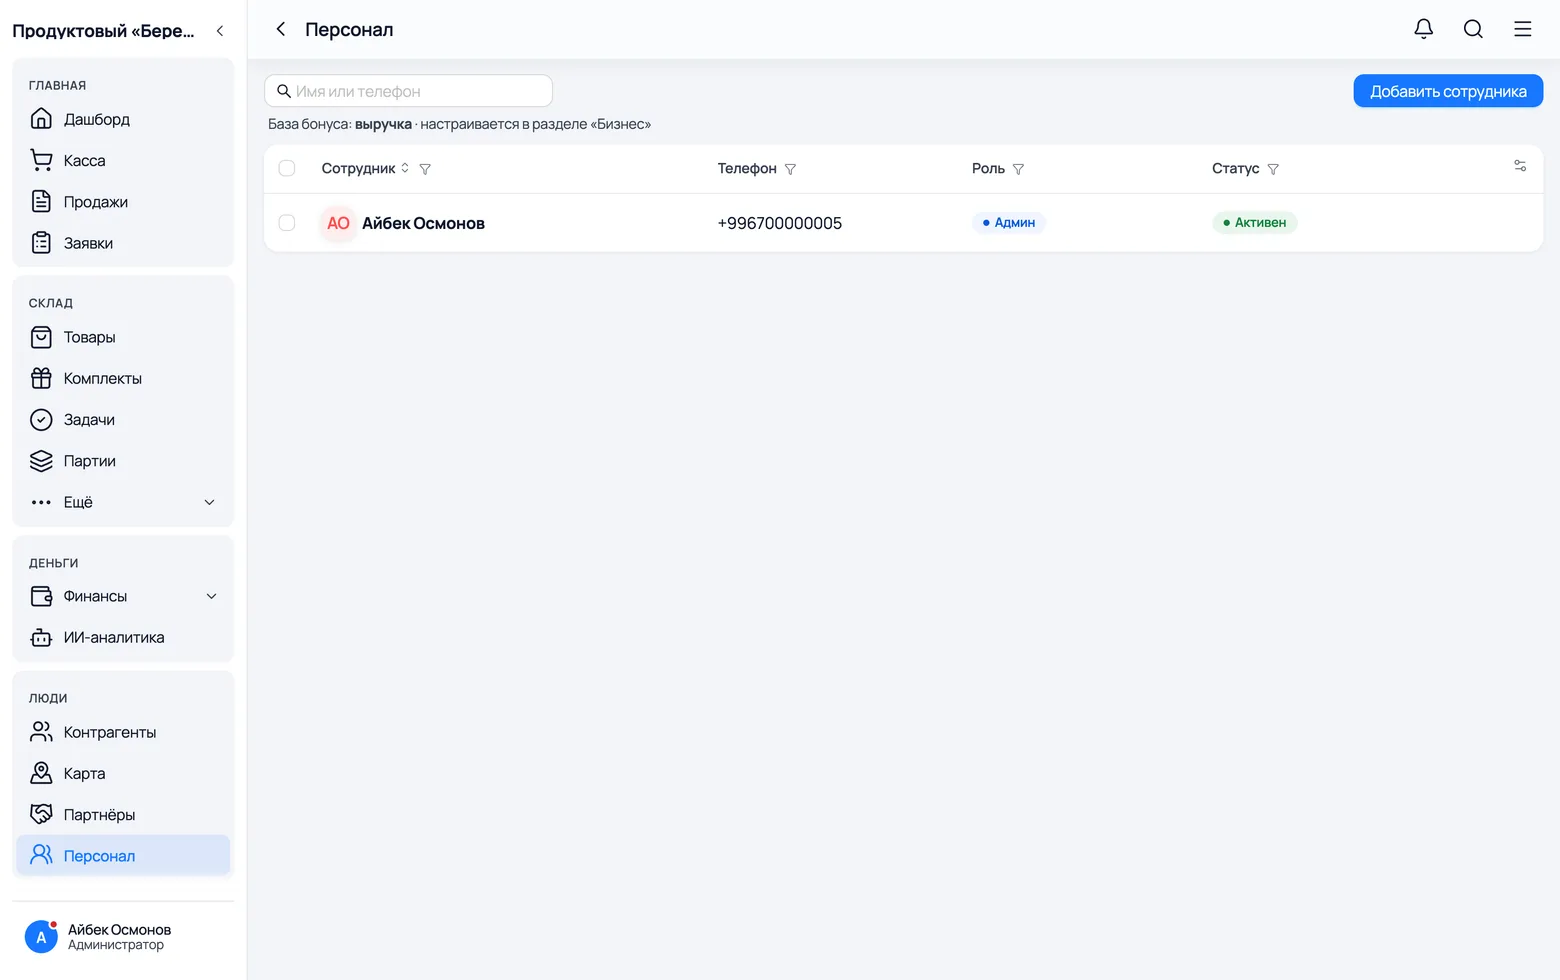
Every salesperson gets their own login. Then the receipt shows who rang it up, and the payroll sheet shows who sold how much over the month.
 1
1
- 1Add employee — name, phone, password. That is what they will sign in with.
- In the employee card you can close single rights: for example, you can stop a salesperson from seeing purchase prices and deleting receipts.
- The Cashier role opens only the cash drawer and receipts — the rest of the warehouse is closed for such an employee. How they work the counter is a separate guide about the till.
- The sales bonus is set there too — the percentage a salesperson earns from revenue or from profit. Base pay, percentages and payouts are covered in the payroll guide.
Set the app up for your shop
The app can do more than a grocery shop needs. Sections you do not need are switched off with one toggle — the data stays where it is, it just disappears from the menu.
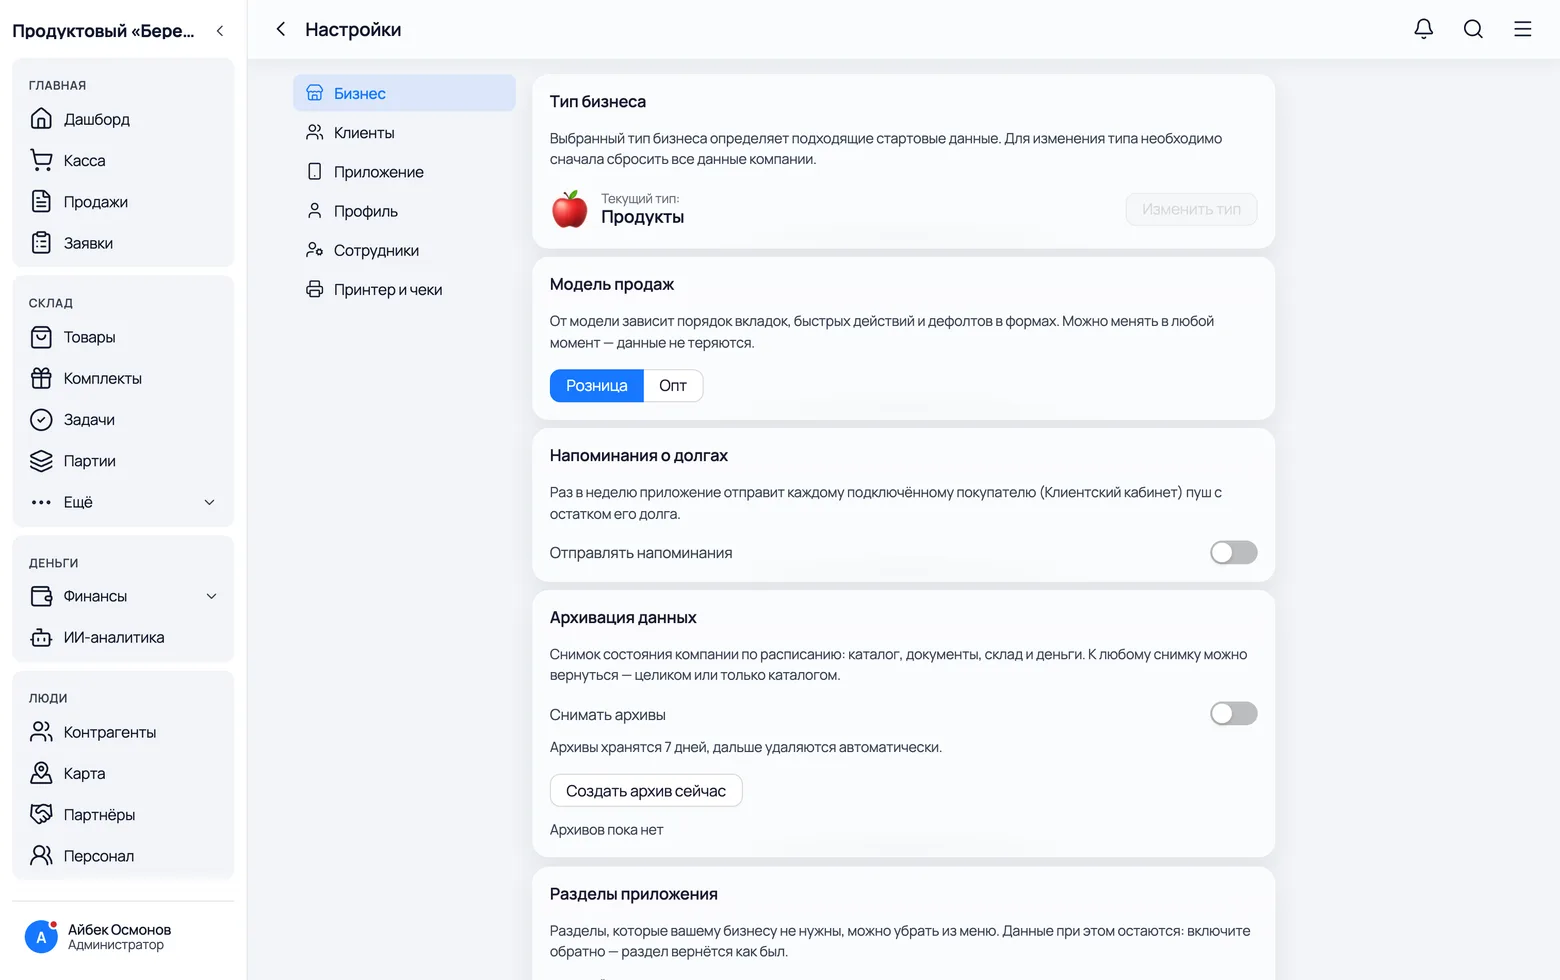
- Business → App sections — switch off what you do not use: Kits, Partners, Map, Services. The menu gets shorter and life gets easier for your salesperson.
- App → Interface language — Russian, Kyrgyz and five more languages. Every employee picks their own.
- App → Currency — the som (KGS) is set by default.
- Printer and receipts — your shop details for the receipt, and connecting a receipt or label printer over Bluetooth.
- Business → Data archiving — turn on backups. Once a week the app takes a snapshot by itself, and you can go back to it.
On the phone: where everything is
The phone is the workplace of the salesperson and of whoever receives the goods. Everything you need every day is in the bottom bar, the rest is under 'More'.
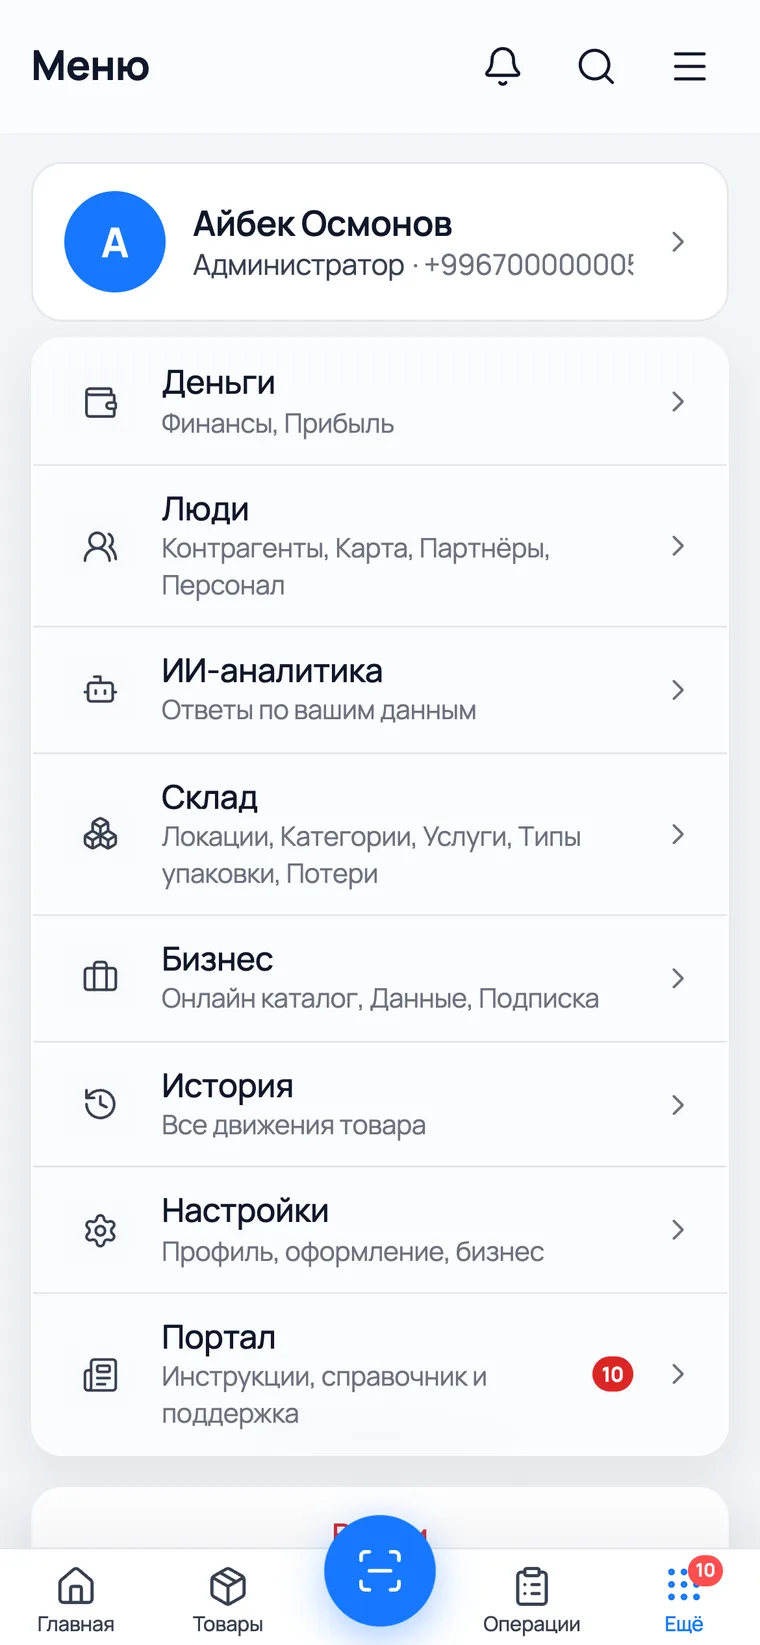
- Home — revenue and quick actions. Products — the catalog and stock. Scanner (the round button) — selling and receiving by barcode. Operations — receipts, orders, tasks. More — everything else.
- The '≡' burger in the header holds quick actions from any screen: Sell, Receive, Write-off, Create product, Import.
- The app installs on iPhone and Android from the App Store and Google Play — the data is the same as on the computer, and it syncs instantly.